
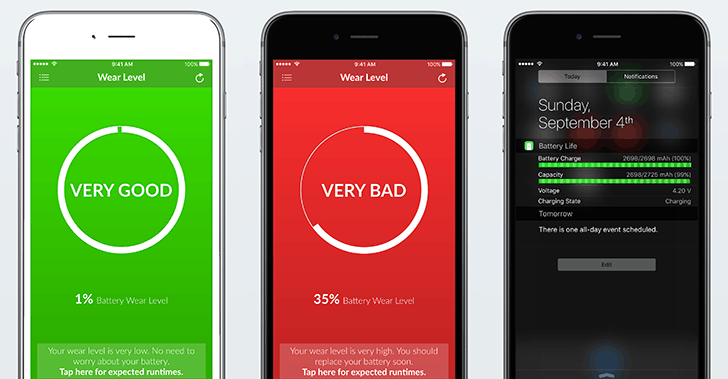
Recently, Apple has included the battery health feature to the iPhone that can reveal the battery’s performance and tell you about the exact condition of your battery. Now, a similar battery check-up tool is coming in their Apple’s Watch WatchOS 7.
Read more - https://my-blog-search.com/check-the-battery-health-status-on-your-iphone-mac-or-apple-watch/


A Calculator is a basic calculating tool available in almost every device; however, the previous editions of the Apple watch did not have the same.
The watchOS 6 has added the feature to the latest version of watch.
It resembles iOS design as you find on the iPhone or iPads.
Follow these steps to know more:
First of all, hit the Digital Crown to go to the watch screen of your Apple Watch.
Now move the Digital Crown in rotating mode and look for the complications to choose an option for your calculating application.

Apple systems have built-in zoom features which can be enabled or disabled by the users.
The users can choose to zoom out on the internet browser or to zoom the entire Mac display.
Go through these guidelines to zoom out on the Mac.Source : http://au-norton.com/how-to-zoom-out-on-a-mac/Steps to Zoom Out Through the Mac Zoom Preferences Click on the Apple logo located on the upper left side of the display.
Select the “System Preferences” option given in the pull-down menu.
You have to enable or disable the zoom in and out option without the help of the Universal Access window.
Move the mouse wheel in the upward direction to zoom in after clicking on the Control option.Steps to Zoom Out on a Mac Through Trackpad Keep pressing on the Control button.

Creating a partition or a new volume right on the existing hard drive makes the users eligible to manipulate all of the available storage temporarily as required.
If you are partitioning the hard drive for testing your macOS, you will get a separate container on your existing hard drive, but it will be limited in terms of abilities and performance.Here is how to add a volume or Partition on Mac to test the Big Sur:Adding an APFS Volume on MacFollow these steps to add an APFS volume on Mac:At the start, launch the Finder directly from the dock section of your Mac.Then, choose the Applications option.Scroll down the page and launch the folder Utilities.Now, double click on the Disk Utilities option to launch the same.Choose the APFS drive directly from your sidebar.Type a particular name for your volume.Then, choose the APFS format type you wish.Now, select the Add tab.If you wish to choose the specific size for your volume, then follow these straightforward steps:Hit the Size options.Now, type the Reserve Size option to ensure that the new volume holds a minimum amount of space.Type the Quote size to ensure that your primary drive never runs out of storage.Next, tap the OK tab there.Now, press the Edit button.Press the Add tab.Creating Partition on MacFollow these straightforward instructions to create a partition on your Mac:At the start, launch the Finder directly from the dock section.Now, choose the Application tab.Scroll down the page and then launch the folder Utilities.Double-tap to launch the Disk Utility section.Choose the hard drive from the window of Disk Utility.
Now, you will be prompted to either add an APFS volume or Partition.Hit the Partition tab there.Press the Add Partition button.
It appears as a plus-shaped icon.Now, you have to change your partition size you desire to use by dragging the resize controls.
Used space will be represented in blue.Next, you can name your new Partition.After that, you have to specify the file system format you desire to use.Then, press the Apply tab there.Now, the Disk Utility will check your disk and then make necessary changes.Switching Partitions or VolumesHere are the guidelines to switch partitions or volumes on your Mac:First of all, hit the Apple icon from the top-left edge of your device’s screen.Now, choose the option “System Preferences” from the pull-drop menu.Then, hit the Startup Disk option.Tap the Lock option from the lower-left edge of your window to unlock and make necessary changes.Type the system admin password.Press the OK button there.Choose the relevant partition drive there.
It will bring you to the Startup Manager section and then you can choose the relevant drive from there.Finally, hit the Restart tab.Mac gives the option to create and test the beta of macOS Big Sur by adding volume or partitioning Mac’s hard drive.

Apple Watch is the wearable device, which is the perfect buddy for your iPhone.
But, in case the users lose their new Apple Watch and want to know how they can find it, then they need to follow the instructions given below to find their lost Apple Watch from the iPhone, iPad, Windows, and Mac.
They can get their lost Apple Watch by using the “Find My iPhone” option which permits the users to find their lost device.Source url:- http://sy-norton.com/how-to-find-a-lost-apple-watch/

If you said yes, then it means your device has some issues, but it doesn’t mean you cannot fix it.
Do not be anxious as there are still some ways that you can try to troubleshoot the ongoing issue.
This article has some practical resolutions to fix an iPhone that freezes on the Apple logo during the startup.So without wasting any more time, let’s get started.Reasons for Your iPhone Freezing on the Apple LogoWhen there are some common or critical glitches in your device’s operating system or firmware, it might cause your device to stick on the boot screen.
It can be pretty puzzling for a regular user to find the exact cause of this problem.
Here are the common reasons for the Apple logo to stick on your iPhone screen:Glitches in the newer iOS updateA malfunction during the jail-breaking processInstalling a Beta iOS on your iPhoneSharing data between an older iPhone to a new iPhoneMalfunction in the hardware or componentsTroubleshooting an iPhone That is Stuck on the Apple LogoIf you have noted your iPhone freezing on the boot screen for more than 20 or 30 minutes without any changes, you should try these three effective fixes:Fix 1: Rebooting Your DeviceMost users who have encountered this problem have fixed it by simply restarting their phones.
All you need to do is try a simple restart and see if that fixes the problem.

Dropbox app is a software that stores all kinds of files, documents and images to save some space on your device.
It keeps your data safe and asks for a password every time you want to reach your files.
It has four-tier yearly plans with free-trials.
The plus plan provides 2TB space, security, anytime-anywhere access to the files, and costs $9.99/month if billed yearly.
The professional plan offers 3TB space, secure sharing, two-factor authentications, etc.
The advanced plan provides phone support during work hours and gives you an upper hand to audit logs with file event tracking, and it charges $20/user/month if billed yearly.