You’ve made the decision—you’ve decided that recording and/or creating music is in your future. There are many different routes you can take, and they all depend on what you plan on doing. But no matter your ultimate goal, learning how to set up a
home music studio setup is the first step.
Not every music studio will look the same. For example, recording vocals doesn’t require that much. So if you only intend to record vocals, a home music studio really doesn’t need a lot of equipment to get started. However, if you plan to create from scratch, instrumentals and all, your home studio setup could easily become elaborate and diverse—it really just depends on what you’re looking to do.
No matter your goal, in this article, we’ll explore how to set up a home music studio best-suited for your needs.
How To Set Up a Home Music Studio: The Basics
Don’t be overwhelmed by the grandeur of the word; a music studio is nothing more than a place to record and/or create. I have similar articles about setting up a recording studio—but this article is about setting up for recording, producing, creating, etc.
The minimum requirements really aren’t much. However, in this day and age, a computer is a necessity. It will serve as your mainframe no matter what kind of music you plan to create. The rest is variable.
First off, setting up your studio doesn’t need to be expensive—and it doesn’t need to happen all at once.
Musical equipment can get very expensive. However, there is always an intersection point where price meets quality, and you’ll start to see diminishing returns the more you pay.
If you can get headphones that provide 90% of the performance for 10% of the cost of premium headphones, you’ll be able to record great music affordably. Don’t think you need to spend top dollar to create quality sound.
We’ll show you how to set up a home music studio that is professional and affordable. Here is a basic list of what you will need. Keep in mind, different approaches might not require a microphone but may require a MIDI keyboard. It really depends on what you are looking to do.
Computer
The good news is that you probably already have a computer.
If you don’t, you can get something that will work from a factory-direct web page for a couple of hundred dollars. It’s nice to have a computer that is dedicated to your recording work.
That computer becomes your workstation—your mainframe. In this day and age, it is the ultimate tool and storage device for your creation to come.
What sort of machine should you get? I use an Mac, but there are plenty of great Windows machines out there too. The really important thing is to make sure that you’re using a computer that will support the software you want to use, that it has enough storage on a HD for music production, and that it is fast enough to run everything smoothly.
Storage
You want a hard drive that has a minimum of 500GB of storage—preferably an internal solid state hard drive. When you’re operating system, software, AND files are all on a solid state drive, your computer can function at its highest potential. Solid state drives are just faster, plain and simple.
If you’re mixing a lot, or if you want to store a lot of sound files or instruments on your computer 500GB should be the minimum. Recording software and plugins can take up a lot of space, and libraries of virtual instruments can add up especially quickly. Recording also takes up a significant amount of space.
In addition, if you’re mixing different renditions of a song, you may wind up with a half dozen versions of the same project (or more) that are each unique, while you decide which one sounds the best.
CPU
A CPU with 2.9-3.0GHz is preferable. You don’t want to spend all your time watching your computer think, while it tries to process your edits. If you can get a little more, then that’s great, but if you at least stay above this minimum, you should be in good shape.
Not to mention, CPUs are rarely upgradable. You’re stuck with what comes in your computer—unlike RAM and hard drive space.
RAM
8-16GB of RAM will allow you to use most standard professional music software, provided it works with your operating system. If you start to drop below this point, you will likely notice your computer struggles while multitasking.
Mac or PC?
Most people already have some sense of whether they’re more comfortable on an Apple computer or on a Microsoft Windows machine. I’d say that it’s really a matter of personal taste. If there are no compelling reasons to get one or the other, you should stick with the one you are more used to. You’re going to be learning how to use new music software, you shouldn’t have to learn a completely different computer too.
That said, once I switched to a Mac, I never looked back. The workflow of OSX was a gamechanger. Three finger swiping between applications, and other features made working with a Mac seem so much quicker.
You can probably hit those RAM/CPU/Storage benchmarks for a little less money if you go with a Windows PC or laptop. Macs are slightly overpriced in my opinion, but I still prefer them. It all depends on your budget and price range. Really though, either computer will give you the tools to make great music.
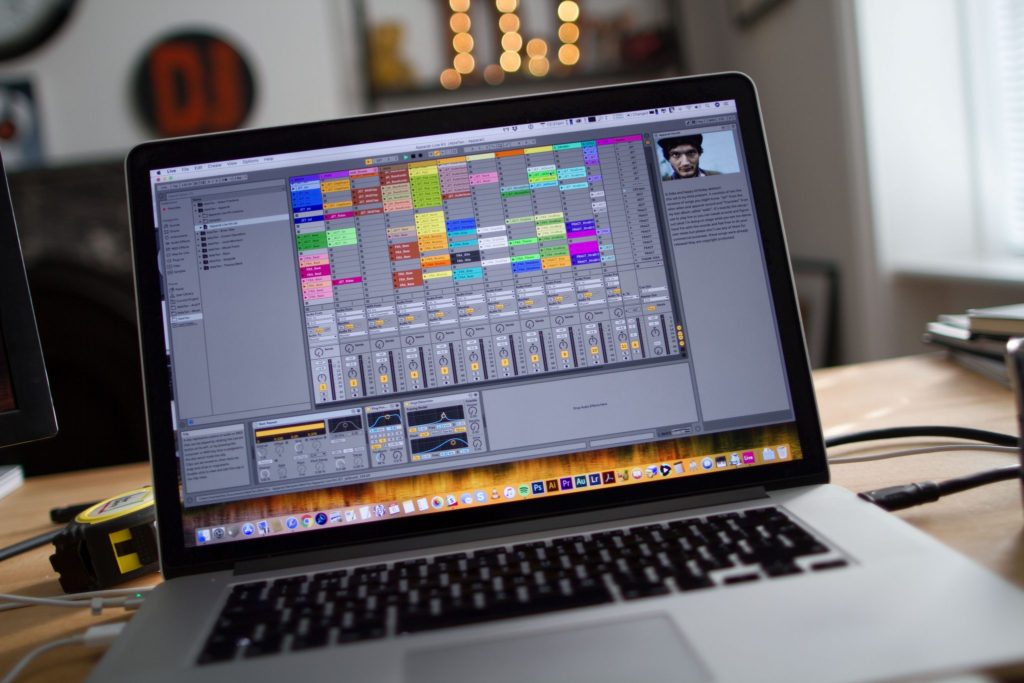
DAW
ableton live
DAW stands for digital audio workstation, and it is the software you’ll be using to record, create, and mix your tracks.
Sometimes you can get a free DAW when you purchase an audio interface. If you get a free DAW somewhere, use it.
Macs typically come with Garageband, but Logic Pro X is more robust. Pro Tools works on Macs or PCs and is widely used in the industry. It’s a good one to know if you spend a lot of time editing. This may be especially true for people who take editing work for other musicians, but it’s still an industry standard.
Your DAW software will be where your music comes together. Keep in mind—ultimately, they all do the same thing. The trick is learning the software as well as you can.
From Ableton Live to FL Studio, it really doesn’t matter which you choose—as long as you learn it like the back of your hand, your creating potential will become limitless. Pick one, and stick with it! Don’t get too drawn into producers’ opinions on which one is best.
For example, I’m most familiar with Ableton Live. If you sat me in front of FL Studio, I could still create—but the process would be slower as I learned to understand the new workflow of FL Studio.
So pick your DAW and master it. But don’t be afraid to try a few, especially while you’re just starting out.
Free DAWs?
There are free DAWs out there. Here’s my take:
Audacity is a popular one for PC. It’s extremely limited and outdated, and I honestly wouldn’t waste precious time learning it. I’m actually not sure if it’s even considered a DAW or just a recording software. But—if you’re on an incredibly tight budget, I guess it could be a place to start.
Garage Band for Mac, on the other hand, is a great starting DAW—and free. It can be a great introduction to Logic Pro, or really any DAW since they’re all really doing the same thing. I’ve heard great producers create using nothing but Garage Band.
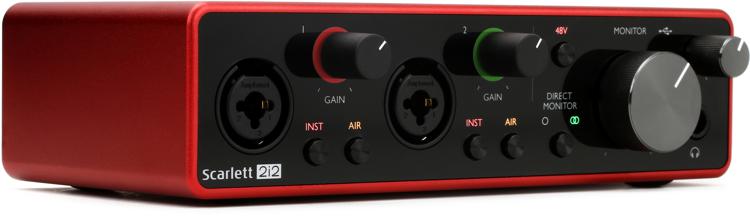
Audio Interface
The audio interface is the hardware you’ll use to connect your gear up to your computer so you can make recordings.
There are complex and expensive audio interfaces available, but for your first home music studio, you probably don’t need more than 2 inputs and 2 outputs. Start simple. I recommend the
Focusrite Scarlett 2i2.
With all of your equipment, start out economical, and you’ll discover whether or not you need to upgrade down the road.
When picking your audio interface, make sure it is compatible with your computer, DAW, and other relevant equipment. Usually, you can find a high-quality, entry-level audio interface for less than $200, and some of them even come with a lite version of a DAW. Bundles are also a great way to save on interfaces, and they often come with a selection of cables and other goodies.
A Presonus Audiobox or Focusrite Scarlett are both solid choices. They are compatible with a wide range of other pieces of equipment, and they are pretty simple (and therefore easy to get started with.)
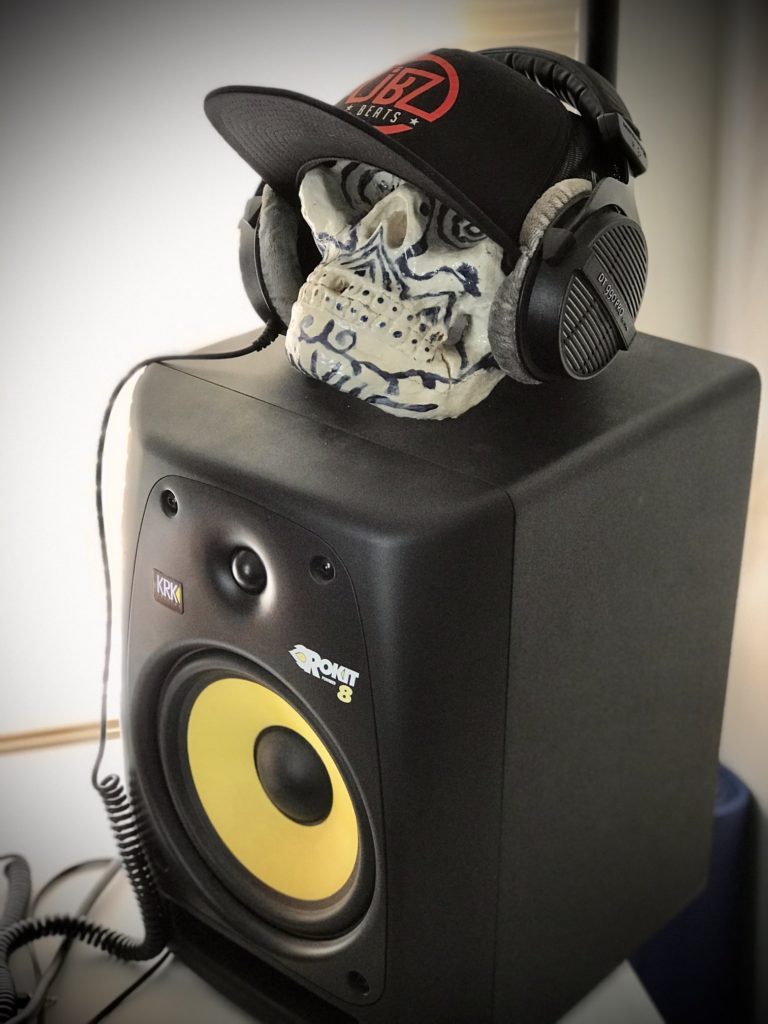
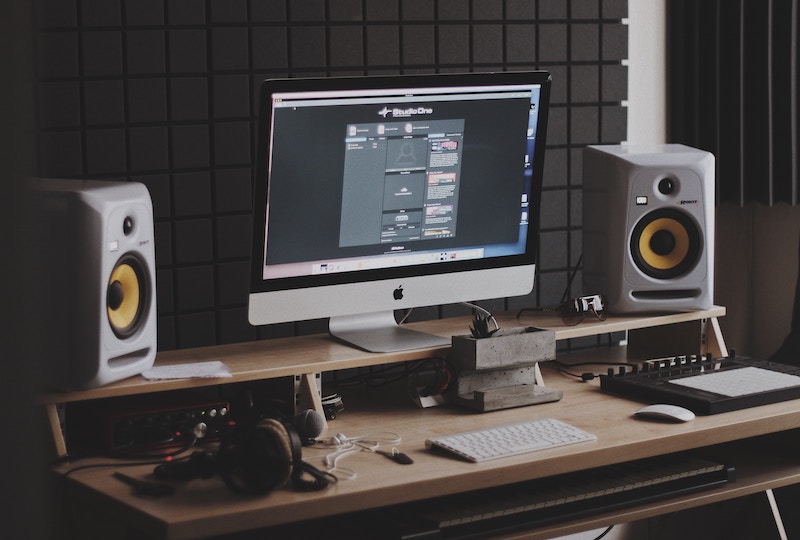
Headphones and Monitors
DT 990 and Roki 8
You can spend as much money as you want on headphones and monitors. But if you’re on a budget, it’s easy to start small.
Most mixing is done on monitors, but it is becoming more common for individuals to do their mixing on headphones.
So, if you can only afford one or the other:
If you will be recording with a microphone, start with headphones. This way, you can monitor (listen) to your recordings as you record them.
If you will be primarily producing without the use of a microphone, start with monitors.
Headphones
In terms of headphones, closed and open-back headphones are often used for mixing, and closed-back headphones are used for recording.
Open-back offers a wider stereo image, and a more natural sound. However, they naturally leak sound, which makes them less ideal for using next to an in-use microphone. If you’re actively recording something next to a mic, and listening on headphones at the same time, then you probably want closed-back headphones instead.
Closed-back headphones are less likely to leak sound and are more ideal for microphone recordings.
Usually, you can get a good set of studio headphones for less than $100, and excellent deals pop up all the time.
If you do a lot of both recording and mixing, then it’s probably a good idea to get a pair of each.
The only exception to this is if you absolutely have to record and mix, and you are on a tight budget. If you are recording and can only afford to buy just one pair of headphones, then you probably want closed-back headphones. You don’t want to leak sound onto your recording! That is incredibly frustrating, especially after a good take.
You can also lean toward closed-back headphones if you already own a good pair of studio monitors, because those can provide a faithful representation of your music during mixing, and they’ll do much of the work that you’d expect from open-back headphones.
Monitors
Monitors are more of an investment, and many of them are sold one at a time—but regardless, you need two. Be sure to read the listing carefully; you don’t want to spend your whole monitor budget only to discover you ordered a single-unit monitor.
If you really decide to go for the best possible scenario and get the complete set, you can consider adding a subwoofer to complete the setup. Two studio monitors with a high quality woofer will give you a rich and accurate sound, and enable you to do your best work. For this, you’re going to want to have a little bit of room to position everything properly. But the woofer will give you a great bass sound for those lower frequencies, while the two studio monitors handle the upper and midrange part of your sound.
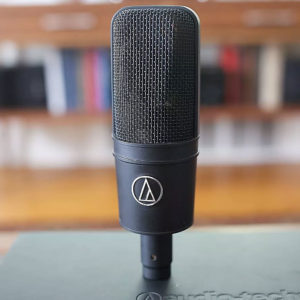
Microphone & Microphone Stand (Optional)
I say optional because, in this day and age, you can create music on as little of an iPad.
If you’re recording external instruments, including voice, you will need a microphone.
If you don’t intend to record those things, you don’t.
You can get quality recording mics for around $100 to start. Condenser microphones are generally best for studio recording. They have a better ability to pick up high frequencies, and they’re one piece of recording equipment you’ll use a lot over the years.
How Many Mics?
If you’re recording only vocals, one large diaphragm condenser mic will do the trick.
If you intend to record instruments, like an acoustic guitar, for example, it’s better to get two—and you’re probably looking for small diaphragm condenser mics.
Microphones are monophonic “instruments,” meaning they will record one mono track.
To get the most out of your instruments, it’s best to record in stereo—requiring two microphones, and some strategic placement.
The Stand
Fairly self-explanatory here. If you have a mic, you need something to hold it. Depending on what you’re recording, make sure the mic stand is versatile enough to place your microphone exactly where you need it. Fortunately, stands are very easy to find, inexpensive, and you don’t generally need to worry a lot about which type to get.
Obviously, if you get two mics for stereo recording, you’re going to need two stands.
This is one of those areas where you don’t need to drop a lot of cash, just get something that will do the job, and you’ll be good to go.
MIDI Keyboard or MIDI Controller (Optional)
What I Use: Korg X50 – A MIDI w/ the infamous Triton soundbank
I say optional here because it’s dependent on what you plan to use your music studio before.
If you’re looking to create melodies, instrumentals, or full songs, you should definitely invest in a MIDI keyboard.
One With Soundbanks Or Not?
Plain MIDI Keyboards With NO Soundbank
Generally, a “MIDI keyboard” does not produce sound on its own. You couldn’t hook up a pair of headphones to a plain MIDI keyboard and hear what you are playing.
Instead, MIDI (Musical Instrument Digital Interface) keyboards send MIDI information. This is essentially data that is telling the computer what keys you are playing, at what velocity, and more.
This means that your receiving device (most often your computer) is producing the sound that your MIDI keyboard is telling it to play.
This route requires you to have soundbanks on your computer. Luckily, most DAWs come with sounds ready to use. But eventually, you will probably want more, in which case you purchase what is called VSTs (Virtual Studio Technology) to use and create more sounds.
Synthesizers/MIDI Keyboards WITH Built-In Soundbanks
As a creative myself, I HIGHLY recommend this route if you have the extra dough to spend.
Whether you’re new to playing the piano or you’re a veteran, having easily selectable sounds already on-hand does wonders for the creative process.
In my, having to mess around in the computer to just to change or select sounds can put a damper on the creative workflow. Sometimes it’s just nice to sit down and play in order to create the basis of your song.
That said, if it’s not super old, it will also have the same MIDI capabilities as a plain MIDI-only keyboard. So you won’t need both.
Alternatively, not having built-in sounds can force you to learn your software and VSTs, which isn’t a bad thing either. The choice is yours!
Other Kinds of MIDI Controllers
There are so many MIDI controller options. You can even get controllers that are designed for guitar players and more. Drum pads and launch pads are another popular option. The best part, is you don’t have to pick just one.
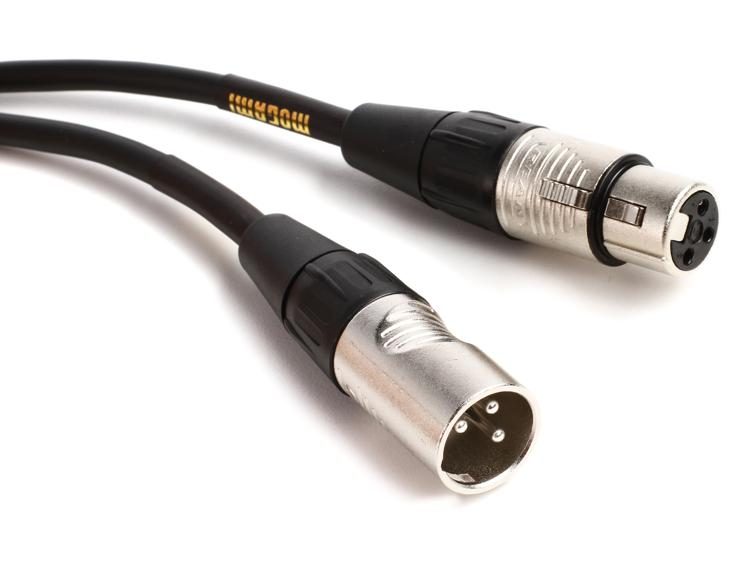
Cables
I’ve said it before—it seems like cables reproduce themselves when left alone in storage bins.
You can’t avoid cables. Even if you get wireless headphones, you’ll still need cables to recharge them.
The good news is that most of the equipment you’ll purchase comes with its own set of cables. You can often get upgrades in sound with better quality cables, but make your first recordings with the factory supplied cables to develop a point of reference.
Sometimes it’s not clear whether a cable is included with a product, so don’t purchase any extra cables until you discover you need something.
And one last note on cables: keep them organized and untangled when they’re not being used. You’ll thank yourself later.
Other Accessories/Adapters/Decorations
Setting up a home music studio is like setting up a house: there is stuff you don’t realize you need until you need it. For example, a 1/4″ headphone adapter.
Don’t go crazy buying accessories right out of the gate.
During the first stages of learning of how to set up a home music studio, start with the essentials. Anything you don’t have, you can purchase when you need it.
For example, setting the mood with the right lighting IS important—but “needs” come first. Would you rather have a music studio that looks cool, or one that helps you create the best music possible? If you’re a serious musician, then that’s where your focus is going to be. So everything in your studio is going to be geared toward capturing the best recording and giving you the best sound quality for your work.
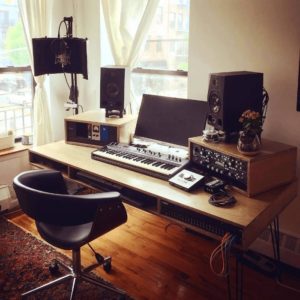
Setting Up for Success: The Room
A home music studio is not something that you set up and break down every time you have friends over. You should consider your home music studio to be a semi-permanent addition to your home.
If you’re recording, you’ll want to consider the acoustics of your room. It’s also nice to soundproof your room so you can record at any time of the day without upsetting anyone else in the house—or them upsetting you.
Consider the size of your room. Once you start soundproofing and adding equipment, you can run out of space quickly.
Keep in mind you’re probably not going to find the perfect room in your house or apartment. Don’t let that stop you.
Learning how to set up a home music studio is a process, and you’ll get a lot better at it even if your first set up isn’t ideal. In a perfect world, you would have a large room with hard floors, high ceilings, and irregularly shaped walls.
But since you probably aren’t a millionaire with unlimited resources to construct a recording studio room from scratch, just pick a room and get to work. Here are some things to consider:
Soundproofing
You can’t make good recordings if your mics are always picking up the sounds of sirens, barking dogs, or your screaming neighbors (why are they so unhappy anyway?).
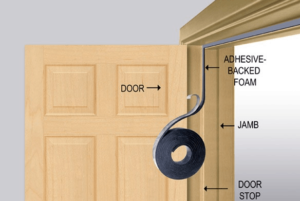
Sound travels in the air and through vibrations in the floor. Sound curtains or blankets mounted on the wall will absorb sound. Make sure the doors and windows are sealed so air can’t escape—or get in. One strategy is to build a room within a room.
But assuming you aren’t building a house for this, start with the basics:
Make The Room As Airtight As Possible
Use weather strips for your windows, and draft stoppers for underneath your doors. You may want to block off your windows entirely if the outside noise pollution is especially bad.
When sealing up the doors, a door sweep on the bottom is a good way to keep sound transmission down––whether it’s traveling in or out. But you also don’t want to forget about the space between the door and the frame. Make sure to get all the potential air gaps as tightly sealed as possible.
Limit Floor And Wall Vibrations As Much As Possible
Use acoustic paneling for rugs, and consider laying carpet on floors.
Unless you really dig in, there is only so much that can be done about sound traveling through the floor and ceiling. Your problem usually depends on what’s above you or what’s below you.
Air Supply
Now that your windows and entrances are airtight, mount acoustic boxes over the vents to prevent sound from coming in and out.
Acoustic boxes are boxes with an S-shaped tunnel covered in sound dampening material. Any sound waves that enter the box, from either side, are absorbed before they can pass through.
Acoustic Treatment
Not to be confused with soundproofing, you’ll now need to consider the acoustics inside of your room. Sound waves bounce all over the place, and your mic will capture it all.
That’s not to say that all reverberation is bad. Dampening the room too much may cause it to sound “dead.” A certain amount of reverb is to be expected.
Diffusion panels allow you to break up sound waves and transform ambient room noise from a disharmonious blast to a warm background element.
Now That You Know How to Set up a Home Music Studio…
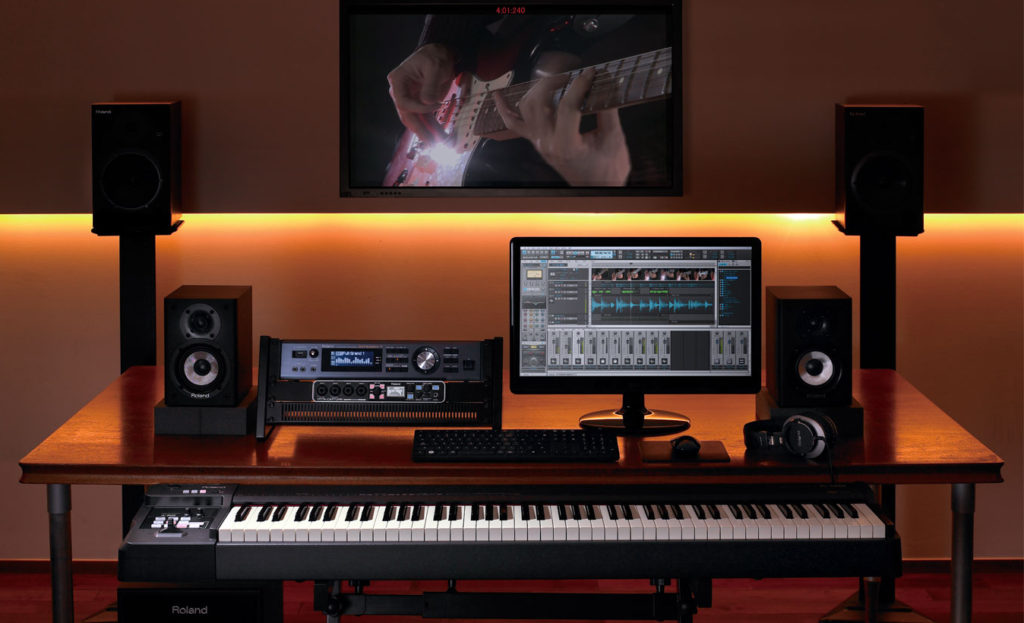
music studio setup
…get started! The first step in how to set up a home music studio is to just get started. You should consider your first DIY home music studio to be a labor of love and a learning experience.
Figure out your budget, get the best studio equipment within that budget, and begin learning the creative process itself. Most importantly—your home recording studio setup doesn’t need to be perfect.
Every second you spend thinking about what other equipment you can add, how you can better soundproof your room, you are not perfecting your craft itself. All too often, it’s easy to put off creation because you’re too busy idealizing your perfect studio. Just get started! Your studio will improve over time.