


In this article, you will find a detailed tutorial on data recovery from RAID 0, 1 or 5. The array we have been testing was built on Linux, and the methods described here will help you recover your files even if one or several disks break down.
A Linux-based hardware RAID is hardly a good example of a reliable storage system – if one of the disks within the array gets disconnected, the whole RAID can’t be mounted, and all the information becomes inaccessible in a second. In this case, you will need a special utility to rebuild the array with the remaining (healthy) drives. It will find and display the data which is still there, and restore this information.
We will perform all the tests with Hetman RAID Recovery. Its main purpose is to search and restore information from inoperable drives which used to be a part of the disk array. The program will identify automatically which controller, motherboard or software tool were used to build the array, and will rebuild the RAID with the remaining disks which are still in good condition. The final step is to find all the data you need and save it to healthy drives.
At the moment, there is no version of Hetman RAID Recovery for Linux, but running the utility on this specific operating system is still possible.
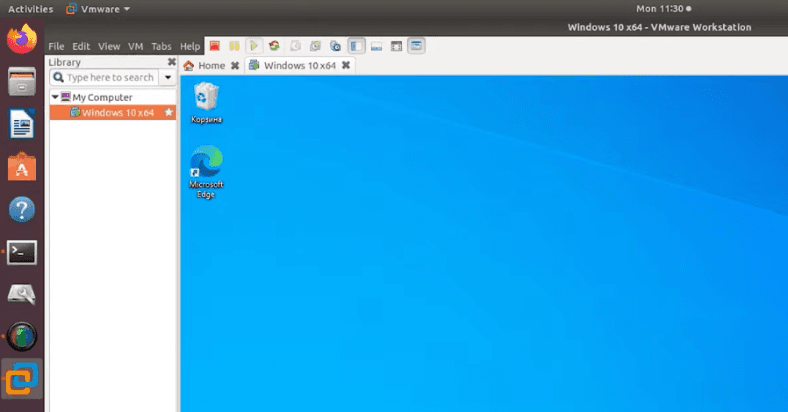
To recover information from a damaged Linux-based RAID, connect the hard disks to a Windows computer. If you don’t have access to such a computer, you can install a Windows virtual machine or install this operating system along with Linux.
How to recover data from a RAID 1 system
First of all, let’s explore the recovery procedure for a RAID 1 device built on Linux and consisting of two hard disks of the same model.
This RAID type can use an even number of drives (at least two) which are used for ”mirroring” all the data.
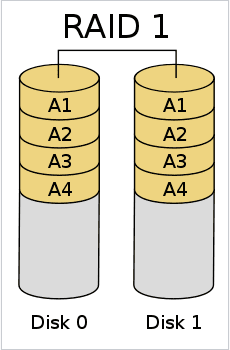
This disk array type is one of the most popular. It is characterized by high resilience: if one of the drives fails, you can replace it with the ”mirrored” copy, and then add another (new) drive, and the entire storage system will work again as if nothing happened. However, when only one HDD broke down, we couldn’t mount it properly in Linux. It is still available in the disk utility, but there is no button to mount it, and the automount feature can’t be enabled too.
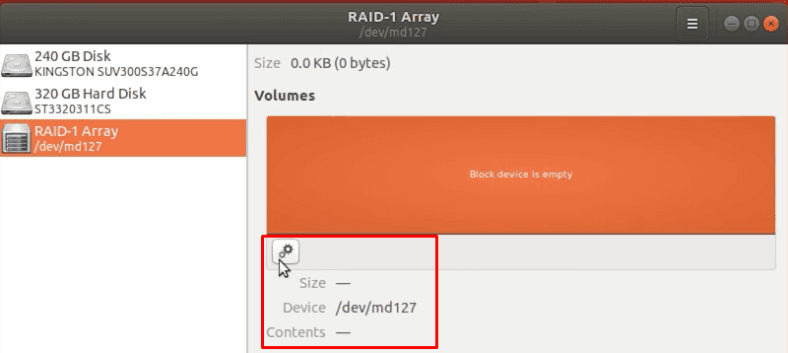
Hetman RAID Recovery managed to identify all properties at once, built and displayed the disk array automatically.
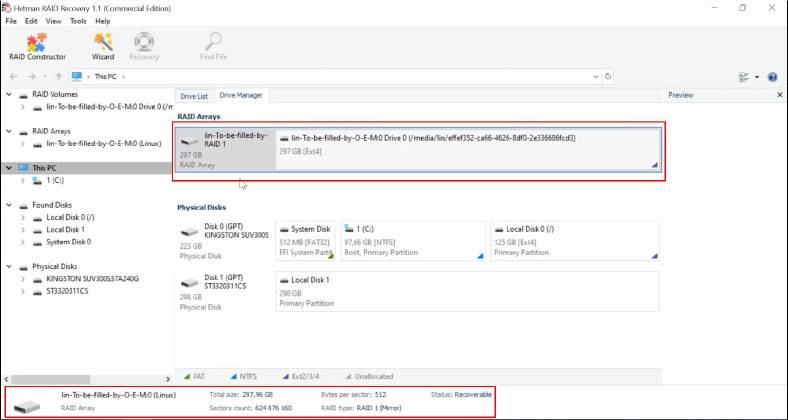
To start the scan in the Drive Manager, right-click on the device icon and open it.
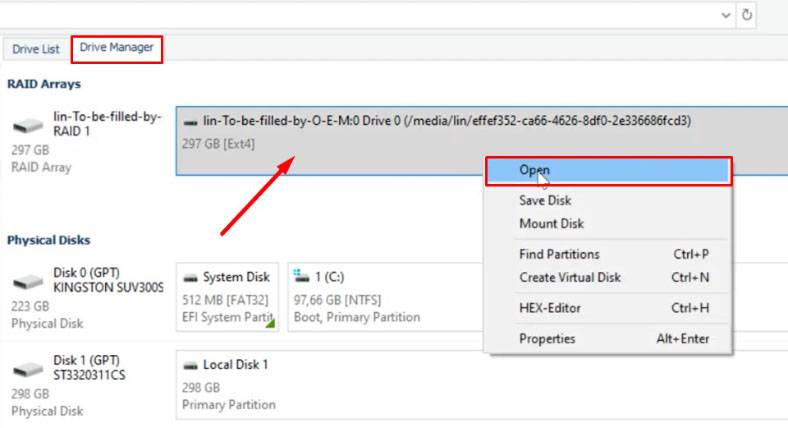
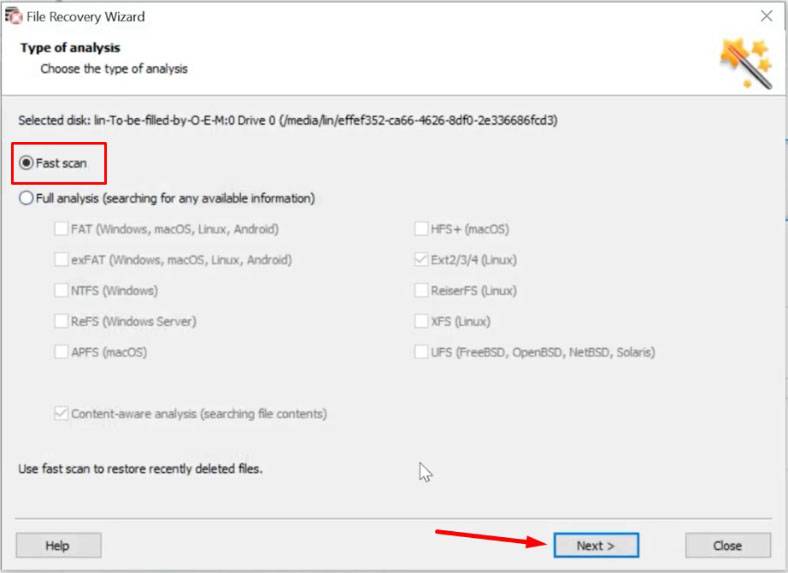
Run the Fast scan first.
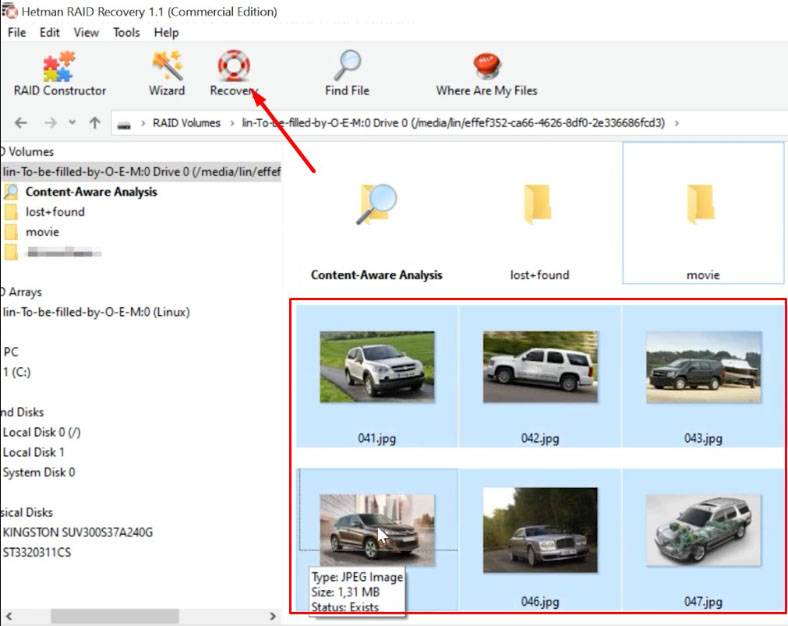
When the scan is over, the program will display the results in the right side of the window. It finds all data which is still on the disk without effort, and the contents can be previewed.
Select the files you want to restore and click Recovery.
Choose where to save them, then click ”Next” and hit ”Recovery” again.
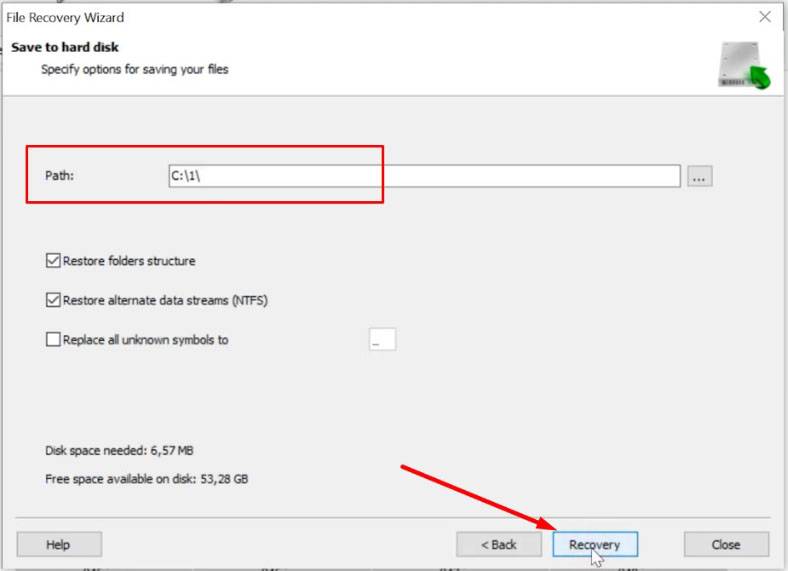
Wait until the system recovery process is complete and click ”Finish”.
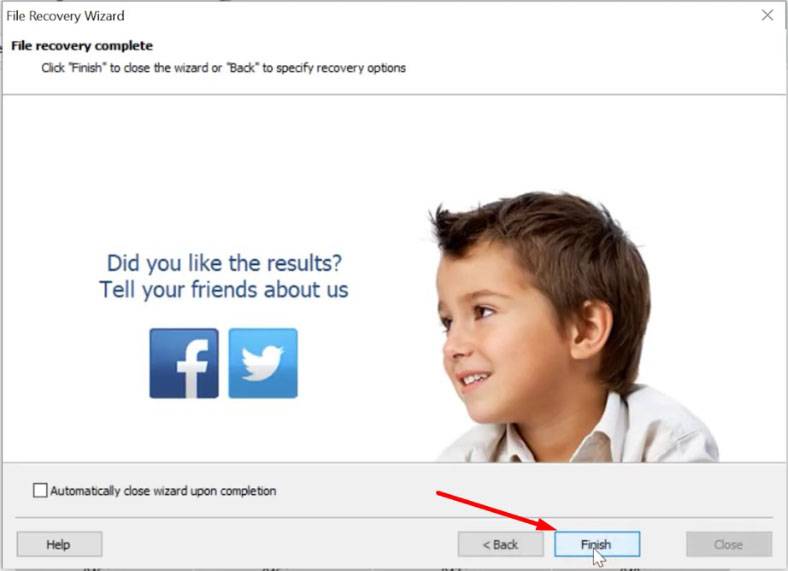
When the process is over, you will find the recovered files in the folder you have chosen.
A hardware Linux-based RAID 1 is designed in such a way that it writes service information on this array type to all of its disks (this information includes the number of disks, their serial numbers, and where each disk begins). That is why if one of the disks is missing, the program reads this data from other disks and adds the data on the missing disk when rebuilding a damaged RAID.
In some cases, this information can be damaged, and while building the array the utility can’t understand where the data on a certain disk is located, and what kind of offset is used for a specific disk. If that’s the case, the utility won’t find any data after the scan. In order to find the information which is still on the disk, you’ll have to use a special tool known as RAID Constructor.
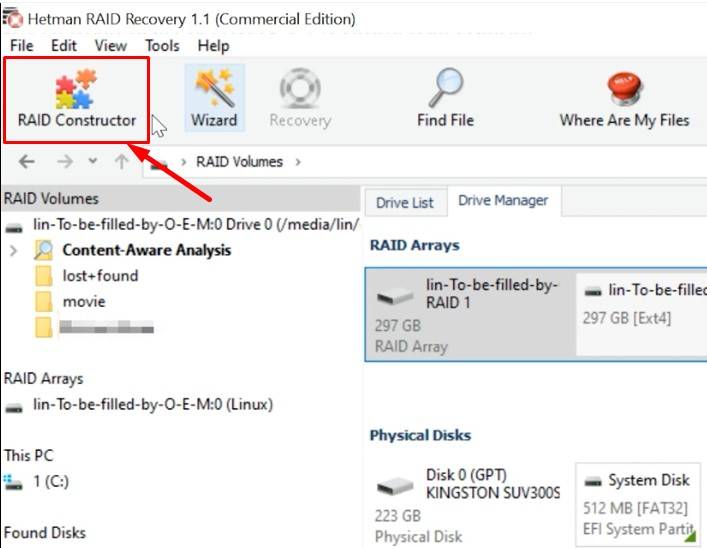
In addition to all the properties, you have to specify the offset by which you can locate the beginning of the disk.
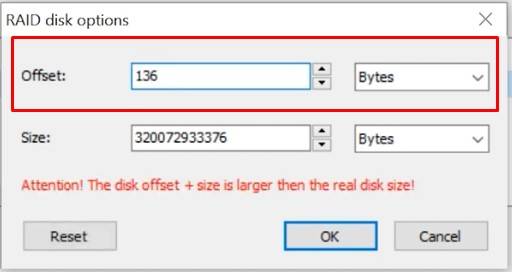
Every file system has specific signatures which help us to identify its beginning. When you specify this offset you’ll be able to rebuild the damaged RAID and extract data from there.
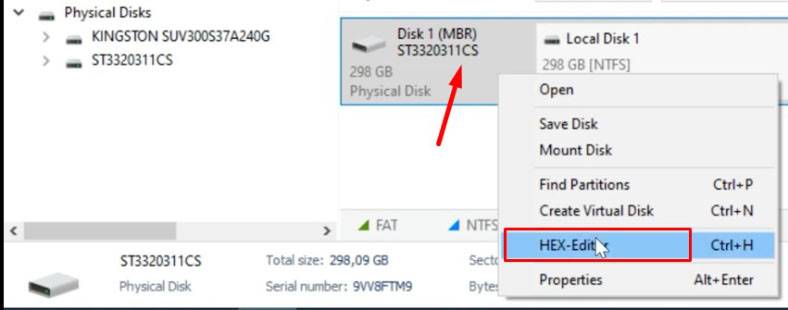
To find the offset, use the HEX-editor: right-click on the disk and open HEX, or press the key shortcut ”Ctrl+H”.
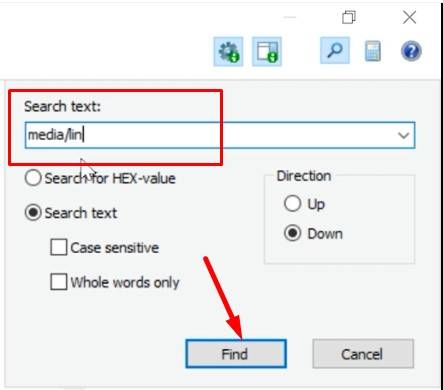
In Linux, you can find the beginning of the disk by the field with the name like ”/media/lin/”, – where lin stands for the user’s account name.
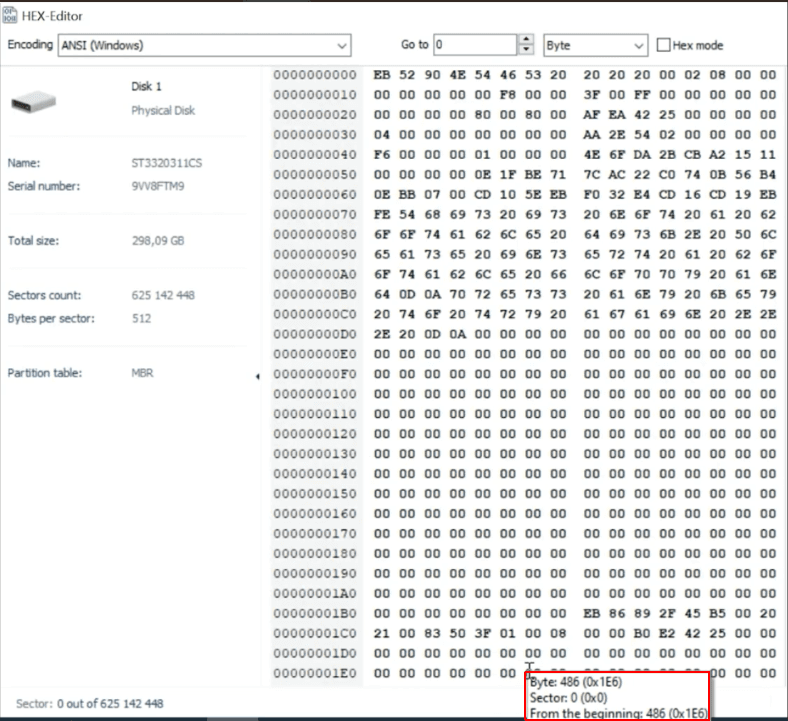
As we know, information about the beginning of the disk in this file system is written to the second sector from the beginning, so we need to go two sectors up. After that, use a calculator to convert the HEX value into the decimal system.
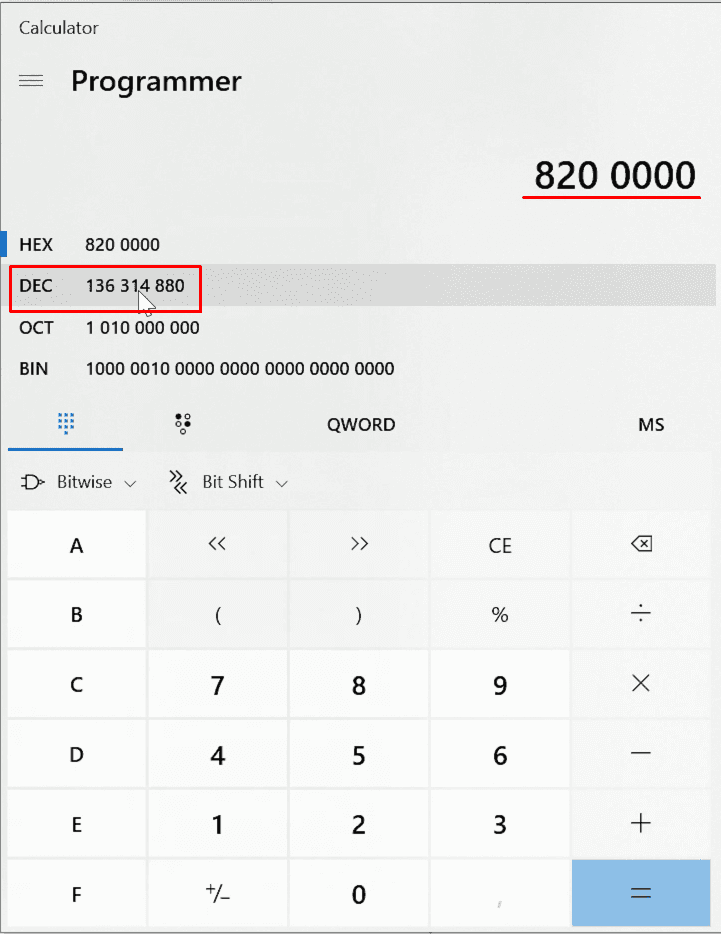
In the calculator, open the programmer mode, select HEX and enter the value (8200000). Immediately, you get the value in the decimal system (136 314 880).
Now that we know the offset, specify it in the Constructor.
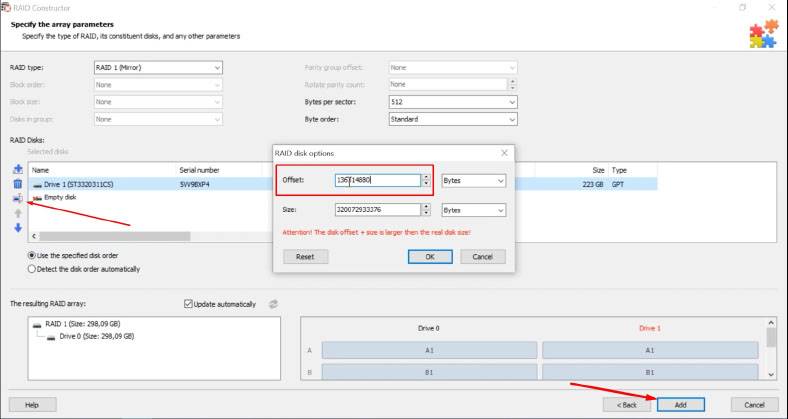
Now you should add the device, scan it and recover the found information.
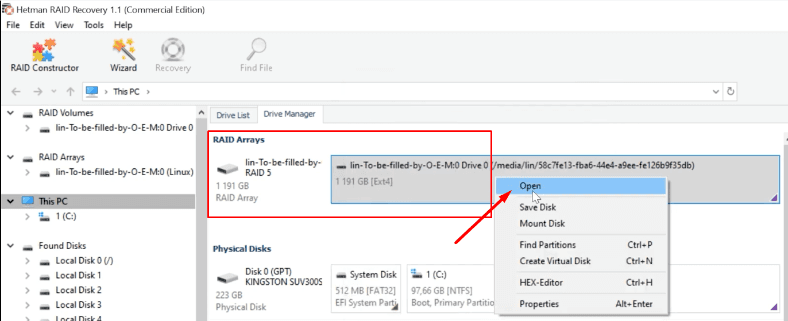
Recovering files from RAID 5
In the next example, we’ll explore the recovery procedure for RAID 5 arrays.
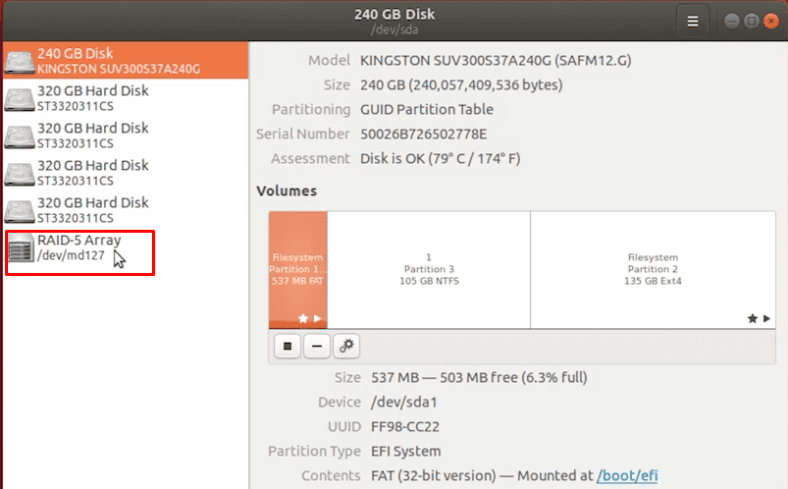
RAID-5 is a hard disk array with redundancy and striping, but without a separate parity drive.
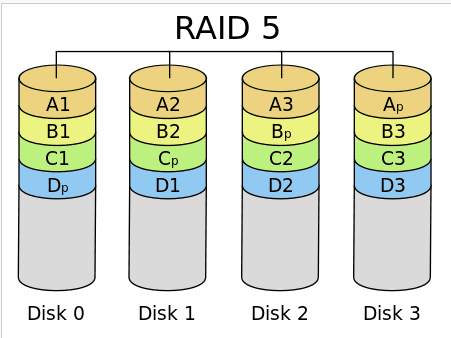
It is designed to remain operable even if one of the disks fails. However, in practice it becomes impossible to mount RAID in Linux, when one disk breaks down. Therefore, you can’t copy any data from there. In order to restore the information, you need to connect a new disk or use additional software.
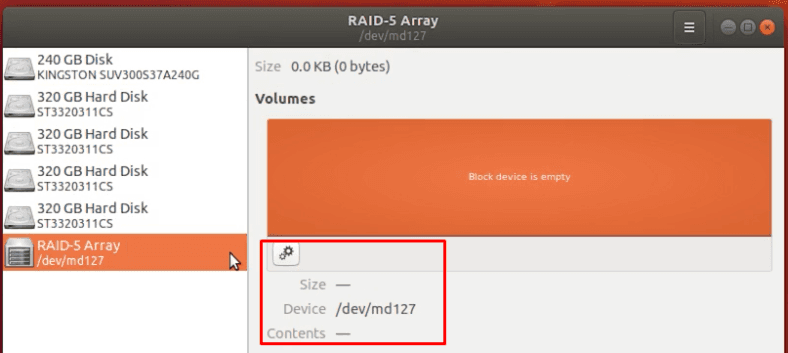
RAID 5 consists of 5 HDDs one of which is damaged. Connect the remaining hard disks to a Windows computer, or add them to a virtual machine. When the program starts, Hetman RAID Recovery identifies the array type and properties without effort.
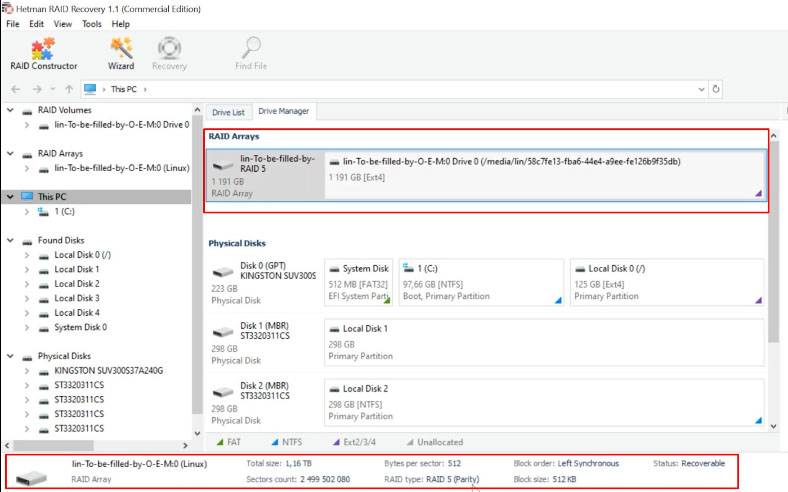
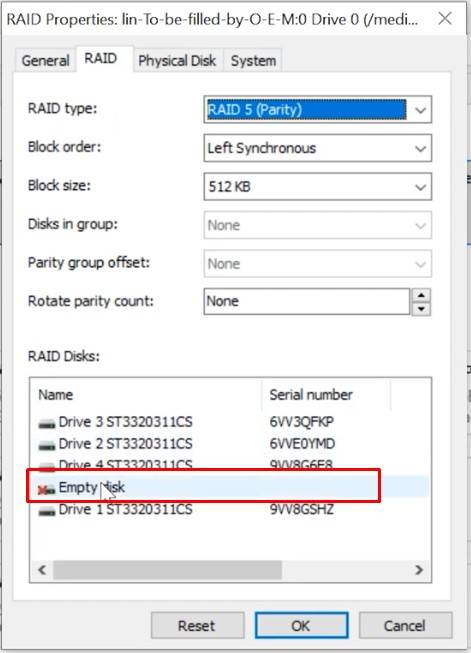
One HDD is empty. (Right-click on the array – Properties – the RAID tab)
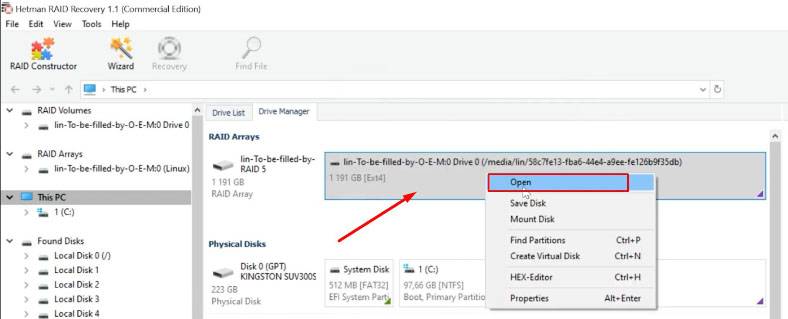
Right-click on it, then select Open.
Analyze the array – select Fast scan.
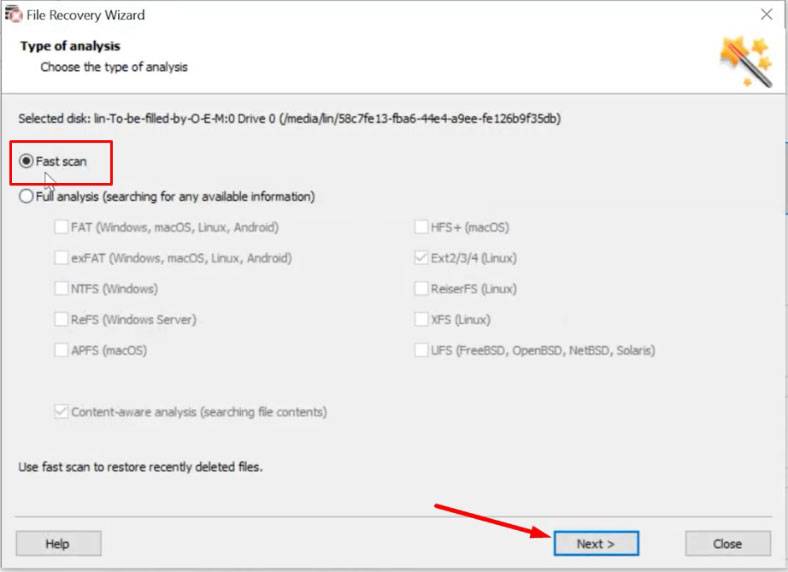
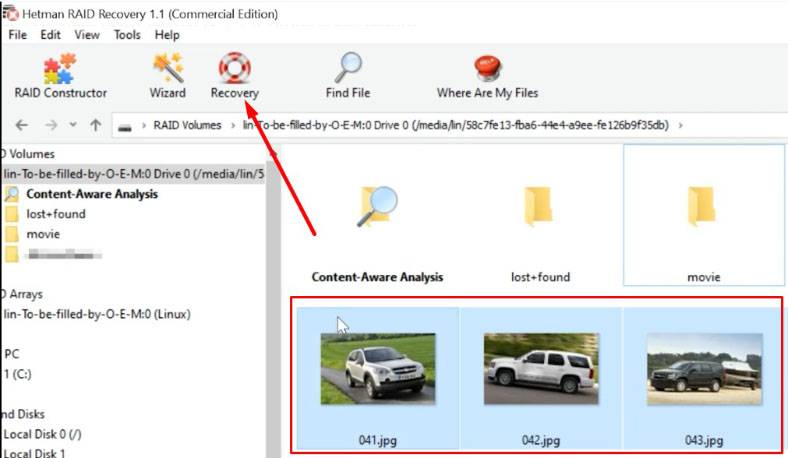
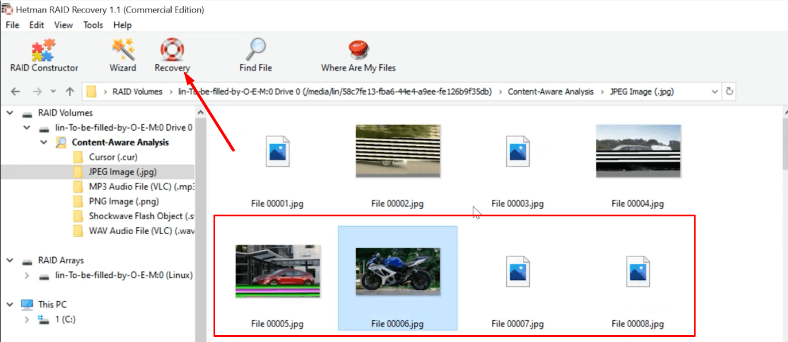
The program has found the remaining files easily. Select the ones you need and click Recovery.
Choose where to save them, then click Recovery again.
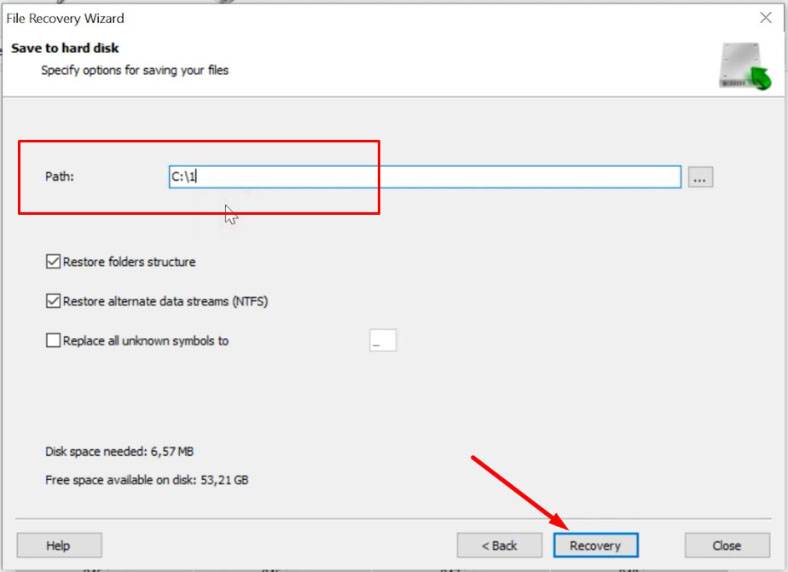
In the end, you’ll find all the information in the folder you have specified for saving.
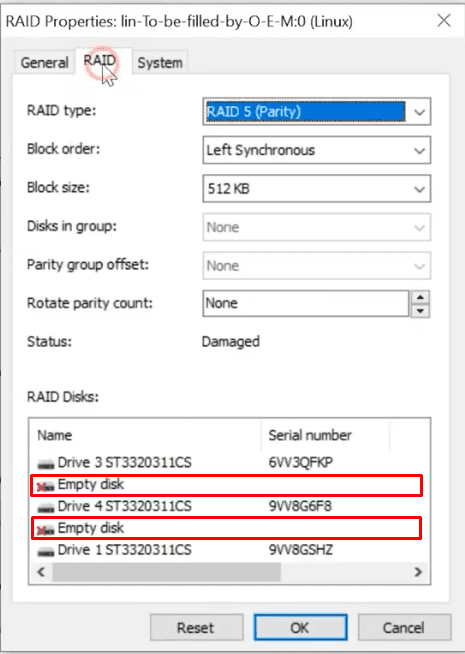
The program will be able to identify the RAID type, all the properties and the file system even if several disks break down at the same time.
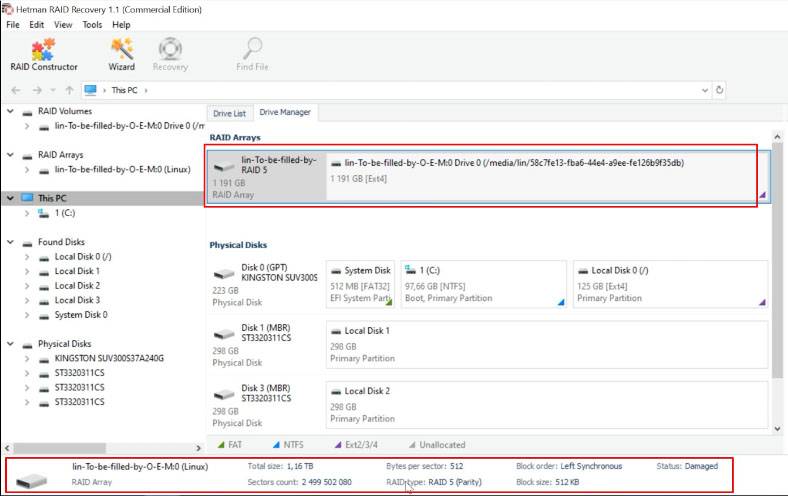
Two disks are empty (Right-click – Properties – jump to the RAID tab).
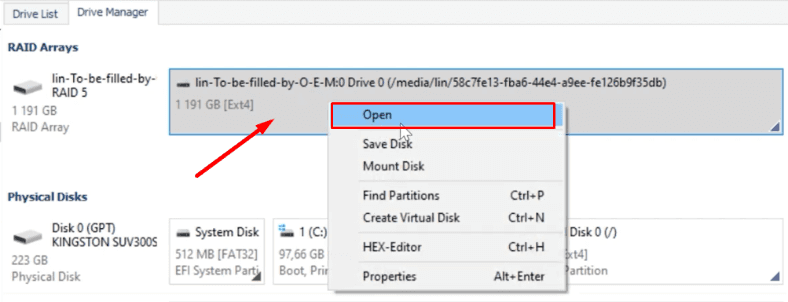
Scan the device: right-click on it and select Open.
For starters, we only run Fast scan.
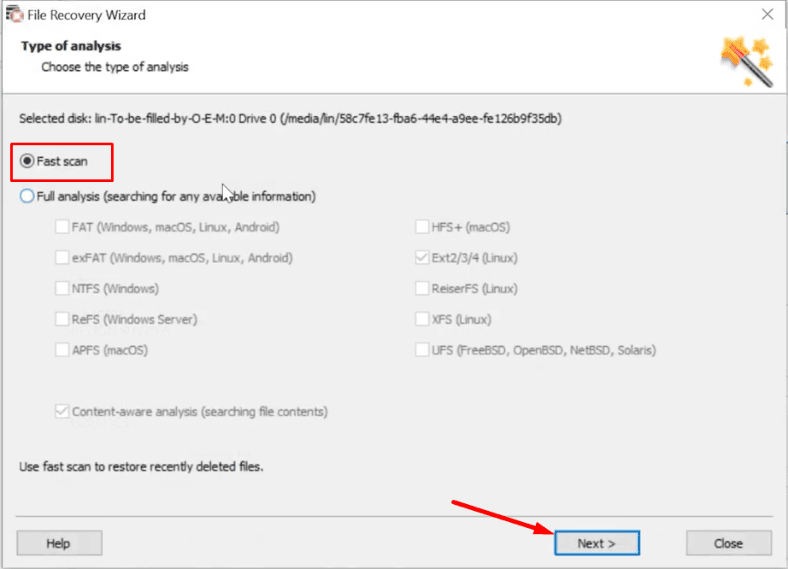
As a result, the Fast scan couldn’t find any healthy data – all the data it has identified is damaged. After that, we decided to run Full analysis.
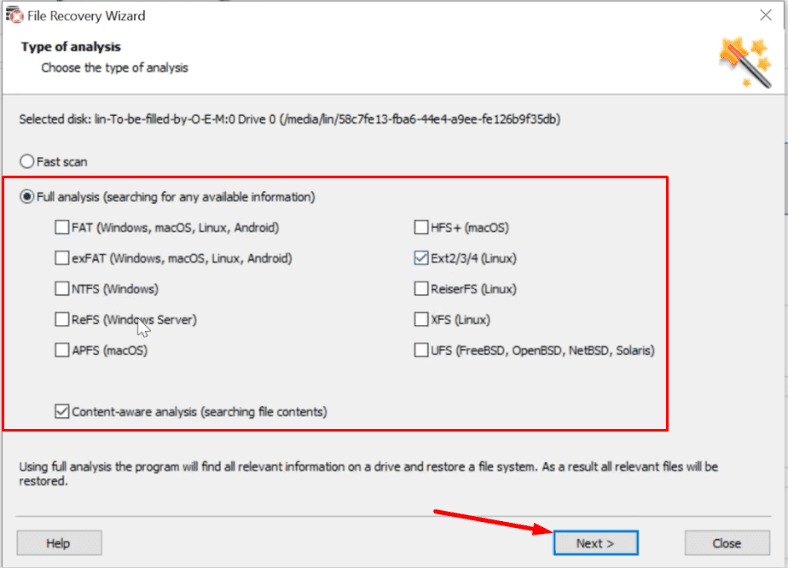
After full analysis, the utility was able to find the necessary information which remained intact, but some data is damaged.
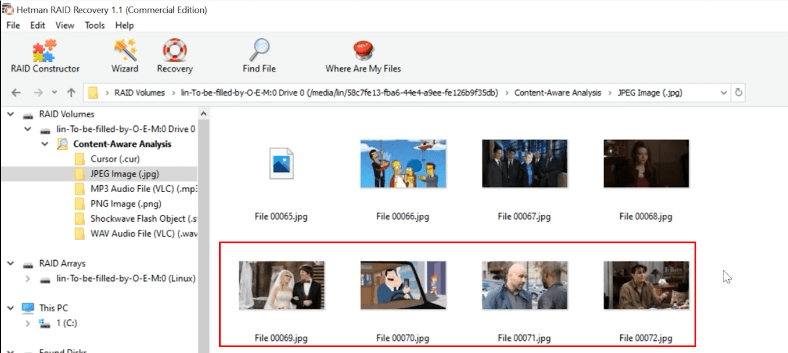
When two or more hard disks break down, this array type becomes completely inoperable and restoring information becomes a challenging task.
That is why such result can be considered quite good as we managed to recover a part of the remaining data. Select and recover it.


The World Redundant Array of Independent Disks (RAID Market Research Report 2024 (covering USA, Europe, China, Japan, India, South East Asia and etc), is an informative market report offered by DecisionDatabases.com.
Redundant Array of Independent Disks (RAID) market research report provides the newest industry data and industry future trends, allowing you to identify the products and end users driving Revenue growth and profitability.The industry report lists the leading competitors and provides the insights strategic industry Analysis of the key factors influencing the market.The report includes the forecasts, Analysis and discussion of important industry trends, market size, market share estimates and profiles of the leading industry Players.Final Report will cover the impact of COVID-19 on this industry.Access Full Report with Table of Contents @ https://www.decisiondatabases.com/ip/45250-world-redundant-array-of-independent-disks-raid-market-reportThe Players mentioned in our reportBroadcom(Avago Technologies)IntelFujitsuHPIBMLenovoMicrosemiSupermicroAreca Technology CorporationDellGlobal Redundant Array of Independent Disks (RAID) Market: Product Segment AnalysisHardware RAID CardSoftware RAID CardGlobal Redundant Array of Independent Disks (RAID) Market: Application Segment AnalysisInternet IndustryService IndustryManufacturing IndustryFinancialGovernmentGlobal Redundant Array of Independent Disks (RAID) Market: Regional Segment AnalysisUSAEuropeJapanChinaIndiaSouth East AsiaDownload Free Sample Report of World Redundant Array of Independent Disks (RAID Market @ https://www.decisiondatabases.com/contact/download-sample-45250There are 10 Chapters to deeply display the World Redundant Array of Independent Disks (RAID) market.Chapter 1 About the Redundant Array of Independent Disks (RAID) IndustryChapter 2 World Market Competition LandscapeChapter 3 World Redundant Array of Independent Disks (RAID) Market shareChapter 4 Supply Chain AnalysisChapter 5 Company ProfilesChapter 6 Globalisation & TradeChapter 7 Distributors and CustomersChapter 8 Import, Export, Consumption and Consumption Value by Major CountriesChapter 9 World Redundant Array of Independent Disks (RAID) Market Forecast through 2024Chapter 10 Key success factors and Market OverviewPurchase full World Redundant Array of Independent Disks (RAID Market Research Report @ https://www.decisiondatabases.com/contact/buy-now-45250Other Reports by DecisionDatabases.com:World Advanced Driver Assist Systems (ADAS) Market Research Report 2025 (Covering USA, EU, China, South East Asia, India, Japan and etc)World Industrial Panel PC Market Research Report 2022 (covering USA, Europe, China, Japan, India, South East Asia and etc)About Us:DecisionDatabases.com is a global business research report provider, enriching decision makers and strategists with qualitative statistics.
DecisionDatabases.com is proficient in providing syndicated research Reports, customized research reports, company profiles and industry databases across multiple domains.Our expert research analysts have been trained to map client’s research requirements to the correct research resource leading to a distinctive edge over its competitors.
We provide intellectual, precise and meaningful data at a lightning speed.For More Details:DecisionDatabases.comE-Mail: sales@decisiondatabases.comPhone: +91 9028057900Web: https://www.decisiondatabases.com
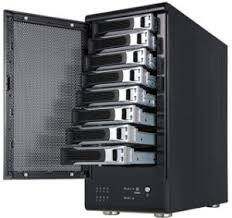
The latest trending report Global Redundant Array of Independent Disks (RAID) Market 2020 by Manufacturers, Regions, Type and Application, Forecast to 2025 offered by DecisionDatabases.com is an informative study covering the market with detailed analysis.
The report will assist reader with better understanding and decision making.The global Redundant Array of Independent Disks (RAID) market size is expected to gain market growth in the forecast period of 2020 to 2025, with a CAGR of 4.6% in the forecast period of 2020 to 2025 and will expected to reach USD 5929.7 million by 2025, from USD 4954.7 million in 2019.The Redundant Array of Independent Disks (RAID) market report provides a detailed analysis of global market size, regional and country-level market size, segmentation market growth, market share, competitive Landscape, sales analysis, impact of domestic and global market players, value chain optimization, trade regulations, recent developments, opportunities analysis, strategic market growth analysis, product launches, area marketplace expanding, and technological innovations.Final Report will cover the impact of COVID-19 on this industry.Browse the complete report and table of contents @ https://www.decisiondatabases.com/ip/14126-redundant-array-of-independent-disks-raid-market-analysis-reportThe major players covered in Redundant Array of Independent Disks (RAID) are:Broadcom(Avago Technologies)Microchip TechnologyFujitsuIntelLenovoDellAreca Technology CorporationIBMHPSupermicroBy Type, Redundant Array of Independent Disks (RAID) market has been segmented intoHardware RAID CardSoftware RAID CardBy Application, Redundant Array of Independent Disks (RAID) has been segmented intoInternet IndustryService IndustryManufacturing IndustryFinancial, GovernmentOthersThe report offers in-depth assessment of the growth and other aspects of the Redundant Array of Independent Disks (RAID) market in important countries (regions), including:North America (United States, Canada and Mexico)Europe (Germany, France, UK, Russia and Italy)Asia-Pacific (China, Japan, Korea, India, Southeast Asia and Australia)South America (Brazil, Argentina, Colombia)Middle East and Africa (Saudi Arabia, UAE, Egypt, Nigeria and South Africa)Download Free Sample Report of Global Redundant Array of Independent Disks (RAID) Market @ https://www.decisiondatabases.com/contact/download-sample-14126The content of the study subjects, includes a total of 15 chapters:Chapter 1, to describe Redundant Array of Independent Disks (RAID) product scope, market overview, market opportunities, market driving force and market risks.Chapter 2, to profile the top manufacturers of Redundant Array of Independent Disks (RAID), with price, sales, revenue and global market share of Redundant Array of Independent Disks (RAID) in 2018 and 2019.Chapter 3, the Redundant Array of Independent Disks (RAID) competitive situation, sales, revenue and global market share of top manufacturers are analyzed emphatically by landscape contrast.Chapter 4, the Redundant Array of Independent Disks (RAID) breakdown data are shown at the regional level, to show the sales, revenue and growth by regions, from 2015 to 2020.Chapter 5, 6, 7, 8 and 9, to break the sales data at the country level, with sales, revenue and market share for key countries in the world, from 2015 to 2020.Chapter 10 and 11, to segment the sales by type and application, with sales market share and growth rate by type, application, from 2015 to 2020.Chapter 12, Redundant Array of Independent Disks (RAID) market forecast, by regions, type and application, with sales and revenue, from 2020 to 2025.Chapter 13, 14 and 15, to describe Redundant Array of Independent Disks (RAID) sales channel, distributors, customers, research findings and conclusion, appendix and data source.Purchase the complete Global Redundant Array of Independent Disks (RAID) Market Research Report @ https://www.decisiondatabases.com/contact/buy-now-14126Other Reports by DecisionDatabases.com:Global Rotating U Disk Market 2020 by Manufacturers, Regions, Type and Application, Forecast to 2025Global External Hard Disk Market 2020 by Manufacturers, Regions, Type and Application, Forecast to 2025Global U Disk Market 2020 by Manufacturers, Regions, Type and Application, Forecast to 2025About-Us:DecisionDatabases.com is a global business research reports provider, enriching decision makers and strategists with qualitative statistics.
DecisionDatabases.com is proficient in providing syndicated research report, customized research reports, company profiles and industry databases across multiple domains.Our expert research analysts have been trained to map client’s research requirements to the correct research resource leading to a distinctive edge over its competitors.
We provide intellectual, precise and meaningful data at a lightning speed.For more details:DecisionDatabases.comE-Mail: sales@decisiondatabases.comPhone: +91 9028057900Web: https://www.decisiondatabases.com/