


Sometimes you locate the exceptional photograph in Cricut Design Space. However, there is the number, name, or greeting you prefer to edit to make it perfect. Cricut received it and brought Editable Images. Cricut has up-to-date and protected lots of pix in the Design Space software program and made these pics editable so that customers can customize a unique name, change up the sentiment, or alternate the occasion.

Editable Images are pix with personalization in mind. Change any phrase to shape the occasion, add household names, and even encompass a funny internal story to beautify its relevance for you. After including an Editable Image to Cricut Canvas, editable textual content highlighted in blue will appear. Once you edit your preferred image, the spotlight will disappear. Besides the text, customers can edit whatever is in a photo by utilizing the layer panel. Change the size, cross the photograph elements, alternate the shade, or whatever you want to.
Cricut Editable Images
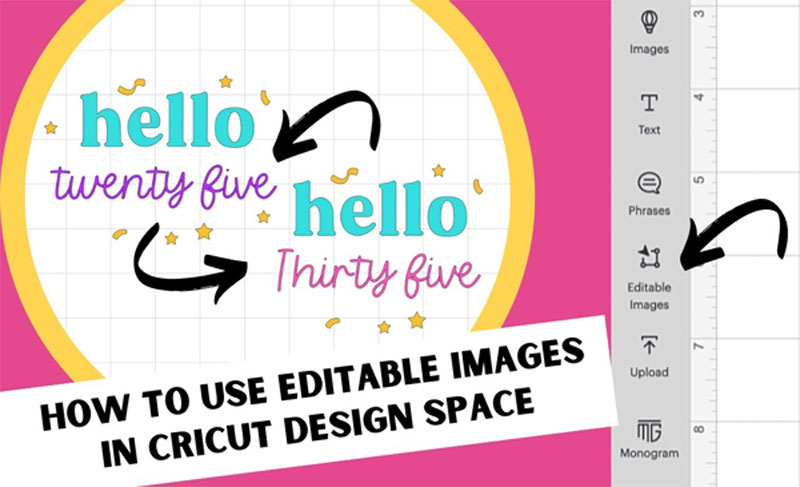
The most uncomplicated technique to discover the Editable Images in Design Space is to faucet on the Editable photograph tab on the left-hand aspect of the Cricut Canvas or pick the Editable Text filter choice in the Images section.
Also, you can discover Cricut Editable Images beside different photographs in the Design Space software; search for the Editable Image tab at the backside and the blue highlighted textual content in the picture itself. When you hover the mouse over the pinnacle Editable Image tab, you will locate a badge that reads this picture is editable.
Pricing for Cricut Editable Images
When you search through the many Editable Images in the Cricut library, each has distinctive costs. All the Editable Images are on hand in Cricut Access subscriptions, from $0.
If you haven’t subscribed yet, don’t worry. Person Editable Images can purchase at various costs. Different designs have one-of-a-kind prices, relying on the images, fonts, and shapes you use. Non-subscribers can own other snapshots or fonts in the Cricut Design Space account to limit the value of the Editable Image and forestall overcharging.
For instance, if the Editable Image provides a premier font, the preliminary value will add the license together with this font to your Cricut library. If your Design Space account already consists of that font, the price will minimize so that you don’t have to pay for the font you already have. If you do now not have the premier font, however, swap to the one you already have or a specific one, and the rate would possibly change; you will comprehend the up-to-date fee when you take a look at it earlier than slicing an image.
Edit in Cricut Editable Images
You can edit any in Editable Images. If the Editable Image provides an editable text, a spotlight will appear on every text in the editable image. Do not worry; this blue spotlight will disappear as soon as you edit your text. Double-tap on the favored textual content to add edit mode and write the new content like when you usually encompass textual content in the projects. If the textual content is lengthy to fit, trade the font measurement to make it smaller.
Need to wrap the text? Move to the Alignment menu and choose the Wrap On option. With the reader on a single line? Navigate to the Alignment menu and hit the Wrap Off tab.
Choose the textual content and edit the font to whatever is already in your Cricut library if you want a non-Access font. To exchange a structure or different assets, pass beforehand and replace it. Users can customize the components of the favored photo displayed in the layers panel, resize them, go them, and alternate the color, typically any function available for the layer you desire to edit.
Cutting any Editable Image is comparable to any different design; ensure to attach or group the way you require them to be and faucet on the Make It tab.
Use Cricut Editable Pictures
You can modify the image When you include an editable image in the Cricut.
To edit the text, you Should get to the faucet on the editable layer. This way, you can edit New Year, date, and Gabrielle. For instance, select the “NewYear’s first” text.
After that, you will locate that your edited textual content will trade to black. Then it will be reduced on the identical mat as the new year’s first text. Because of its specific colors, the warmness will concentrate on its slicing carpet.
If you want, you can edit the photograph more, modifying matters like the size, and colors, together with different factors (such as changing the coronary heart with the easter egg from your Cricut library), or modifying the operation king (including knocking down for Print, then Cut feature). Usually, you can make any adjustments to a reduced file or different image. You might have to detach or ungroup layers to provoke adjustments like this.
After that, you can cut your picture on the Cricut computing device to create your project.
Edit the Images in Design Space
In this guide, you will understand the procedure to edit a PNG image & separate it so that you can merge other elements and generate a new design.
- First, you have to add the image. Tap on the New Project tab to launch a blank canvas. From there, you can hit the Upload icon.
- Tap again on the uploaded image.
- Next, Select The Browse Option.
- Choose the diagram you desire to edit. We chose the Cactus PNG bundle using the cited Design Bundles in this example. Select the Complex choice and hit the Continue tab.
- Hit the Zoom icon and Zoom the area of the graph you desire to keep. Now, the faucet on the Crop tab and trim your image.
- Use the Eraser device to do away with the extra components of the layout you don’t desire to keep.
- Tap the Preview choice to see if you have obliterated the unwanted parts. Once you are ready, the spout Resumes.
- Now, store your file as Print, then Cut the format and hit the Save tab.
- Move returned to add a picture and pick the favored print to upload.
- Pick the sketch again, the faucet on the complicated photo option, and hit the Continue button. You will repeat the step. However, this time you’ll delete the pot of the cactus.
- Tap Continue and save it.
- Next, pick the portions of the edited graph and hit the Insert Images tab.
- Now, the pics will be seen in the Cricut Design Space undertaking canvas.
- Note: you can take exceptional components from any different photo and combine & healthy them to make a new design.
Step how to Separate Images From Multiple Images in Design Space
- Let’s commence with launching the Cricut Design Space. Tap on the Upload Image tab in the left toolbar.
- You need to hit the Upload Image icon on the next screen again.
- The uploaded photo will show on the screen. You will see countless snapshots in the design, but you want a few images to separate them from the scenario. Pick the relatively complicated alternative and hit the proceed icon.
- Then, the faucet on the Crop device and trim the photo you want for a better image.
- After this, pick out the magic wand icon. Tap on the background and the place you don’t want to preserve around your image. When you are prepared with your picture, faucet on the Preview tab to make sure you have deleted all the undesirable things. Then hit the Continue tab.
- You ought to print and reduce with this image, so bear in mind to faucet on the print and minimize tab, not solely the reduce option. Rename your picture and save it.
- Repeat the procedure if you want to choose different pictures from a couple of images. After that, you can pick them and insert them into your diagram space.
- The pictures you want will be seen personally on the screen. Every photograph has its Cut traces so that the user can cut them by their own choice rather than a whole design.
- Resize the selected image and click the Make It tab.
- Now, the image is ready to print out and then cut.
- Also, you can insert Red and white snapshots like coloring in the pages and separate components of your web page from the relaxation to make use of as design. Now Hit the Upload Image tab.
- You can pick out a complicated option with the uploaded coloring page.
- After deciding on the preferred image, faucet on the Crop device and trim the section of the photo you want.
- Hit the Magic wand icon at the top left corner and put off the background you want.
- When saving the image, you should remember to keep it as a print & cut, not only in the cut file. Rename the photo and Save it.
- Now, you can insert your photograph into the Cricut Design Space, and your picture has its cut lines. Once you are geared up with your design, pick the Make It alternative to print and cut.
- After that, you can print and cut the favored layout on the print-and-cut page.
- Separating one or different snapshots from one picture is a helpful learning method. Users would want solely a unique component of a plan for their project.
Summary
Separating one or different snapshots from one picture is a valuable learning method. Users would want solely a unique component of a plan for their project.
Source URL - How to Use Editable Images in Cricut Design Space


