


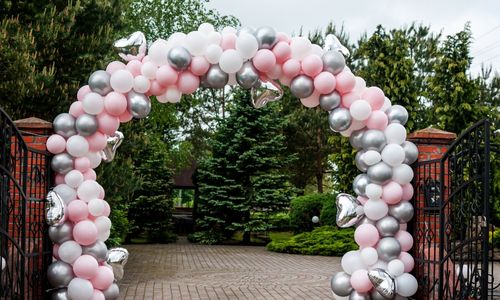
Balloon Arches
Balloon arches are a beautiful and versatile decoration for any occasion. Whether you're looking to spruce up a birthday party, wedding reception, or corporate event, building a balloon arch from scratch can be an easy and cost-effective way to add a colorful touch. A DIY balloon arch is surprisingly simple to create, especially with the help of step-by-step instructions. This article explores what materials you need to build your own balloon arch and provides detailed guidelines on how to assemble it from start to finish. Read on for everything you need to know about constructing your own stunningly eye-catching balloon arch for any special event! For balloon arch hire be sure to check out the number one UK balloon arch hire company known as 'The Added Extra'
Supplies Needed
Building a balloon arch from scratch is an impressive way to add a fun, festive touch to any occasion. Whether you're throwing a birthday party or celebrating the holidays, these arches can be made with minimal supplies and effort. Here's what you'll need:
First and foremost, you'll need balloons! Different shapes and sizes of balloons will give your arch unique dimensions and texture. For those looking for something classic, round balloons work best; for something more modern, try long cylindrical ones. Balloons in vibrant colors are sure to make your arch stand out.
Next up is the frame for your balloon arch. This can be anything from wooden dowels or PVC pipes cut into different lengths to fit your desired shape - just make sure it's sturdy enough to support all of the balloons!
Step 1: Secure Frame
Creating a balloon arch is an exciting way to decorate any event or special occasion. The first step in building the perfect balloon arch is securing the frame. Without a sturdy and reliable frame, the balloons will not be able to be attached properly and your arch will not last throughout the duration of your event.
The ideal frames for balloon arches are either metal or PVC pipe frames that can be molded into shape while providing stability. When selecting a frame, make sure it is tall enough to create the desired arch size as well as wide enough for balloons to fit snugly around it without sagging or slipping off during assembly. For added support, consider using tent poles and zip ties at each end of the frame for extra security and stability. Ensure that all connections are fully secure before attaching any balloons so that you can enjoy your arch with peace of mind!
Step 2: Tie Balloons Together
Tying balloons together is the second step in building a balloon arch from scratch. This simple yet important step will help your arch keep its shape and structure no matter what elements it may be exposed to. To begin, you should gather all of the materials needed for this step: balloons, scissors, ribbon or twine, and tape. Once everything is assembled, start by cutting the ribbon or twine into manageable lengths - about 1-2 feet long - then blow up each balloon separately. After blowing them up, tie two of the same size balloons together with a knot at their necks before securing them with tape. Finally, use one length of ribbon or twine to connect several pairs of tied-together balloons in order to create an arch that is wide enough for whatever needs you have. With these few simple steps, your balloon arch will be on its way to completion!
Step 3: Create Design
Creating the balloon arch design is an important step in creating a unique centerpiece for any occasion. When it comes to making a balloon arch, there are many different options when it comes to selecting the right supplies and components. First, consider what type of balloons you will be using. You may want to use latex balloons, mylar balloons, or even bubble-type balloons. Additionally, select the types of ties and arches that will work best for your project.
Second, determine how big you would like your arch to be and what kind of shape you would like it to take on. Choose an overall design that is practical as well as aesthetically pleasing. Once you have decided on your design elements, then start gathering your supplies and begin assembling them according to the instructions in Step 2 of this article series: Building a Balloon Arch from Scratch.
Step 4: Attach Arch to Wall
Building a balloon arch from scratch is an easy way to add style and excitement to any special event. Step four of the process is attaching your arch to the wall, which requires extra supplies and materials.
For this step, you will need adhesive putty, a tape measure and double-sided tape. Begin by measuring where the top of your balloon arch should be attached on the wall or ceiling. Next, apply pieces of adhesive putty along this area to secure it in place. Finally, use double sided tape along the side of the arch that will be attached to the wall for added support. Make sure that all elements are firmly secured before releasing helium balloons into your arch structure! With these simple steps you can craft a unique and stunning balloon arch for any occasion!
Step 5: Final Touches
When it comes to creating a professional-looking balloon arch, the fifth and final step is all about making sure it looks perfect. This step involves tweaking angles and adding any desired finishing touches that will make your arch stand out from the rest.
To achieve this, start by tidying up uneven edges or any unsightly gaps with extra balloons. Next, use ribbon to create a neat border along the top of the arch; this will also help ensure that all of your balloons are securely in place. You might even choose to incorporate some additional decorations such as flowers, leaves or streamers for an extra special touch! Finally, if necessary you can adjust any loose strings so that they don’t detract from your masterpiece. With these steps complete you can be confident that your balloon arch is ready to take centre stage at whatever event it may be featured at!
Conclusion
The conclusion of this article on how to build a balloon arch from scratch is simple. Building a balloon arch takes patience and practice, but the end result can make any special event look amazing. With just a few tools and materials, you can create a beautiful, custom-made decoration that will give your party or event an extra special touch.
Though it may take some time to put together, it’s worth the effort when you step back and admire your work at the end. Whether for weddings, birthdays or any other occasion that calls for celebration, by following these instructions you can easily make your own balloon arch from scratch and enjoy the satisfaction of knowing you did it yourself!


