


Birthdays are special occasions that only come around once a year, so why not make them extra memorable? A creative and unique way to present a gift is by crafting your own paper cake box. Whether you’re giving a small gift or something fun like money hidden inside a cake, this project is sure to bring a smile to anyone’s face. In this guide, we'll walk you through how to create a beautiful and personalized paper cake box, complete with a money-pull option that adds an element of surprise and excitement.
Customizing Your Paper Cake Box
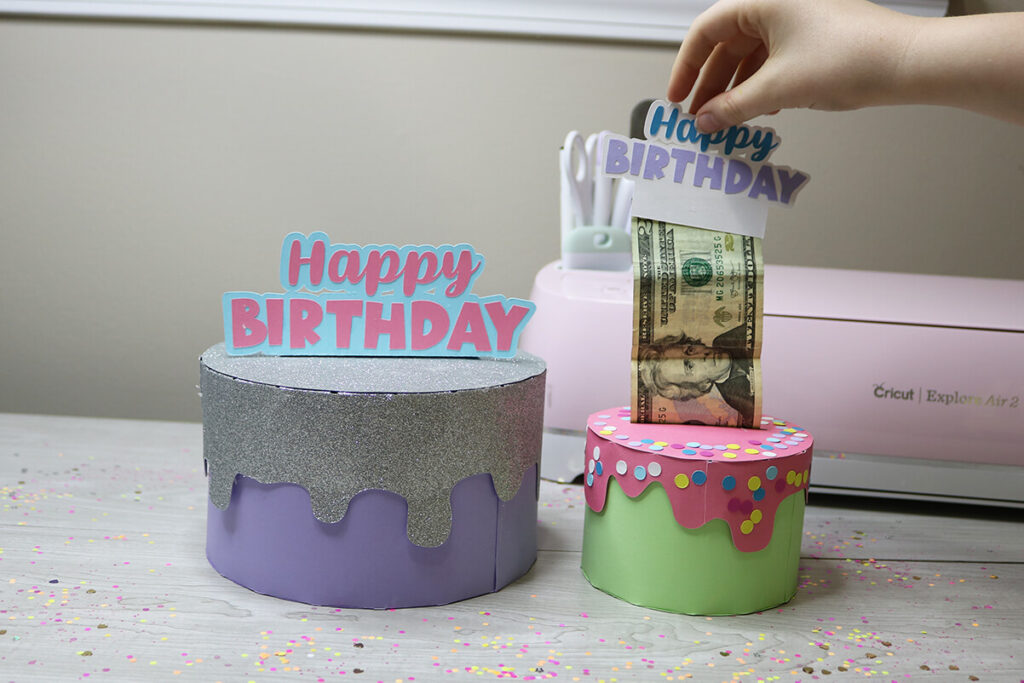
One of the best things about this DIY project is its versatility. The paper cake box template is available in two different sizes to suit your needs, and you can even add a fun money-pull feature. The recipient will be able to pull a string and watch as money magically comes out of the cake! This unique twist makes the paper cake box an ideal gift for birthdays, but its uses don’t end there. With a bit of creativity, you can personalize it for other special events such as baby showers, graduations, or even weddings.
To make your gift even more special, consider pairing your paper cake box with a custom birthday card. There are plenty of free templates available online, including pop-up designs, kid-friendly cards, and more general options for adults.
Getting Started: Cricut Design Space
To begin your project, you’ll need access to Cricut Design Space, a design software that allows you to upload templates and cut your cake box with a Cricut cutting machine. Start by opening a new project in Cricut Design Space and upload the paper cake box template. Once the template is uploaded, add it to your design canvas. You'll notice that the template consists of several different layers, which you’ll need to ungroup before moving forward. To do this, simply click on the template and select the “ungroup” option, which will allow you to modify each layer individually.
Modifying the Cake Box Template
Before you start cutting the design, it’s important to adjust the lines on the template to suit your needs. Specifically, some lines need to be changed to score lines. Scoring lines will allow you to fold the paper neatly and accurately, making it easier to assemble the box. If your cutting machine has a scoring tool, you can proceed by changing the necessary lines to score lines in the software. If you do not have a scoring tool, you can delete these lines altogether.
To change the lines to score lines, select the layer with the lines and change the operation to “score.” Afterward, group the score lines with their corresponding layers and click “attach” to make sure they stay aligned. Be sure to repeat this process for each of the layers, including the icing layers and the sides of the box. If you’re working with the larger template, you will also need to score the "Happy Birthday" design layer, attaching the score line to the back white piece.
Assembling Your Paper Cake Box
Now that your pieces are cut, it’s time to assemble your paper cake box. Start by taking the two rectangular pieces that make up the sides of the box and connect them using the tab piece along the edge. It’s important to make sure that the tab pieces on both ends of the rectangles are lined up properly. Once everything is in place, fold the sides in, ensuring that the tab piece connecting the two rectangles is on the inside of the box. Use glue to secure the tab pieces to the circular bottom of the cake box, creating the base.
If you’re adding the money-pull feature, you’ll need to attach a small strip of paper or ribbon to the money, which can then be threaded through a hole in the top layer of the cake. When the recipient pulls the ribbon, they’ll be surprised to see a roll of money emerge from the cake!
Adding Personal Touches
The paper cake box offers endless opportunities for personalization. You can decorate the box with colorful paper, stickers, or embellishments to match the occasion. Consider writing a special message or the recipient’s name on the box to make it feel even more personalized. You could also experiment with different color schemes or patterns depending on the celebration.
For those who want to take this project to the next level, adding intricate details or using specialty papers such as glitter or foil can enhance the look of your cake box. Whether you’re giving a small gift or planning a creative way to give money, the paper cake box is a fun and thoughtful way to make any occasion special.
Conclusion
Crafting a paper cake box is an enjoyable and creative way to add a personal touch to your birthday gifts or any other special occasion. The money-pull option adds an element of surprise that will delight your recipient. With the flexibility to customize the design for various events and recipients, this DIY project is sure to be a hit. So, gather your supplies, fire up your Cricut machine, and start creating a memorable gift today!
Christmas Designs for Cricut 3D Flower Cutting Designs Christmas Monogram SVG for Cricut Monogram Designs for Dancers Fish-themed DIY projects


