


DIY Screen Printing: Unleashing Your Creativity with Dip Tanks
Dive into the world of DIY screen printing and discover the transformative power of dip tanks. Screen printing, a versatile and creative process, allows individuals to imprint their designs onto various materials, from textiles to ceramics. Whether you're a hobbyist or an aspiring entrepreneur, understanding dip tank screen printing can elevate your craft to new heights. This technique not only enhances the quality of your prints but also provides a cost-effective solution for producing professional-grade designs at home.
DIY screen printing is a journey of exploration and innovation. It offers a unique opportunity to express your creativity while mastering a skill that can be both fulfilling and profitable. With the right tools and techniques, you can transform simple ideas into vibrant, tangible creations. The dip tank method, in particular, is favored for its precision and efficiency, making it ideal for those looking to achieve high-quality results without investing in expensive equipment.
Screen Printing Materials: Essential Tools for Dip Tank Success
Embarking on your screen printing adventure requires a comprehensive understanding of the materials involved. The success of your prints hinges on the quality and compatibility of the materials you choose. Here's a detailed look at the essentials:
1. Screens: The backbone of any screen printing setup, screens come in various mesh counts, which determine the level of detail achievable in your prints. Choose a mesh count that aligns with your design's intricacy.
2. Emulsion: A light-sensitive liquid applied to screens, emulsion is crucial for creating stencils. It's essential to select an emulsion compatible with your ink type and exposure unit.
3. Inks: Available in numerous formulations, including water-based and plastisol, inks are chosen based on the material being printed and the desired finish. Water-based inks are eco-friendly and ideal for soft, breathable prints.
4. Squeegee: This tool is used to push ink through the screen onto the substrate. Squeegees vary in hardness and size, affecting the ink deposit and print quality.
5. Dip Tank: The centerpiece of this method, dip tanks are used to reclaim screens by removing old emulsion. They simplify the cleaning process, making it efficient and environmentally friendly.
6. Exposure Unit: A device that uses light to harden emulsion, creating a stencil on the screen. It's vital for capturing the details of your design accurately.
Screen Printing Techniques: Mastering the Art of Precision
To achieve stunning screen prints, mastering various techniques is essential. Each step in the process requires attention to detail and an understanding of how materials interact. Here are some techniques to focus on:
1. Preparing Screens: Proper screen preparation involves cleaning and coating with emulsion. Ensure screens are free from dust and debris to prevent imperfections in your prints.
2. Exposure: Accurate exposure is critical for transferring your design onto the screen. Test exposure times to find the perfect balance between detail and durability.
3. Registration: Aligning screens with precision ensures that multi-color designs are printed accurately. Use registration marks to maintain consistency across prints.
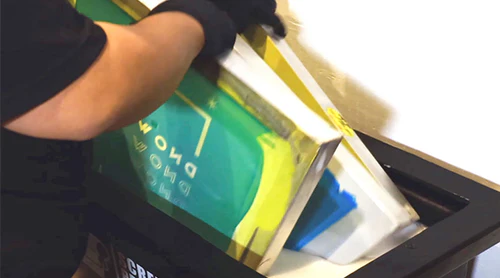
4. Printing Technique: The angle and pressure of the squeegee affect the ink deposit. Practice controlling these variables to achieve the desired texture and coverage.
5. Curing: Proper curing of inks, especially plastisol, is essential for durability. Use heat sources like flash dryers or conveyor dryers to ensure inks are set correctly.
Screen Printing Step-by-Step: A Comprehensive Guide to Dip Tank Mastery
Embarking on a screen printing project involves a series of steps that require careful execution. Here's a comprehensive guide to mastering dip tank screen printing:
Step 1: Design Creation
Begin by crafting your design using graphic design software. Ensure your artwork is suitable for screen printing, avoiding intricate details that may not transfer well.
Step 2: Screen Preparation
Clean your screens thoroughly to remove any contaminants. Apply emulsion evenly, ensuring a smooth coat. Allow the emulsion to dry in a dark, dust-free environment.
Step 3: Image Exposure
Position your design transparency on the screen and expose it to light using an exposure unit. Adjust exposure times based on your emulsion type and screen mesh count.
Step 4: Screen Development
After exposure, rinse the screen gently with water to reveal your stencil. Ensure all areas are clear and defined before proceeding to the next step.
Step 5: Printing Setup
Secure your screen on a press and align your substrate beneath it. Load ink onto the screen and use a squeegee to transfer the design onto the material.
Step 6: Curing the Print
Once printed, cure the ink using appropriate heat sources. This step is crucial for ensuring the longevity and vibrancy of your design.
Step 7: Screen Reclamation
Use a dip tank to reclaim your screen, removing old emulsion and ink. This process prepares the screen for future use, maintaining its quality and effectiveness.
Additional Tips for Successful Dip Tank Screen Printing
To enhance your screen printing experience, consider the following tips:
1. Experiment with Inks: Try different ink formulations to discover unique finishes and textures. Experimentation can lead to innovative designs that stand out.
2. Maintain Equipment: Regular cleaning and maintenance of your tools, especially screens and presses, ensure consistent quality and extend their lifespan.
3. Stay Updated: Keep abreast of industry trends and advancements in screen printing technology. Continuous learning can inspire new techniques and approaches.
Conclusion: Embarking on Your Screen Printing Journey
Mastering the art of dip tank screen printing is an exciting and rewarding endeavor. With the right materials, techniques, and dedication, you can produce professional-grade prints that captivate and inspire. Whether you're printing for personal enjoyment or commercial purposes, the skills you develop through this process will serve you well in your creative pursuits. Embrace the journey, explore new possibilities, and let your imagination guide you as you transform ideas into reality.
This post has been published by Screenprintdirect.com on May 14, 2025 and has been republished with author’s permission.


