


Students, workers, and anyone who is online will find it useful to know how to take a screenshot from a laptop. You can capture what is on your screen with a screenshot. It could be an image, video frame, document, or error message. This guide shows you how to take screenshots on Windows and Mac laptops. We will show you how to do it step by step and give tips on how to make it easier.
Why Screenshots are useful
Screenshots can be more than just a picture of your computer screen. Screenshots are useful for:
Save Important Data: Capture images or data for future reference.
Share Content Quickly: Send screenshots easily to friends, colleagues or support teams.
Report Bugs and Errors: Tell tech support exactly what went wrong.
Create guides and tutorials: Make educational material easier to understand
You can save time and increase your productivity by taking screenshots.
How To Take A Screenshot On Windows Laptop
There are several ways to capture the screen of a Windows laptop. Each method can be used in a variety of situations:
1. How to use the Print Screen Key (PrtScn).
By pressing the PrtScn button, you can copy the entire screen to your clipboard.
Step: Click PrtScn.
Action Open a document or image editor such as Word.
Step: Click and then press Ctrl+V in order to copy the screenshot.
This method is fast, but it requires manual saving.
2. Windows + Print Screen Keys
This combination will automatically save your screenshot.
Step: Click the Windows Key + PrtScn at the same time.
Results: Screenshots are automatically saved to the Pictures/Screenshots directory.
It is perfect for those who frequently take screenshots.
3. Using Snipping Tool (Snip & Sketch)
Windows includes built-in applications for flexible screenshot options.
Select Snipping tool/Snip and Sketch in the Start menu.
Select the type of screenshot you want: Full-screen, window, rectangle, free-form or rectangular.
Save screenshot immediately after capture.
This method allows you to choose the area that you wish to capture.
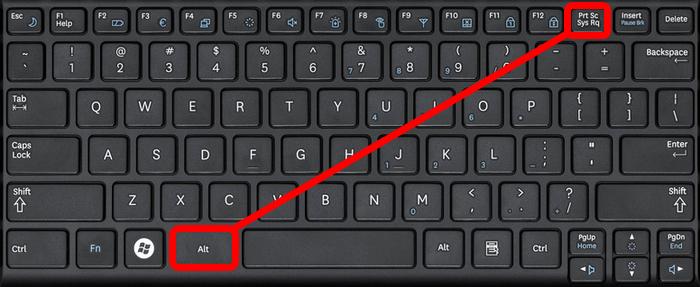
4. Capturing Specific Windows
You may only need a specific window.
Step: Click Alt + PrtSc.
Action: Copy the screenshot into any editor to save.
The background will not be visible in the screenshot.
How To Take A Screenshot On Mac Laptop
There are many different ways to take screenshots on Mac laptops, depending on what you need.
To view the entire screen: Press Command Shift + 3. The screenshot will be saved automatically on your desktop.
Select Part: Press Command Shift + 4 and drag to select the area you want to capture.
Specific window: Press Command Shift + 4 and then Spacebar to select the desired window.
Screenshot toolbar: Press command + shift + 5 to access it. You can capture the entire screen, just the screen or a specific area.
The built-in shortcuts on Mac devices make it easy to take screenshots.
Tips to Improve Screenshots
To avoid losing files, always check the location where you have saved your files.
Highlight key areas using tools such as Paint, Snip & Sketch for Windows or Preview for Mac.
Install apps such as Lightshot or Greenshot for regular use. Both apps allow you to edit, share and save your photos in the cloud.
Specialized apps or extensions are needed to create scrolling videos.
Conclusion
It is easy to take screenshots with a laptop. You can capture your screen using the built-in tools and shortcuts, whether you are on Windows or Mac. It's great for sharing, creating tutorials, and documentation. Using tools such as PrtScn or Mac shortcuts, you can boost your productivity and save time. Sharing visual content is easy with this tool.
Learn this skill now. Screenshots let you share information faster, clearer, and in a more organised way. For more details, call our laptop repair Dubai Experts at 045490505.


