


Get one-stop solutions for protecting your device from viruses, malware, cyber attacks, and online threats. Get comprehensive solutions and guide for all Norton related issues or learn how to download, install, and activate norton.com/setup from Norton customer service team. In order to connect with the technicians, dial the toll-free number of Norton customer service. The team of experts offers 24/7 support and helps you in finding 25-digit alpha-numeric activation product key code for activating it. Or get assistance by visiting official site.
Learn how to find and enter the activation key code by experts and the support team offers assistance 24/7. For more info, visit us.


For securing your device and information from cyber attacks and online threats, download, install, and activate norton.com/setup on your device.
However, Norton Activation product keys are necessary to give you accurate Norton product to you.Thus, without entering the 25 digit activation product key code, your device is not fully protected.
In case, if you are facing any issue while downloading, installing, and activating Norton Setup, dial the toll-free number of Norton customer service and get-in-touch with experts.
The support executives assist you 24/7.
We provide support services for:• Diagnose and repair antivirus application errors.• Run full computer scan.• Fix other issues related to norton.com/setup• 100% Money Back Guarantee.• No Fix No Charges.• Certified Technicians
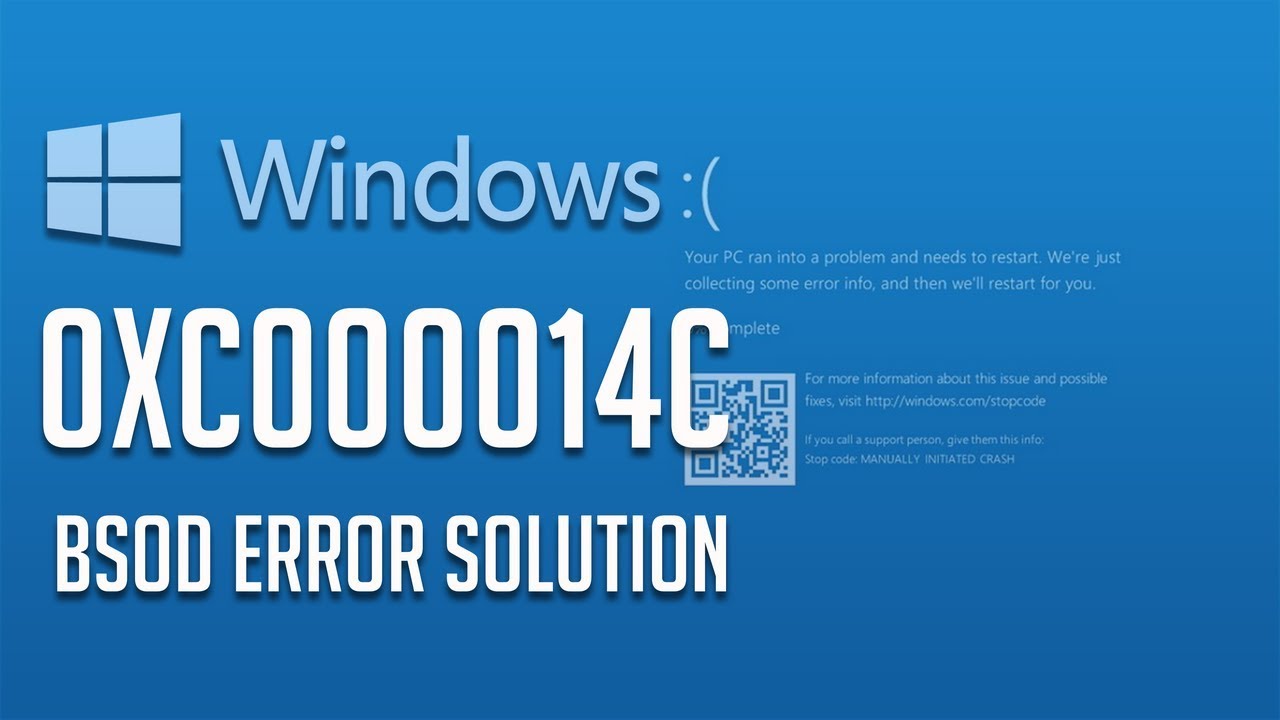
Error Code 0xc000014c is troubling the users a lot nowadays, and hence we have prepared a workaround to resolve it.
There are several reasons behind this error, such as Software problems, firmware, driver, and hardware issues.
Below we have written all the absurd information about this error, including its causes and fix.
Make sure that you read this workaround carefully to get the best results.Using Windows 10 Installation MediaIf you would like to use Windows 10 installation media, then abide by the given steps.Go to the Windows 10 installation media and attach it to your system.Then restart the system.You should hold any button within the installation media.Navigate to currency, language, keyboard/input, and time process and click on the Next option.Thereafter, click on the Repair your computer (NOT Install Windows) and choose the type of Operating System you would like to repair.You have to click on the Troubleshoot option.After that, choose the Advanced option and click on the Startup Repair or Automatic Repair.If the computer identifies the Operating System, choose the version which is recently using on the device.Now, delete DVD bootable media or detach the USB and attempt to boot the computer up.Run Particular Commands and Use Command PromptIf you wish to run particular commands and use Command Prompt, then pursue the given instructions.Go to the Power key and attempt to start the system.You should hold the F8 button constantly at the start and choose the Repair your computer option.Navigate to Command Prompt and form of the pursuing commands (hit the Enter key after everyone:bootrec /fixMBRbootrec /fixBootbootrec /rebuildBUsing an External DeviceIf you would like to use an external device, then abide by the given steps.Take a DVD device or USB drive and insert it into the system.When you are come up to with a message claiming ‘Press any key to boot from DVD or USB, press any key o the keyboard.Then, go to the Install Windows screen should come.Here choose ‘Repair your computer.’Now, the Windows recovery environment will be turned on.Here, select for ‘Choose an option’ then pick the Troubleshoot option.Run an SFC ScanIf you wish to run an SFC scan, then pursue the given instructions.Go to the Windows installation media and link your device with it to the system.Then, if a window comes, select ‘Repair your computer.’You should select the Troubleshoot option and choose Advanced.Thereafter click on the Command Prompt service.You have to enter ‘sfc /scannow’ once the cursor blink and press the Enter button.Now, you should wait to complete the command and restart the system.Confirm the Disk for Probable CorruptionIf you would like to confirm the disk for probable corruption, then abide by the given steps.Link the device which contains the ‘Windows installation media.’Go to the option which says ‘Repair your computer.’Then, choose the Troubleshoot option and select the Advanced option.You should select to perform a Command Prompt service.Enter ‘chkdsk C:/f/x/r’ once the cursor blink.Thereafter, press the Enter button and wait to perform the command.Now, reboot the system.Restore the BSD FilesIf you wish to restore the BSD files, then pursue the given instructions.Navigate to the system and connect the bootable ‘Windows 10 external drive into it.You have to wait for a welcome page to come and go for Next and Repair your computer.After that, choose the Troubleshoot option and proceed with the Advanced options.Thereafter, select the Command Prompt and enter these commands one after the other: bootrec /FixMbr, bootrec/FixBoot, bootrec /ScanOS, bootrec /RebuildBcd.Press the Enter key after every command and wait to complete the process.Now, restart the Windows system.Source url:- https://williamsblogpoint.wordpress.com/2020/01/13/how-to-fix-0xc000014c-bsod-on-windows/Ava Williams is a Norton product expert and has been working in the technology industry since 2002.
As a technical expert, Ava has written technical blogs, manuals, white papers, and reviews for many websites such as norton.com/setup.
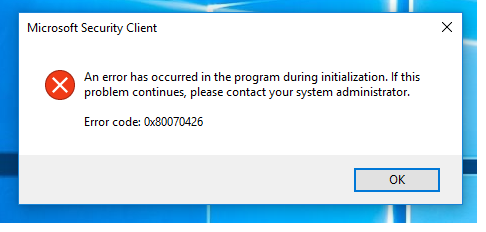
The 0x80070426 error code mostly shows up when the system processes mismatches and initialization issues.
In case Microsoft Essentials used to stay on your device, and you need to update to Windows 10, which provides the security of enhanced Windows Defender, the error could show up.This often happens if the application is not supported by the third-party software you got in your device.
This error can trigger a plethora of other issues in case you ignore it.Fix 1.
Removing Microsoft EssentialsHere is a guide to removing the Microsoft Essentials from your system to fix the 0x80070426 error code:On your system, press the Windows logo + D keys altogether to bring yourself to the desktop screen quickly.
Now press the ALT + CTRL + DELETE Keys at the same time on your computer keyboard.Then head to the Task Manager option to trigger the Windows Task Manager.Look for the option called Windows Defender (Windefend) and then make a right-click on that.Head to End Task.Now head to the start menu by pressing the Windows logo key on your keyboard.Put in the Control Panel and then hit enter.
Uninstall the Windows defender.Fix 2.

Norton Setup is one of the most popular antivirus software package developed by Symantec that gives you complete protection from the harmful attacks of virus and enhance your online security.
If offers a different level of protection to your device through various features and tools and alerts you if found any suspicious activity.
There can be many reasons due to which such a problem occurs and if you are the one who is facing the same difficulty in Norton.Com/Setup Installation then you can reach our professional team of experts who are capable of solving any type of problem in short spans of time.Norton.com/myaccount - 7 Easy Steps to Process Norton Account - TonortonHowever, our professionals have suggested some easy solutions for different login issues, as like:*Internet Connection Issues-It may be possible that your device is unable to get access to the Wi-Fi network or have a poor internetconnection.
In such a situation, just restart your system and make sure that the internet speed is good.Recover your Norton Account-Sometimes, you forget your User Name or Password due to which you are unable to login to your Norton account.
Insuch a case, follow the instructions given below:Ø Open the Norton login page and click on having trouble signing in?Ø Enter your User name and Password and click on the Continue button.Ø A message will be sent to your registered email address.
Click on that link and follow the instructions givenbelow in order to recover to the Norton account.
The technique of deleting blank rows in Microsoft Excel sheet in the quickest way is easy though you must watch out for unintended consequences.Blank rows are useless in most of the Microsoft Excel Sheets.
Though blank rows are not that bad for most of the sheets, they are unnecessary and undesirable, so it is better to get rid of them all.
The good news is that the quick and easy way to delete blank rows from a data range in Microsoft Excel sheet is available.
With the following easy technique, you can remove empty rows, but you must be careful too because it has the potential to destroy data.
Once you select the data range, follow the below steps: Use keyboard and Press “F5.”Now go to Dialog Box, and then tap on “Special.”Tap on Blanks option and then click on “OK.”Now you must select the blank cells like A7: E7 and A10: E10.Now go to the “Home” tab and then click on the “Delete dropdown” available in Cells groups.Now choose “delete cells”.
Now tap OK or to use the shortcut key, press (Ctrl)+ (-).

norton.com/setup – In the contemporary world, your devices are your most trusted pals.
You spend hours using the Internet, and share all your important data on those PCs, Macs, and smartphones.
No wonder they are your best secret-keepers.
But hey, somebody somewhere might be conspiring to access your precious data.
Who knows your device gets hacked tonight?


