


Though VNC is a useful feature when you don’t have your computer near you and have work on it. A VNC enabled system can be accessed and controlled remotely with an internal or external network. If your computer has enabled it, then you can remotely administer it through your network. Probably you do not want your system to be accessed and controlled by someone else. If you have left VNC enabled on your computer, then viewing your data and activities won’t be difficult enough for someone else. Luckily, you can block VNC on your PC whenever you want. Here are the ways:
1. Blocking from the Windows Firewall with Advanced Security
2. Disabling VNC Service
3. Uninstalling VNC program from your system
4. Disconnecting your PC from the Network
Here is how to block VNC in a computer to prevent accessing remotely.
Blocking from the Windows Firewall with Advanced Security
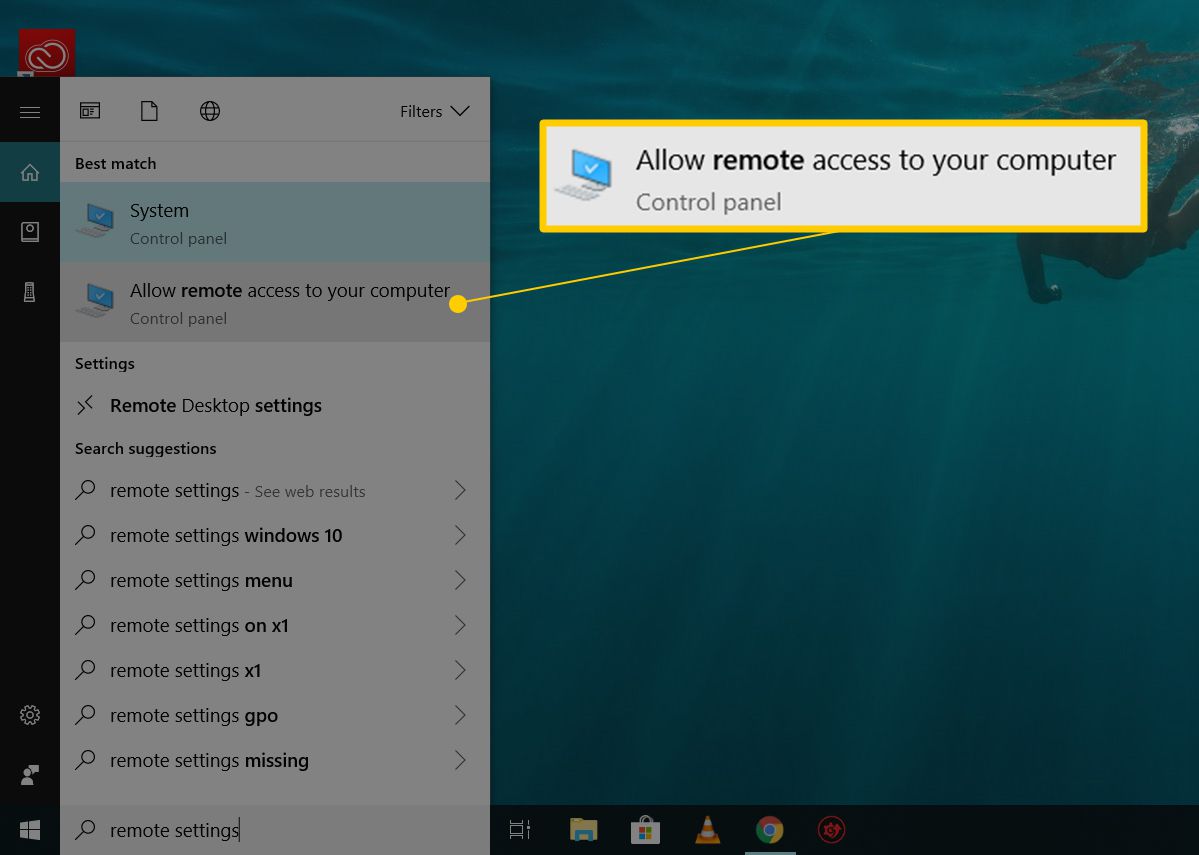
You’ll need to access your computer that has VNC enabled. There is no way to block VNC remotely. Here are the direct steps for you, go ahead and perform them on your computer.
1. Start your PC enabled with VNC.
2. Now, go to the ‘Control Panel’.
3. And open ‘System and Security’ settings. You can also search and open System and Security in the control panel by using the Search bar of Start menu.
4. Then select ‘Windows Firewall’.
5. Now, click on the ‘Advanced Settings’ in the left column of the Windows Firewall window.
6. Then click on ‘Inbound Rules’.
7. Under Actions column, click ‘New Rule’.
8. Then choose ‘Ports’ for “What type of rule would you like to create?”
9. Click ‘Next’.
10. Then click on ‘TCP’.
11. Click the box of the ‘Specific local ports’ and enter the port number your VNC is using. The default value is 5800 and 5900.
12. Click ‘Next’.
13. Then select ‘Block the connection’ option.
14. Again click ‘Next’ to finish.
Disabling VNC Service
For disabling VNC service, you’ll need to go into the “System 32” folder in the drive your operating system is installed.
1. Open the drive (usually Local Disk C) in which OS (Windows) is installed in your computer.
2. Then open the ‘Windows’ folder.
3. Open ‘System 32’ folder.
4. Now, find the ‘Services.msc’ file and open it.
5. Right-click on the ‘VNC Server’ and choose ‘Properties’.
6. In the General section, click the ‘Startup type:’ dropdown button.
7. And choose ‘Disabled’.
8. Click ‘OK’ to close.
Uninstalling VNC program from your system
The un-installation process for VNC is also the same as other applications.
1. Go to ‘Programs and Features’ settings in the Control Panel.
2. Select the ‘VNC Server’ and ‘VNC Viewer’.
3. And click ‘Uninstall’.
Disconnecting your PC from the Network
1. Remove the connected network cable from your PC.
2. Then, go to ‘Network Settings’ in Control Panel.
3. Right-click on the network connection and then click ‘Disable’.
Emily Williams is a self-professed security expert; she has been making the people aware of the security threats. Her passion is to write about Cyber security, cryptography, malware, social engineering, internet and new media. She writes for Norton security products at norton.com/setup.
Source: http://asknorton.com/blog/how-to-block-vnc-in-a-computer-to-prevent-remote-access/


McAfee Error Product Rejected The Update Request Error is a code that is caused by misconfigured system files in your windows operating system, in one way or another.
If you have downloaded McAfee products via mcafee.com/activate and while making an update to your product you receive a message saying “McAfee Error Product Rejected The Update Request errors” then it is strongly recommended to download McAfee Error Product Rejected The Update Request Repair Tool.
This is a common error code format used by windows and other windows compatible software as well as driver vendors.This code is used by the vendor to identify the error which occurred at the time of the update.
In some cases, the error may have more parameters in McAfee Error Product Rejected The Update Request format and in some cases, it may not.
Visit௹☞ McAfee.com/Activate » office setup » Norton.com/setup » Telstra Webmail » Plumbers Near Me » office.com/setup » norton account ..What causes McAfee Error Product Rejected The Update Request error?The McAfee Error Product Rejected The Update Request error is probably caused by windows system files damage.
It can also be caused if your computer has recovered from a virus, adware, and spyware attack or by an improper shutdown of the computer.

Norton Setup Highly popular among the PC users, the Norton antivirus software has been eliminating malware, viruses and other kinds of online and offline threats from affecting the performance of a computer for years.
Norton, being a security solution providing company has created various software’s that are known for providing much-needed protection in terms of data protection, database security, network security, web security and much more.
Norton setup - Get started with Norton by downloading the setup and installing it on the device.
Enter the unique 25-character alphanumeric product key for activation.
Check your subscription at norton.com/setup More related Google’s New Gallery Go is an Offline Google Photos AlternativeTop 5 Free VPN Services Available in 2019How to Turn Off Automatic Image Download for Email on OutlookHow to Install Beta Version of MacOS Catalina on a Mac

I really happy found this website eventually.
Really informative and inoperative, Thanks for the post and effort!
Please keep sharing more such blog.norton.com/setupnorton.com/setupmcafee.com/activatekaspersky activation codepogo not loadingroadrunner emailaol mail password recovery