


Whenever you take pictures from your smartphone, you might be wondering that this picture could have been better. Somehow, We all want to upload the best pictures on our social media to increase our followers. When you scroll through your Instagram or Facebook, you might have noticed that the accounts of your favorite celebrities upload more attractive and bright pictures than you do.
Read more - https://my-blog-search.com/edit-instagram-photos-like-a-pro-using-these-amazing-snapseed-tricks/


Do you want to print your Instagram photos with your mobile printer?
If yes, then you have come to the right place.
Just read on and learn how to use your mobile printer for printing Instagram pictures.Source : http://hbnorton.com/how-to-print-instagram-photos-from-a-mobile-printer/What kind of photos can you print on Instagram and how large can you print?You should know that you can only print your images from Instagram.
If you want to print a large size image, then you have to sacrifice the image quality.How to Print Instagram Images from a Printer?It is good to have a hard copy of your favorite shots on Instagram.
If you have a mobile printer or a regular printer, you can easily print your images by following some simple steps.More To ReadHow to Manage your Local and Cloud Files with ES File Explorer AppHow to Activate RCS in Android Messaging for iMessage-Like ExperienceHow to Turn Off Automatic Image Download for Email on OutlookHow to Install Beta Version of MacOS Catalina on a MacTo print a photo from Instagram, you will have to download or save the image first.
There are several tools available that help you to bypass Instagram restrictions and let you save your favorite photos.

The company has rolled out a newly customized layout that users can get on their home screen.
In the navigation bar at the bottom, Instagram has swapped ‘activity’ and ‘upload’ with ‘Reels’ and ‘Shop’ tabs respectively.Reels Tab is Now Front and CenterInstagram, in its recently redesigned version of the app, has moved the upload and activity tabs to the upper-right corner of the home screen.
Instagram has directed its attention towards competing with other Reels-like competitors, and this is the reason why it has managed to place ‘Reels’ on the front and the center.Previously, Instagram placed ‘Reels’ in the navigation bar in place of the ‘Explore’ tab, but then the changes were taken back after a while, and now the ‘Explore’ tab has regained its place which is pretty impressive.
But now, Instagram has come up with some new customizations.Some of you might be thinking of why bringing ‘Reels’ to the front is so important for Instagram.
Well, as far as we have concluded out, Instagram wants to increase the viewership of short videos on its platform, and it has also stated this through its recent blog post.
The blog post by Instagram states that Instagram wants Reels to become a ‘one of its kind’ stage where users can easily share their creativity with others and get connected with the right audience.Placing the upload tab always showed the app’s simplicity for uploading the content.
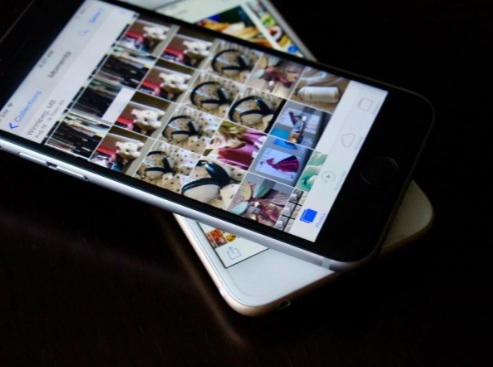
If you want to make your images and video well organized, then the Photos application will help you place them into smart groups which depend on the time and location.
Moments is the smaller group, Collections is the larger groups, and after that, Years is the largest group.
If you want to navigate photos on your iPhone and iPad, then follow the instructions mentioned below.Steps to Navigate Between Moments, Collections and Years Smart Groups• Open the Photos application.• You will get this app on the Home screen of the iPhone or iPad.• Press on the back option.• It is located on the upper left-hand side of the display.• Press on the photo or video thumbnail to navigate the photos to the small group.• Some of the iPhone applications allow you to go back by sliding from the left-hand side.• This is a gesture which is not available in the Photos app.Steps to Navigate Between Years, Months and Days in Your iOS 13• Open the Photos application.• It is given on the iPhone or iPad with iOS 13.• Press on the Photos option in case you have not open it yet.• Press on the timeline view option which you wish to get.• The timeline options are “Years, Months, Days and All Photos.”• In case you begin at Years, press on the year and it will change into the Months.• Pressing on the picture will change it into the All Photos view.• You can go back to the view by pressing on the Years, Months, or Days located in the textbox over the Photos options.Steps for Viewing Picture and Video Locations on Your Map• Open the Photos application.• It is located on the home screen of the iPhone and iPad.• Press on the location name given over the photos group.• Slide up for searching for the map.Steps for Viewing Picture and Video Locations on Your iOS 13• Open the Photos app on the iPhone or iPad with iOS 13.• Ensure that the Photos option is already opened on the screen.• On that window, you can change between Years, Months, Days, and All Photos.• In the Months or Days option, press on the three dots symbol.• You will get this symbol on the collection thumbnail.• Press on the Show Map option.Steps to Navigate Between Picture or Video in Years or Collections• Go to the Photos application.• You will get this on the home screen.• Keep pressing on the Year or Collection view display.• Press and swipe the finger on the backward direction and above the collection.• It will enlarge the thumbnail.• Click on the photo which you wish to see.• In case you have the pre-3D Touch iPhone Model, press on the picture.Davis Johnson is a self-professed security expert; she has been making the people aware of the security threats.
Her passion is to write about Cybersecurity, cryptography, malware, social engineering, internet and new media.
She writes for Norton security products at norton.com/setup.Source: http://norton-us.com/how-to-navigate-photos-on-your-iphone-and-ipad/

Instagram is an American social networking app and is completely owned by Facebook.
It’s one of the most popular social media platforms that allow the users to upload their desired images, video, captions, clips, audio, etc.
It is well organized with tags and mapping information.
Posts can be easily shared either with the public or with pre-authenticated followers.
Users are free to browse other content and can tag the desired person#VerifiedInstagram #instagram Read Full Article Here - Get Verified on Instagram
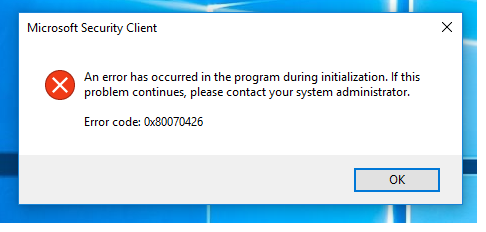
The 0x80070426 error code mostly shows up when the system processes mismatches and initialization issues.
In case Microsoft Essentials used to stay on your device, and you need to update to Windows 10, which provides the security of enhanced Windows Defender, the error could show up.This often happens if the application is not supported by the third-party software you got in your device.
This error can trigger a plethora of other issues in case you ignore it.Fix 1.
Removing Microsoft EssentialsHere is a guide to removing the Microsoft Essentials from your system to fix the 0x80070426 error code:On your system, press the Windows logo + D keys altogether to bring yourself to the desktop screen quickly.
Now press the ALT + CTRL + DELETE Keys at the same time on your computer keyboard.Then head to the Task Manager option to trigger the Windows Task Manager.Look for the option called Windows Defender (Windefend) and then make a right-click on that.Head to End Task.Now head to the start menu by pressing the Windows logo key on your keyboard.Put in the Control Panel and then hit enter.
Uninstall the Windows defender.Fix 2.
Norton setup downloaded from the norton.com/setup page helps to work and explore the ever-changing digital landscape.
Norton makes it as easy to protect and manage your devices while installing an application on your smartphone.