


Readability in a WordPress posts and other web pages is one of the top priorities of many marketers, bloggers, SEO specialists, and content writers.
Presenting information in a table allows them to make content readable and engaging, increasing visitor’s dwell time.
Tables can leave visitors with a good impression of your company. If they see your web pages look organized and professional, they would believe in you more, resulting in a constant lead acquisition and high client conversion.
Below, we have gathered some tips and tricks to help you add tables in WordPress posts and pages even without HTML required.
WordPress Block Editor
One of the easiest ways to add tables in posts or pages is to use the WordPress block editor, which is a bit similar to the WYSIWYG HTML editor.
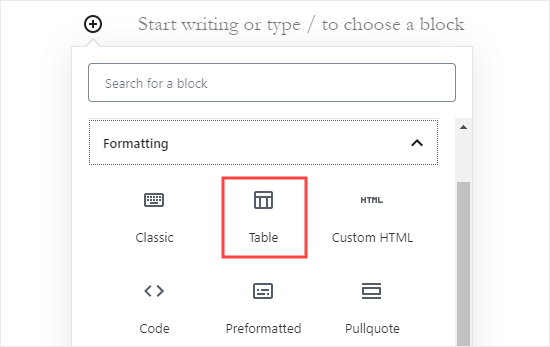
After creating a new post, go to the default content editor. Once you are there, add a new block by clicking the plus symbol. Then, choose Table, which is usually under the Formatting section. Alternatively, you can type Table into the search bar.
After that, you will be prompted to select how many rows and columns you need. Also, you can add or even remove columns and rows if the need arises.
Once you have added tables, you can type in the information you need. While tables can automatically resize, you could have them fixed width.
By default, every text in the column is aligned to the left. But don’t worry! You could modify that. All you have to do is tap the Change Column Alignment button.
Before publishing, make sure to preview your page. Examine if the table appears as planned. Change what needs to be tweaked. Or improve some parts that will market your brand efficiently.
TablePress Plugin
Aside from the default WordPress block editor, a TablePress Plugin can also help you add tables in most of your WordPress posts.
Experts consider TablePress the best WordPress tables plugin today. It is tailored to create and even manage tables for free.
If you have spent hundreds of bucks on a WordPress tables plugin, TablePress can help you save some cash. Whether you are on a budget or want to make your page look credible, TablePress is what you are looking for.
After installing and activating the TablePress plugin, you will see a TablePress menu in the CMS dashboard.
Then, click TablePress and select Add New to create a table. Be sure to customize a name for your table.
Next, think about how many columns and rows you will use. Like the default WordPress block editor, you can either add or even remove rows and columns.
After adding the name, columns, and rows for your table, your job does not stop there. It is time to click the Add Table button.
Then, you will see a screen where you can find and add information to your table.
To edit and add data in your table, just type the details into every cell. That’s it! There’s no complicated procedure to follow.
Below the Table Content, there are many advanced options you cannot afford to miss. Some of the features below this area include duplicating, adding, and removing rows.
After editing rows, where to add a header and footer row? It is in the Table Options. Like the Table Content, Table Options is user-friendly with no prior experience required.
Once you are done, do not forget to click Save.
Now, you can finally add tables to your WordPress page without HTML needed. If you still find the process difficult, there are specialists you can hire!


Lathiya Solutions has a team of passionate, motivated, and diligent Wordpress Developers who are excited to work for your Wordpress related needs.
We have offered Wordpress related design, development, support & services since 2009.
We worked on thousands of Wordpress base sites for clients across the world.
That's why we are the leading Wordpress development company all around the world.Our Best Of Services:Wordpress Design and DevelopmentWordpress Theme & Plugin DevelopmentTheme & Plugin CustomizationCustom functionality integrationPSD to Wordpress ThemeHTML to Wordpress ThemeMulti-Language Website using WPMLWordpress Blog DevelopmentE-Commerce website with Wordpress WooCommerceSecurity for Wordpress WebsiteOther CMS to Wordpress MigrationWebsite migration / Server shifting3rd Party Service integration in WebsiteWordpress Maintenance & Support
WordPress is a free and open-source content management system written in PHP and it is paired with MySQL and Maria DB database.
WordPress is the simplest and most popular way to create a website.
WordPress website is a website that uses WordPress as its Content Management System (CMS).
WordPress potents both the backend and frontend of the website.
Do you want to develop a website using WordPress?
you can contact Nevina Infotech to hire a WordPress developer that can guide you to develop your app with the help of its best and dedicated team of developers.
Unable to login into WordPress admin dashboard?
Contact us now and we'll fix WordPress Admin & WP-Admin Access Failure error for you.
Get help with WordPress issues.