Presently that all of us are all the more firmly appended to our PCs with an ever increasing number of utilizations being PC based,
USB headset have ascended in significance and handiness.
Headset With Mic We've seen various applications ascend in their utilization over the previous year. A portion of these include:
Zoom for video conferencing gatherings
Microsoft Groups
Google Meet
Cisco Chatter
What's more, some more
Wireless USB Headset One thing these applications share for all intents and purpose is they're PC based, and to take an interest utilizing them, you need a receiver and speaker utilized with the PC. Given the sound quality deficiencies in utilizing what accompanies your PC, you need to utilize a sound gadget that brings better solid. In particular, you need to utilize a decent quality USB headset
USB Headset With Mic
Best USB Headset for Work In light of that, what are 5 acceptable ones that you can put on your rundown to consider? All things considered, there are various makers of headsets, like Poly (some time ago Plantronics), Jabra, Logitech, Bose, EPOS/Sennheiser, Yealink, Find, and others. Also, to add somewhat more intricacy to the cycle, every one of these brands offers a few models. That can make for some disarray in attempting to settle on a USB headset.
List of chapters
In this blog, I'll give you 5 great USB headsets that you can consider.
On the off chance that you'd prefer to add a couple to this rundown, that works as well. Yet, these are 5 that are known to be of acceptable quality, legitimate brand, and elements and sound quality known to be awesome.
As a commentary, these 5 USB headsets aren't being introduced in positioning request. All things being equal, they're being introduced as five USB headsets you ought to consider.
The vast majority of the models contained in the blog will be remote models. I will give data on wired models too. I'm displaying remote USB headsets as the focal point since insights show that remote headsets are more well known over wired models.
More individuals basically need the capacity to talk remotely, and they need the opportunity to move around their workspace without a string. Finally, remote USB headsets offer the capacity to reply and end summons when from the work area. Hence and then some, remote USB headsets are the more famous decision.
The idea of certain individuals' work however doesn't fit the requirement for a remote USB headset. In those cases, a wired USB headset would be entirely fine. Hence, I'm including two or three wired models for you to consider that I believe merit considering.
So, I'll separate things into two gatherings adding up to 5 USB headsets
Remote USB headsets – 3
Wired USB headsets – 2
We should get everything rolling!
Remote USB headsets

The following are three extremely pleasant remote USB headsets that truly should be on your short rundown. What's more, as I referenced prior, these aren't being given in any positioning or estimating request.
Presently that we are in general more firmly joined to our PCs with an ever increasing number of utilizations being PC based, usb headsets have ascended in significance and value.
We've seen various applications ascend in their utilization over the previous year. A portion of these include:
Zoom for video conferencing gatherings
Microsoft Groups
Google Meet
Cisco Chatter
What's more, some more
One thing these applications share for all intents and purpose is they're PC based, and to take an interest utilizing them, you need a receiver and speaker utilized with the PC. Given the sound quality deficiencies in utilizing what accompanies your PC, you need to utilize a sound gadget that brings better solid. In particular, you need to utilize a decent quality USB headset.
In light of that, what are 5 acceptable ones that you can put on your rundown to consider? All things considered, there are various producers of headsets, like Poly (in the past Plantronics), Jabra, Logitech, Bose, EPOS/Sennheiser, Yealink, Find, and others. What's more, to add somewhat more intricacy to the interaction, every one of these brands offer a few models. That can make for some disarray in attempting to settle on a USB headset.
In this blog, I'll give you 5 great USB headsets that you can consider.
On the off chance that you'd prefer to add a couple to this rundown, that works as well. However, these are 5 that are known to be of acceptable quality, legitimate brand, and elements and sound quality known to be awesome.
As a reference, these 5 USB headsets aren't being introduced in a positioning request. All things being equal, they're being introduced as five USB headsets you ought to consider.
A large portion of the models contained in the blog will be remote models. I will give data on wired models too. I'm displaying remote USB headsets as the highlight since insights show that remote headsets are more famous over wired models.
More individuals essentially need the capacity to talk remotely, and they need the opportunity to move around their workspace without a rope. In conclusion, remote USB headsets offer the capacity to reply and end summons when from the work area. Consequently and that's only the tip of the iceberg, remote USB headsets are the more well known decision.
The idea of certain individuals' work however doesn't fit the requirement for a remote USB headset. In those cases, a wired USB headset would be totally fine. Consequently I'm including several wired models for you to consider that I believe merit considering.
So, I'll separate things into two gatherings totalling 5 USB headsets
Remote USB headsets – 3
Wired USB headsets – 2
We should get everything rolling!
Remote USB headsets
The following are three exceptionally decent remote USB headsets that truly should be on your short rundown. Also, as I referenced prior, these aren't being given in any positioning or valuing request.
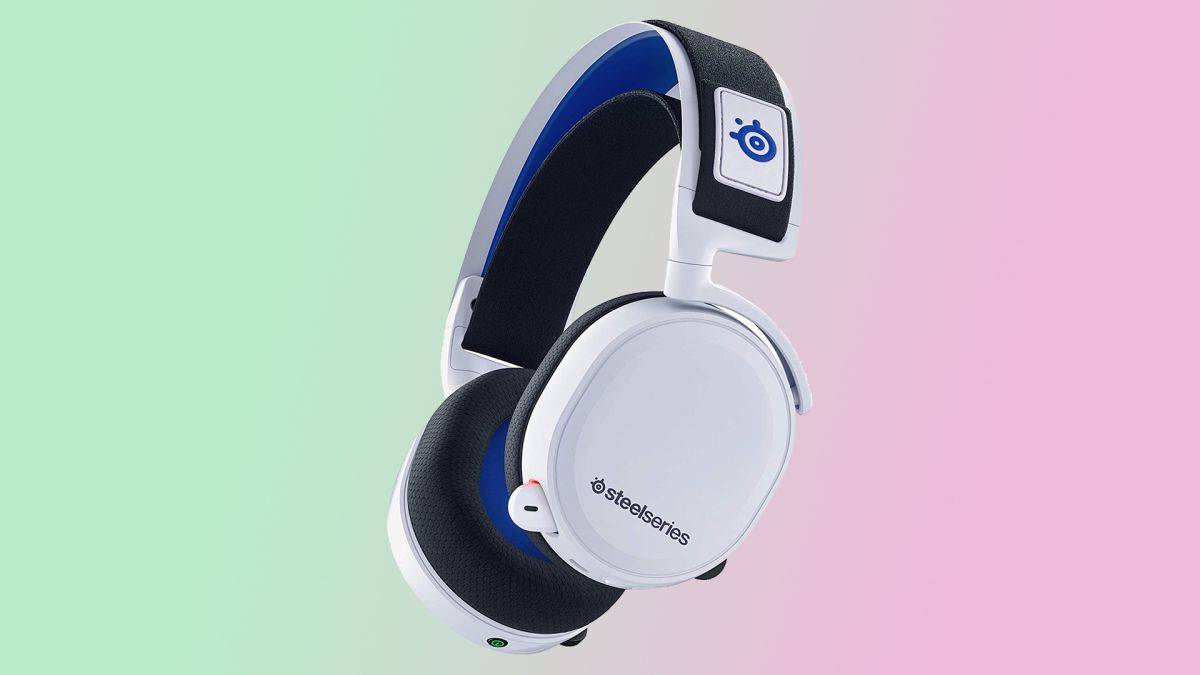
Poly Explorer Center 2 UC – MSRP $349.95
There's a great deal to like in this new form of the first Explorer Concentration. Poly has fused some new provisions into this model, and in all cases, further developed it making it a superior headset.
The following are a couple of things that make this a model deserving of being on this rundown.
Dynamic Clamor Scratch-off
Clamor is something that irritates us all when we're attempting to focus on our work. Truth be told, commotion itself has been observed to be the main source of usefulness misfortune in business. It bodes well to design innovation that is intended to kill diverting commotion into a headset. Poly did only that when they made the Explorer Center 2 UC.
One illustration of this driving innovation is Dynamic Commotion Abrogation, or ANC for short. This is an electronic element that is intended to discharge a countermeasure sound to upset approaching, diverting sound. When initiated, you, the individual wearing the headset, hears less, in the event that anything at all from your current circumstance. This liberates you to remain fixed on your work and not be occupied by the commotions going on around you.
Commotion Dropping amplifier with Acoustic Fence Innovation
One more illustration of commotion killing innovation that Poly has consolidated into the Explorer Center 2 UC is a clamor dropping mouthpiece that is intended to decrease the measure of foundation clamor your guests hear.
Poly made that one stride further by fusing what they call Acoustic Fence Innovation. This is a more significant level of clamor scratch-off, and in view of our testing, the innovation manages job.
The best two models we test incorporate the Explorer Center 2 UC and the Yealink remote models that have their variant of this which they call Acoustic Safeguard Innovation. Both are acceptable, however we feel that the Yealink plays out somewhat better in dispensing with undesirable commotion.
Brilliant Sensors
Brilliant sensors are standard on the Explorer Center 2 UC. At the point when you take the headset off, it knows to quiet the receiver naturally. When you set the headset back on, it will naturally unmute the amplifier.
Similarly, in case you're paying attention to music and you remove the headset, it will stop your music. Putting the headset back on will make the music continue. Regardless of whether you begin talking when the receiver has been quieted, it makes the headset tell you your mic is on quiet. This assists with making this headset instinctive as well as advantageous also.
Network to PCs and cell phones
The Poly Explorer Center 2 UC interfaces with PCs by means of the included BT700 USB dongle/connector, just as to cell phones through Bluetooth network. Today, these are the things that we utilize most, and the Center 2 UC will keep pace as you move from one gadget to another.
Open Mic Button
However you might be secured in your work, you might figure out a period where you need to hear somebody, or something around you. The Center 2 UC has an open mic button that permits you to hear depending on the situation. Helpful and valuable.
A battery that will keep you talking
On the off chance that you settle on a ton of decisions, the Center 2 UC conveys as long as 19 hours of talk time if the ANC highlight is off, and 16 hours in case it's on. On the off chance that you pay attention to a great deal of music, it furnishes you with as long as 40 hours of listening time with ANC off, and as long as 24 hours if on. Add to that the
battery requires just 2 hours to get a full charge. Regardless of whether you neglect to re-energize the battery, the Center 2 UC accompanies a miniature USB link that permits you to plug the headset into a USB port. You can utilize it as a wired headset while the battery charges. Relatively few remote headsets have that element, and indeed, it is important in genuine circumstances.
Solace In addition to
The Center 2 UC is an extremely lightweight and agreeable headset. On the off chance that you don't really accept that me on this, just put one on, and you'll rapidly see what I'm discussing. The actual headset doesn't gauge too much for a binaural headset. It weighs 175 grams, or not exactly a half pound. The lightweight is praised by really delicate, punctured ear pads and
a headband cushion that is suspended so there's no hard metal or plastic sitting on the highest point of your head. This is an extraordinary plan, and unquestionably, assists with making this a truly agreeable headset that you can wear for broadened timeframes.
Jabra Evolve2 85 – MSRP $449.00 or $