


Download and Install SQL Server 2019 Standard Edition
Download SQL Server 2019 Standard
You can download SQL Server 2019 Develop Edition or Express Edtiion from https://www.microsoft.com/en-us/sql-server/sql-server-downloads
Then we will activate it with Standard edition key to convert it to Standard Edition !
Once you have the files downloaded, we can begin the installation process.
Install SQL Server 2019
We'll walk through each of the steps of installing SQL Server 2019 Standard Edition on Windows Server 2019 via the GUI.
Windows Directory
To start the install, double click on setup.exe and the first screen will open
SQL Server Installation Center
Choose 'Installation' from the list on the left side to go to the next screen
Installation
Choose 'New SQL Server stand-alone installation or add features to an existing installation' from the list on the right side
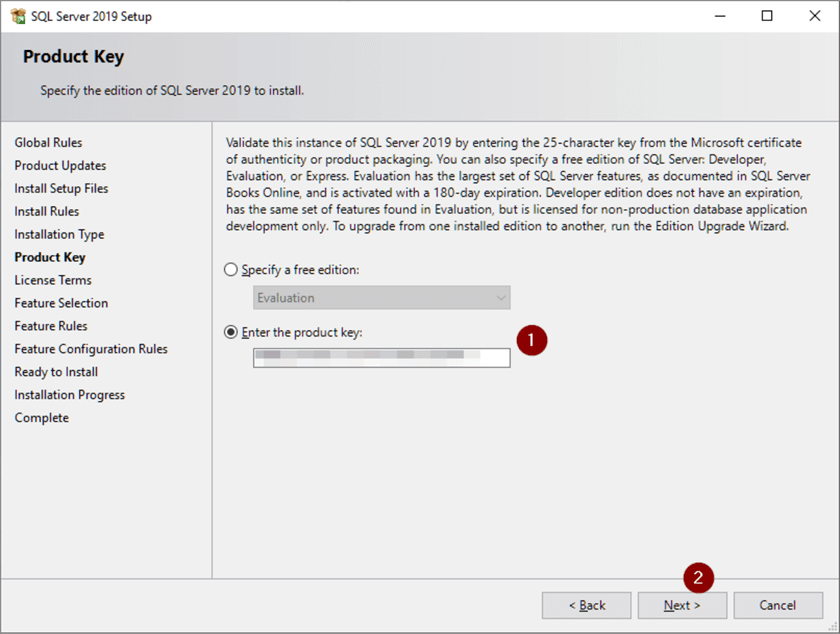
Product Key Enter SQL Server 2019 product key or use the free edition, Then Select"Next", You can get a SQL Server 2019 Standard Product Key on keyingo.com
License Terms
Check "I accept the license terms and Privacy Statement", then select"Next"
Microsoft Update
Check 'Use Microsoft Update to check for updates' if you want to automatically check, otherwise leave unchecke, then select"Next"
Install Rules
If there are any issues, click on Warning to get more information. Below the Warning provides a link to what ports need to be open if the Windows Firewall service is running on the machine that you're installing the SQL Server on, then select"Next"
Feature Selection
Check off 'Database Engine Services, and it is better to Change drives from the default of C:\ otherwise you'll end up installing everything on C:\, then select"Next"
Instance Configuration
Leave 'Default instance' radio button selected to install as the primary instance, then select"Next"
Server Configuration
1. Enter Windows Active Directory service account names you want to run the services as
2. Set SQL Server SQL Agent and SQL Server Database Engine Startup Type to Automatic to avoid the services not starting on a reboot
3. Check on 'Grant Perform Volume Maintenance Task privilege to SQL Server Engine Service' - Instant File Initialization (IFI) speeds up file writes by reclaiming disk space without filling that space with zeros – further information on IFI can be found here: Database Instant File Initialization, here: Check SQL Server Instant File Initialization for all Servers and here: Enable SQL Server Instant File Initialization for Time Saving
4. Next
Database Engine Configuration
1. Leave the 'Windows authentication mode' radio button checked unless you're sure you need SQL Authentication logins, otherwise select 'Mixed Mode' and enter and confirm strong password for the sa login – if in doubt, changing to 'Mixed Mode' is easily done after the install.
2.'Add Current User' to make the current Windows account a SQL Server Administrator – Use 'Add…' to add additional logins to the sysadmin security group judiciously as anyone in this group has full rights over the SQL Server and this should not be granted without thought
3. Click 'Data Directories' tab
Data and Backup Directories
1. Configure your database and backup directories – ideally these are all on separate drives
2. Click TempDB tab
TempDB Configuration
1. User defined database file sizes are somewhat dependent on workload and as in previous steps we're installing this on a laptop, but we would normally want Tempdb data and log files on their own volume.
2. Verify 'Number of files' = number of CPU cores in machine up to 8
3. Click MaxDOP tab
MAXDOP Configuration
1. Verify 'Maximum degree of parallelism (MaxDOP)' = number of CPU cores in machine
2. Click Memory tab
Memory Configuration
1. Select 'Recommended' radio button
2. The machine we're installing this on only has 5,120 MB (5 GB) of memory and the general rule of thumb is to leave 4096 MB (4 GB) for the operating system – 5,120 MB – 4,096 MB = 1,024 MB so we enter 1024 in the 'Max Server Memory (MB)' box – SQL Server will try to get as much memory as it thinks it needs and setting this limit on it ensures the operating system won't starve for memory
3. Check 'Click here to accept the recommended memory configurations for the SQL Server Database Engine' box
4. Next
Ready to Install
Verify configuration and Install
Complete
Click link to open setup log file and review for any issues and then select "Close"


