


Users who create invoices when using QuickBooks payments may notice some missing data and may consequently experience various connection problems in QuickBooks Payments. This issue requires users to adjust the settings related to the internet connection. Follow this blog all the way till the end to find potential fixes for Internet Connection Problems in QuickBooks Payments.
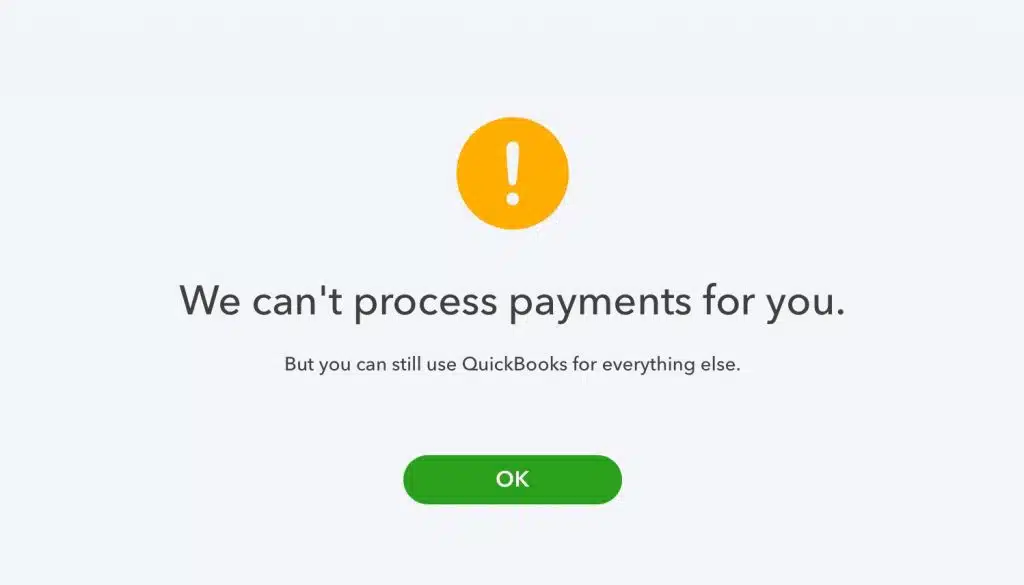
You might get the following error message on your computer screen:
What causes Internet connection problems in QuickBooks Payments?
Internet connection problems in QuickBooks Payments can occur due to various reasons, including:
- QuickBooks Payments requires a stable and consistent internet connection to process payments. If the network connectivity is weak or interrupted, it can cause internet connection problems in QuickBooks Payments.
- The firewall or security settings of your computer or network may be blocking QuickBooks Payments from accessing the internet.
- If QuickBooks is not updated to the latest version.
- Incorrect settings within QuickBooks or your computer's network settings can cause internet connection errors.
Solutions for tackling internet connection problems in QuickBooks Payments
To troubleshoot these issues, you can try the following solutions:
Solution 1: Delete System junk
- Run Internet Explorer. The same can be accessed from the Start menu.
- Go to the Tools tab.
- Click on Internet Options.
- Hit on the General tab.
- Navigate to the Browsing history menu, and then select Delete.
- Make sure the boxes next to Saved Passwords, Cookies Website Data, Temporary Internet files, and other choices are checked.
- Click on Delete.
- Restart QuickBooks and try to process the payment again.
Solution 2: Alter Compatibility View settings.
- Run Internet Explorer.
- Head to Tools.
- Choose the Compatibility View Settings.
- Click on Add this website.
- Add "https://*.intuit.com" and then hit on Add.
- Also, include the websites "https://*.intuit.net" and "https://*.quickbooks.com".
- After that, close the Window.
- Open QuickBooks and process the payment.
Solution 3: Include Intuit as a trusted website
- Open QuickBooks Desktop.
- Next, go to Help.
- Click on Internet Connection Setup.
- Opt for Use my computer's Internet connection settings.
- Click on Next.
- Got to the Advanced Connection Settings.
- Click on Security.
- Head to the trustworthy sites option.
- Add the below given sites in the Sites option:
- ‘https://*.intuit.com’
- ‘https://*.intuit.net’
- ‘https://*.quickbooks.com’
- Click on Close.
- Opt for the Custom level option. Herein, click on Miscellaneous.
- Hit the Enable button corresponding to Access data sources across domains option.
- Hit on Apply.
- Click on Ok.
Solution 4: Alter cookies settings
- Run QuickBooks.
- In the Help tab, click on the Internet Connection Setup.
- Make a move to the Advanced Connection Setup.
- Select the Privacy option.
- Click on "Advanced" tab.
- Click on Disable automatic cookie management option.
- Next, check for the First Party and Third-Party cookies options.
- Click on the Accept option for both the selections.
- Click on the always permit option.
- Finally, hit on Ok.
Solution 5: Change ActiveX Control
- Go to the Security tab.
- Head to the Internet option.
- Choose the Custom Security level.
- Find the ActiveX Controls and related plugins.
- Select the following option to activate:
- Binary and script behaviors
- Download ActiveX Controls
- Run ActiveX controls plugins
- Script ActiveX controls marked safe for scripting
- Click on Ok.
Solution 6: Reset the Custom Level in Security tab.
- Click on Security.
- Head to the Trusted Sites section.
- Choose the Custom level option in the security level option.
- Hit on Reset.
- After that, click on Yes.
- Finally, press the Ok button.
Solution 7: Enable TLS 1.2
- Run QuickBooks.
- Go to the Help tab.
- Navigate to the Internet Connection Setup.
- Further, head to Advanced Connection Setup.
- Uncheck the box next to the option to not store encrypted pages to disk.
- Click on Use TLS 1.2.
- Hit on Ok.
Solution 8: Turn off pop-up blocker
- To disable the pop-up blocker, head to the Advanced Connection Setup.
- Then, go to the Privacy tab.
- Click on Privacy.
- Remove the checkmark corresponding to the Turn on pop-up blocker option.
- Hit on OK tab.
Sum Up!
Through this post, we have unraveled multiple solutions that can help users fix internet connection problems in QuickBooks Payments. If you need any help from our experts, just reach out to our QuickBooks error support team by calling us at 1-800-761-1787.


When watching your favorite movie, show, or reading daily news over the internet and suddenly seeing ‘no Internet connection’ issue on your device due to hardware or Windows 10 OS problems, can be quite annoying.
So, if you would like to fix this issue, then here are some directions given below.Check the Wireless Network AdapterYou should follow the directions given below:First of all, you will have to look at whether the desktop or laptop device has enabled the wireless network adapter.Thereafter, attempt to connect to any available wireless network.Turn on WPS on the RouterYou should follow the directions given below:First of all, power on the Windows 10 system.After that, hover the over to the top right side of the window.You should click on the feature of Settings.Go to the icon of the Network and click on it.Navigate to the network you would like to link the device to.You have to select the button of ConnectLater, hit the WPS button on the router.Updating the Network Adapter DriverYou should follow the directions given below:Navigate to the Windows icon on your Windows 10 system.Thereafter, select the feature of the Control Panel.You should reach the Search section, input ‘adapter’ into it, and select the OK button.Beneath the feature of ‘Network and sharing center,’ you are required to select the ‘View network connections’ option.You will require to locate the network and right-click on it.Go to the Properties option you have on the adapter.You should select the Driver section shown on the top of the screen of Properties.Later, choose the Update driver option.Now, restart the Windows 10 system.Using the Network TroubleshooterYou should follow the directions given below:Hold the Windows key to open the Start menu on your Windows 10.Then select the feature of the Control Panel.Go to the Search section and insert ‘troubleshooter’ into it.Hit the Enter key.You should click on the Troubleshooting button from the results.Navigate to the ‘View all’ link.You have to choose the feature of the Network Adapter.Once the troubleshooter starts, allow it to perform a diagnosis.Once you finish the troubleshooter process, you are required to close each screen you have launched and restart the system.Now, attempt to connect to the internet.In case the solutions mentioned above do not help, then try using a different, updated web browser.I’m Anny.
I’m a social media manager living in USA.
I am a fan of technology, design, and music.
I’m also interested in fitness and movies.
You can attend my event with a click on the button above.Source: How to Fix Internet Connection Errors on Windows 10?

