


Customizing a dog tag with your furry friend’s name is not only a fun way to add a personal touch to their collar but also an important step in ensuring their safety. In this comprehensive guide, we’ll take you through the process to custom dog tag step by step, from choosing the right tag to designing it to suit your dog’s style.
Step 1: Choose the Right Custom Dog Tag
The first step in customizing a dog tag is choosing the right tag for your pet. There are several factors to consider when selecting a tag, including:
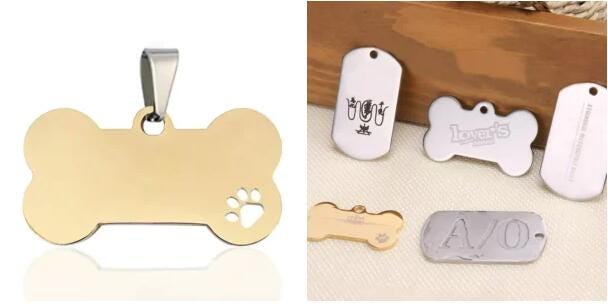
Material: Common materials for dog tags include stainless steel, aluminum, and brass. Stainless steel is durable and resistant to rust, while aluminum is lightweight and easy to customize. Brass is another durable option that develops a unique patina over time.
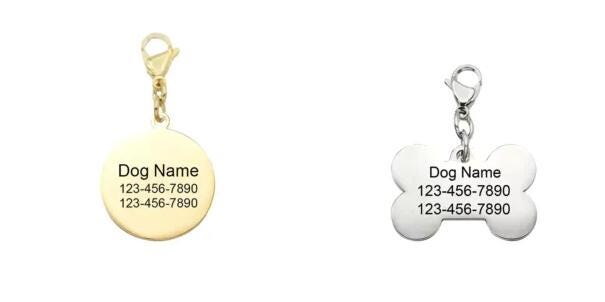
Shape and Size: Dog tags come in various shapes, including bone, circle, rectangle, and heart. Choose a shape that reflects your pet’s personality and a size that is appropriate for their breed and size.
Step 2: Customize Your Dog Tag
Once you’ve chosen the right tag, it’s time to customize it with your dog’s name. There are several ways to do this, depending on the type of tag you’ve chosen:
Engraving: Engraving is a popular method for customizing metal tags. You can have your dog’s name and other information, such as your phone number, engraved onto the tag. This creates a durable and long-lasting design that won’t fade over time.
Printing: Some tags allow for full-color printing, allowing you to create a vibrant and eye-catching design. You can choose from a wide range of designs, including paw prints, bones, hearts, and more.
Step 3: Design Name Tag
When designing your dog tag, consider your pet’s personality and style. You can choose a design that reflects their interests, such as sports or hobbies, or opt for a more classic design that suits any outfit. You can also add additional information to the tag, such as your address or an emergency contact number, to ensure your pet can be safely returned if they ever get lost.
Step 4: Maintain Your Dog Tag
Once you’ve customized your dog tag, it’s important to maintain it to ensure it remains legible and functional. Regularly check the tag for any signs of wear or damage, and replace it if necessary. You should also update the information on the tag if you move or change your contact details.
Step 5: Additional Tips for Customizing Your Dog ID Tags
Consider adding a microchip: In addition to a customized dog tag, consider having your pet microchipped. A microchip is a small device that is implanted under your pet’s skin and contains a unique identification number. This can be a helpful backup in case your pet’s tag is lost or damaged.
Use clear and concise information: When customizing your dog tag, ensure that the information is clear and easy to read. Use a font that is legible and avoid using abbreviations or unclear wording.
Match the tag to your pet’s collar: Choose a tag color and design that complements your pet’s collar. This will not only enhance your pet’s style but also make it easier to spot their tag if they ever get lost.
Step 6: Choosing the Right Font and Layout
When customizing your dog tag, it’s important to choose the right font and layout for your pet’s name. Consider using a font that is clear and easy to read, such as Arial or Times New Roman. Avoid using overly decorative fonts that may be difficult to decipher.
In terms of layout, consider the size of your tag and the amount of information you want to include. If your pet has a long name, you may need to use a smaller font size or abbreviate their name to fit it on the tag. It’s also a good idea to include your phone number or address on the tag to ensure your pet can be safely returned if they ever get lost.
Step 7: Adding Additional Information
In addition to your pet’s name, consider adding additional information to the tag to ensure their safety. This can include your phone number, address, and any relevant medical information, such as allergies or medical conditions. Including this information can help ensure that your pet receives the proper care if they ever get lost or injured.
Step 8: Finalizing Your Design
Once you’ve chosen the right tag, customized it with your pet’s name, and added any additional information, it’s time to finalize your design. Take a moment to review your tag and make sure that all information is correct and legible. If you’re happy with your design, you can proceed to purchase your tag and add it to your pet’s collar.
Step 9: Choosing a Trusted Manufacturer
When it comes to customizing a dog tag, choosing a trusted manufacturer is key. Look for a company with a reputation for quality and reliability, such as Hesank. Hesank is a professional metal craft products manufacturer specializing in the custom production of a wide variety of badges, medals, coins, keychains, bottle openers, bookmarks, plaques, trophies, and other types of metalwork. With Hesank, you can rest assured that your custom dog tag will be crafted with care and attention to detail.
Conclusion
Customizing a dog tag with your pet’s name is a simple and effective way to add a personal touch to their collar and ensure their safety. By following these steps, you can create a customized dog tag that reflects your pet’s unique personality and helps keep them safe and secure. Stay tuned for more tips and advice on creating the perfect tag for your furry friend!


