


Although bumpy artificial grass can diminish its usefulness and look, it is simple to restore a level, smooth surface using the correct methods. Inadequate installation, ground settling, or prolonged heavy use are common causes of unevenness. You must deal with the root cause of uneven artificial grass, such as dispersing infill or compacting the base. While small flaws can be smoothed out using basic equipment like a broom, roller, or rake, more serious problems might need lifting and relaying parts. Future bumps can be avoided with correct installation methods and routine care, keeping your artificial grass looking nice and easy to use.
Why does synthetic grass get wrinkly or bumpy?
When you imagined an artificial turf lawn in your backyard, you did not anticipate bumps, creases, wrinkles, or kinks. Why, therefore, can these flaws appear on surfaces that ought to be flawlessly smooth and maintain their pristine appearance for years on end? Some homeowners are unaware of how complicated installing artificial grass can be. Using specialized equipment, professionals typically spend an entire day preparing the ground and laying the turf. Cutting corners can lead to issues.
1. Installing turf on an uneven surface:
Lumps may form if artificial turf is laid on an uneven surface. Synthetic turf may adapt to the form of the ground beneath it to a certain degree. The grass that is planted on uneven land will not look as well.
Even the most inexperienced do-it-yourselfers can see this, although uneven spots are not always visible when the ground beneath the artificial turf has not been adequately prepared. Similar to carpet, artificial turf is very harsh and will reveal any flaws underneath. It may be difficult to establish an equal surface beneath the grass because of rocks, twigs, tree roots, and other obstacles. Hole filling and object removal are required.
Solution: Contact the experts if you have any questions regarding how to install fake grass. Professional installers are accustomed to collaborating with nature to overcome obstacles and provide the perfect conditions for the turf in their new home, and they install fake grass areas on a daily basis.
2. Installing turf without a base layer:
In order to lay fake grass on top of the flattened earth, a suitable foundation layer needs to be put in place and compacted. Ignoring this procedure could result in the development of lumps, kinks, and creases.
Solution: Once more, expert installation will guarantee the preparation of a superior base layer of finely powdered rock, decomposed granite, and gravel (also known as "shale"). This significantly lowers the likelihood of creases developing.
3. Installing turf without properly stretching and securing it:
To smooth out any creases or wrinkles, artificial turf needs to be gently stretched and securely fastened during installation. This is sometimes tried as a do-it-yourself project, but if done incorrectly, it may lead to defects as the turf area settles.
Solution: Before attempting to put the grass, allow it to sit in the sun for an hour or two. Before installing, the material over, give it a little stretch, and then give it a few minutes to settle. To secure it, simultaneously push out all the wrinkles and nail behind the grass piece. By doing this, wrinkles won't appear later.
4. Installing turf without properly placing the Infill:
After the turf has been stretched, secured, and the ground has been prepared, the proper kind and quantity of infill is applied to the artificial grass area in a professional installation. In addition to keeping the turf fibres erect and preventing wrinkling, the infill gives the installation weight. If infill is applied insufficiently and corners are cut. In the turf region, it may promote the formation of kinks and wrinkles.
Solution: Employ a premium silica-based filler, which is typically applied during colder weather when there is less chance of creases from the midday or early afternoon heat.
5. Expansion at elevated temperatures:
While high temperatures by themselves won't melt artificial grass, they can cause other problems with poorly built or subpar turf. Wrinkles may occasionally form as a result of the turf's backing material expanding due to extremely high temperatures, although they are usually transient and go away as the weather cools down.
Solution: Selecting quality artificial grass that is professionally installed can help avoid this issue. To lower the surface temperature, professional installers suggest turf that makes use of specialized cooling technologies. Before installation starts, the grass should be spread out and let warm in the sun for about an hour.
6. Recently installed grass that hasn't "settled":
Because the turf has been packed firmly after manufacturing, selling, and delivery, some fresh grass installations may seem to have bumps, kinks, or lines. When the turf is unpacked, it will take some time to return to its normal shape. Therefore, these kinds of flaws are typically transient issues that go away on the first day of installation as the new turf settles.
Solution: Unpack the material well in advance of installation to allow it to "breathe" and return to its ideal shape without wrinkling. Cross-brushing with a garden broom or stiff brush after installation will help the artificial grass blades stand up.
How to Fix Bumpy Artificial Grass:
1. Examine and Determine the Issue Areas:
Start by walking around your lawn and locating the most apparent lumps and bumps. To make it easier to find these spots when you start the restoration procedure, mark them with chalk.
2. Raise the Affected Areas:
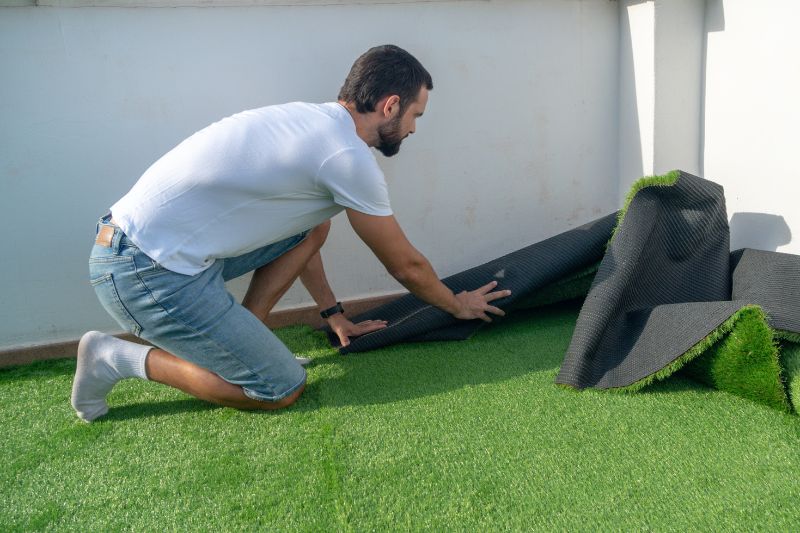
In the regions with lumps, carefully lift the artificial grass. To prevent harming the grass or the background, try to be as gentle as you can. Carefully remove any nails or adhesive that may have been used to secure the grass.
3. Make the Ground Level:
You'll probably discover that the ground beneath the grass is uneven once it has been lifted. Level the area with a flat piece of wood or a rake. Add or remove the base material (such as crushed stone or sand) until the ground is smooth, especially if there are larger bumps or depressions.
4. Reinstall the grass:
Once the ground has been levelled, carefully replace the grass, making sure it is wrinkle-free and stretched evenly. To smooth down the fibres and integrate them with the surroundings, you can use your hands or an old brush.
5. Secure it:
Use adhesive, nails, or whatever technique was initially employed to reattach the grass. To avoid shifting in the future, make sure it is securely fastened.
6. Fluff and Brush the Grass:
Finally, give your artificial grass a thorough cleaning; an artificial grass brush is the ideal tool for this. To raise the fibres and bring back the lush, organic appearance, brush the grass up against the grain.


