


Small rooms don’t have to feel cramped in photos. With a few technical choices and simple staging tricks, you can turn a closet-sized bedroom or a compact kitchen into an image that reads as bright, airy, and desirable. This guide walks through proven gear choices, composition techniques, lighting strategies, and post-processing moves that make tiny spaces feel generous — plus a real-world Houston example showing the payoff.
Why this matters (and why sellers care)
Buyers make snap judgments from listing photos. Listings with professional, well-composed images get much more attention online, which leads to more showings and better offers. That attention isn’t just aesthetic — it’s measurable: professional photos are linked to faster sales and higher buyer interest.
If you’re a realtor, landlord, or photographer in Houston, working with a local real estate photographer houston tx who understands how to maximize perceived space is a direct way to improve listing performance.
The one visual trick that ties everything together: trust the frame
The single biggest factor that helps a small room look bigger in a photo is how you frame and expose the scene. Framing should emphasize depth and flow, not cram every object into the shot. Exposure should show the room clearly while preserving window views where appropriate so the eye has somewhere to “escape.” Those two points — composition and exposure — are the backbone of every tip that follows.
Essential gear and why it helps
Wide-angle lenses (but not too wide)
For interior shots, a moderate wide-angle lens captures more of the room and suggests depth. For full-frame cameras, shoots in the 16–35mm range are common; for smaller sensors, the equivalent focal lengths are a bit shorter. Use the widest focal length with caution — too wide produces fisheye distortion and makes proportions feel unnatural.
Tripod and camera level
A tripod keeps images sharp at lower ISOs and enables precise framing. Always keep the camera level; tilted verticals (like skewed door frames) make a room feel unbalanced and smaller.
Remote or timer + bubble level
Use a remote shutter or camera timer to avoid shake, and a bubble-level (or in-camera grid) so vertical lines stay straight. Straight verticals read as stable and open; bowed walls read as cramped.
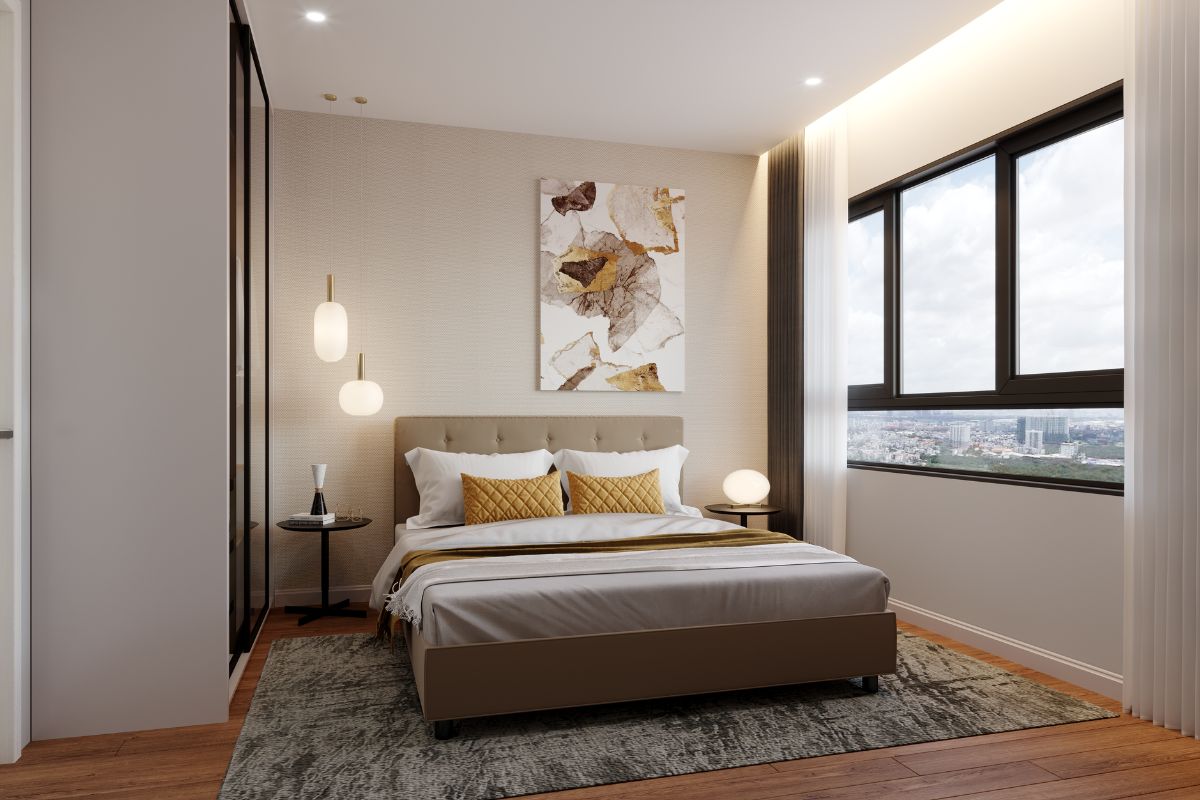
Camera height and perspective: chest height wins
Where you place the camera vertically matters more than people expect. Real estate pros generally recommend positioning the lens roughly between four and five feet above the floor (about chest height). That height shows the relationship between floor and ceiling without exaggerating either, and it keeps lines looking natural while preserving a sense of space.
Small rooms benefit from slightly lower or higher adjustments depending on the subject: lower for showing floor pattern and depth in long rooms, slightly higher for tight kitchens to avoid over-emphasizing counters. But 4–5 feet is a dependable starting point.
Composition rules that enlarge perceived space
- Shoot from the corner: corners show two walls at once and create a diagonal leading line that suggests depth.
- Leave breathing room: avoid cropping objects at the edges; negative space helps a room feel airy.
- Use leading lines: lines from countertops, rugs, or hallways guide the eye through the image and imply continuity beyond the frame.
- Show context: include a doorway or adjacent room in one shot to communicate flow and scale.
Lighting: the real secret weapon
Good lighting flattens shadows that make a room feel boxed in and draws attention to surfaces instead of edges.
- Use natural light when possible: open curtains and allow soft daylight in, but avoid direct sun that creates harsh contrast.
- Fill with flash or continuous lights: a soft, balanced fill light removes dark corners without flattening texture.
- Bracket and merge exposures (HDR): for rooms with bright windows, exposure bracketing and HDR merging preserve detail inside and outside the windows, preventing blown highlights that collapse space. HDR bracketing is standard in professional interior workflows.
Staging: less is always more in tight rooms
Declutter ruthlessly. In small spaces, every object competes for attention.
- Remove personal items and excess décor.
- Keep only a few well-chosen accessories (a plant, a folded throw, a simple bowl) to suggest function without crowding.
- Re-arrange furniture to show clear walkways and to expose the longest view lines.
- Consider virtual staging for empty or badly furnished rooms — it can illustrate potential without adding physical clutter.
Home staging doesn’t have to be expensive. Even small tweaks like swapping heavy curtains for light sheers, replacing a bulky rug with a neutral runner, or clearing off countertops can dramatically alter a photo’s perceived space.
Post-processing moves that expand space
- Straighten verticals and correct keystone distortion to keep lines true.
- Raise shadows selectively to reveal details in corners, which reduces the “boxed-in” look.
- Slightly increase mid-tone contrast and clarity to make surfaces pop without adding grit.
- Crop tightly only when it improves composition; otherwise, a little negative space helps.
- Replace dull skies or clean windows in a subtle way to give the eye an external “escape.”
Don’t overdo perspective correction — too much straightening can look artificial. The goal is believable space, not a cartoon.
Real-world example: a Houston listing that benefited from pro techniques
A Houston-based real estate photography studio that regularly shoots in compact urban homes shares a useful pattern: modest staging + chest-height tripod shots + careful HDR blending. One agent testimonial described converting a low-interest $90,000 listing into a competitively looked-at listing after professional photos were published; the agent attributed increased leads to the new imagery and presentation. That kind of local success shows how relatively small investments in photography and staging produce outsized returns in attention.
Combine that local know-how with the larger industry trend — professional images increase online engagement and speed listings to sale — and the math for hiring a trusted, local real estate photographer becomes compelling.
Quick checklist: Prepare a small room for shooting
1. Declutter surfaces and remove personal items.
2. Open curtains and turn on balanced indoor lights.
3. Position camera 4–5 feet high, level, and in the widest useful corner.
4. Use a 16–35mm (full-frame) equivalent for tighter rooms, careful to avoid fisheye distortion.
5. Take bracketed exposures (±1 to ±2 stops) for HDR blending when windows are visible.
6. Edit to preserve window detail, lift shadows, and correct verticals.
Frequently Asked Questions
Will a smartphone do the job for small-space photos?
Modern smartphones can produce great results with the right technique — wide-angle camera options, panorama stitching, and controlled lighting help — but a camera with manual control, a quality wide-angle lens, and HDR bracketing capability gives the most consistent, high-performance results.
How wide is “too wide” for interiors?
If your image shows obvious curvature (bowed walls, round windows), you’re too wide. Stick to moderate wides (roughly 16–24mm full-frame equivalent) for most interiors and avoid extreme ultra-wides unless you’re skilled at correcting distortion in post.
Should I stage every small room?
Yes — staging small rooms is high-leverage. Even simple staging (removing clutter, adding a small plant, and arranging cushions) costs little and improves perceived spaciousness significantly.
How much should I expect to pay for professional interior photos?
Prices vary by market and package. In many U.S. markets, basic interior sessions range from modest, affordable rates for standard photo packs to higher fees for packages that include aerials, 3D tours, or virtual staging.
Final thoughts: practice, measure, repeat
Making small spaces look bigger in photos is a mix of art and craft. Start by mastering camera height, composition, and lighting, then add consistent staging and careful post-processing. Track results: view counts, inquiries, and time on market change when imagery improves — and local examples in Houston confirm that a targeted investment in photography often pays back through faster sales and stronger interest.
If you work with a trusted, reliable, and well-experienced local real estate photographer houston tx like Pro Photo Listings, you’ll benefit from market-specific expertise and professional techniques that deliver images tailored to what Houston buyers respond to.


Whether you are going to sell your old house or give it for rent, you want your prospective buyers or tenants to see the best face of your house.
There are a few different things to consider for your house to bring the best rate to you.
Good maintenance is a must before you put that “To Let” or “For Sale” board.
And if you are putting your house on Ads on online platforms, put only the best and most beautiful images of it.
You can capture the photographs yourself and put those on the Ads, but professionally taken pictures will always attract more people.If it’s a real estate property, then you must hire a real estate photographer because a professional will add a lot of value to your property in so many ways.
If you are on the lookout for an experienced and friendly Raleigh real estate photographer that can take the best possible photographs of your property at the most reasonable rate, then go for Scala Photography.