


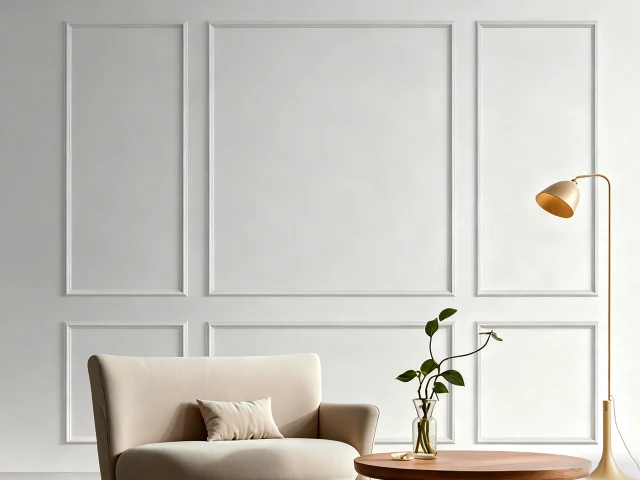
There is a reason why interior designers keep returning to the same trick over and over again. When a room feels flat, lifeless, or just a little bit boring, adding an accent wall with molding is the fastest way to inject personality without committing to a full renovation. But here is what they do not always tell you: you do not need a contractor to pull it off. An accent wall molding kit puts that same designer magic directly into your hands, with all the guesswork removed. These kits come packed with precisely cut strips, corner blocks, and adhesive specifically chosen to turn one wall in your living room, bedroom, or home office into the undeniable focal point of the space. What makes them perfect for modern homes is their versatility. Whether you love clean mid-century lines, dramatic contemporary grids, or soft traditional arches, there is a kit designed to match your taste. The best part? You can finish the entire project over a long weekend and immediately feel like you are living in a completely different house.
Why One Wall Is All You Need for a Dramatic Change
You might think that transforming an entire room requires covering every surface, but that is actually a mistake many first-timers make. An accent wall works precisely because it stands alone. When you apply molding to just one wall, your eye naturally travels there first, making the rest of the room feel like a supportive backdrop rather than a competing element. Think about the wall behind your sofa, the one your eyes land on when you walk through the front door, or the headboard wall in your bedroom. Those are prime candidates. By leaving the other three walls bare or simply painted, you create a sense of intentional design rather than overwhelming chaos. Accent wall molding kits are designed with this philosophy in mind. They typically include enough material to cover a single ten- or twelve-foot wall with a sophisticated pattern, whether that is a large central panel, a series of vertical rectangles, or a chic checkerboard arrangement.
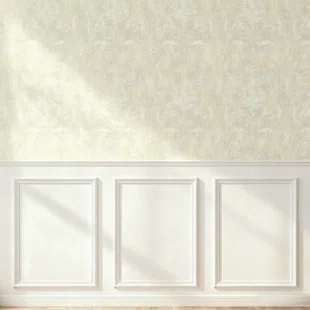
Choosing the Right Pattern for Your Room’s Personality
Not all molding patterns tell the same story, and picking the wrong one can make a beautiful room feel awkward. For modern farmhouse or transitional spaces, shaker-style grids with clean, unfussy lines work beautifully. These patterns use flat, wide strips arranged in rectangles that echo windowpane designs. If your home leans more toward traditional elegance, look for kits with raised profile molding and decorative corner blocks that add a subtle flourish at every intersection. Contemporary and minimalist homes benefit from bold, oversized geometric patterns—think one enormous rectangle that nearly spans the entire wall, or a series of tall, narrow vertical panels that draw the eye upward and make ceilings feel higher. I have also seen stunning results using asymmetrical patterns on accent walls, where the molding creates an organic, abstract shape rather than rigid boxes. The key is honesty: choose a pattern that genuinely fits how you already live and decorate, not one that feels like a costume.
Materials That Balance Beauty and Practicality
Let us talk about what these kits are actually made of, because that matters more than you might expect. High-quality accent wall molding kits typically use either medium-density fiberboard, polyurethane, or high-density foam. MDF is heavy and feels substantial under your fingers, which some people prefer because it mimics real wood. It takes paint beautifully and resists dents, but it is also vulnerable to moisture, so keep it out of bathrooms and damp basements. Polyurethane is the all-around champion for most living spaces. It is lightweight, moisture-resistant, and flexible enough to handle slightly curved walls without cracking. The surface is smooth and ready for paint right out of the box. Foam-based kits are the lightest option and often come with peel and stick backing, making them ideal for renters or anyone who wants minimal commitment. Each material has its place, so consider your room’s humidity levels, how long you plan to stay in your home, and how much weight you are comfortable handling during installation.
Installation Steps That Respect Your Time and Skill Level
I am going to walk you through what an actual installation day looks like so you can decide if this project fits your life. Start by clearing the wall completely and giving it a good cleaning. Then lay out all your molding pieces on the floor according to the kit’s diagram. This dry-fit step is crucial because it lets you spot any issues before adhesive touches your wall. Once you are confident in the layout, apply construction adhesive to the back of each strip in a wavy line, press it firmly against the wall following your pencil guide marks, and hold it for about sixty seconds. For extra security, some people add a few pin nails, though many kits are designed to rely solely on adhesive. The corner blocks go on last, covering the joints between horizontal and vertical pieces. After everything is up, let the adhesive cure overnight, then fill any tiny gaps with paintable caulk. The next morning, you can prime and paint. From start to finish, you are looking at about four hours of active work spread across two days.
Painting Your Accent Wall for Maximum Drama
The color you choose for your molded accent wall can either elevate the design or completely undermine it. Here is a rule that has never failed me: paint the molding the same color as the wall for a subtle, textured look that feels integrated and architectural. This approach works beautifully in bedrooms and home offices where you want sophistication without shouting. For real drama, paint the wall a deep, moody color like charcoal, navy, or forest green, and paint the molding a shade or two lighter or darker. That contrast makes every shadow and highlight pop. A third option that feels unexpectedly fresh is painting the wall a neutral tone and the molding a bold accent color—imagine warm white walls with matte black molding forming sharp geometric panels. Whichever route you choose, use a small foam roller for the molding itself and a brush for the corners. Two thin coats always look better than one thick coat, and always, always use primer first if your molding arrived raw and unpainted.
How to Blend Your Accent Wall With Existing Decor
An accent wall should feel like a natural extension of your room, not a weird appendage that showed up uninvited. The easiest way to achieve harmony is to pull one color from your existing decor and use it on the wall. Look at your sofa, your area rug, your throw pillows, or your largest piece of artwork. If your room features warm earth tones, a terracotta or warm taupe accent wall with white molding will feel cohesive. If your space is cool and calm with blues and grays, lean into a deep slate or dusty blue. Beyond color, consider how the molding pattern relates to your furniture. Tall vertical panels echo the lines of floor-to-ceiling curtains or a tall headboard. Wide horizontal grids complement low, sprawling sectional sofas. And do not forget about lighting. A picture light mounted above the accent wall or a pair of sconces placed within the panels will cast beautiful shadows across the molding, making the texture come alive every evening. For more visit here https://gessolane.com/


If you love online shopping, you can try finding your perfect accent furniture online.
Here are some tips to add a modern touch to your Living room & make it a worthy place to enjoy a great time@ https://creativefurniturestore.wordpress.com/2019/08/21/add-style-to-your-living-room-with-modern-accent-furniture/

7oak developers develop a drawing where you can live your colors of Life.
Since 2005 we are providing the best commercial and living spaces.
Lifestyle at 7oak is fusion of peace of nature and comfort of modern living.
The confidence of our continuous customers encourages us to grow rapidly as real estate developers in Dholera.
Serving since 2005, we are situated in Dholera and Ahmedabad.For More Details,Visit:-https://www.7oakdevelopers.com