


- To launch the Run dialog box by pressing Win + R keys together on your keyboard.
- After that, enter ‘gpedit.msc.’ select the OK tab to launch ‘Local Group Policy Editor.’
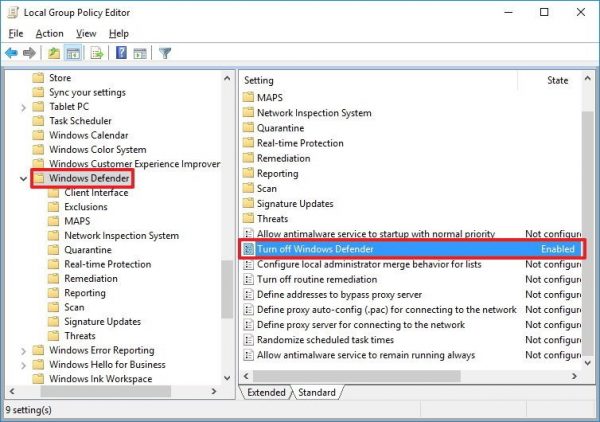
- You should search the pursuing path: Computer Configuration> Administrative Templates> Windows Components> Windows Defender Antivirus.
- Go to ‘Turn off Windows Defender Antivirus and twice click on it on the right-hand side panel.
- Choose the option Enabled, and then click on the Apply button then pick the OK tab.
- Search: Computer Configuration> Administrative Templates> Windows Components> Windows Defender Antivirus> Real-time Protection.
- Reach the policy ‘Turn on behavior monitoring.’
- Choose the option Disabled and select the Apply tab.
- Click on the OK tab.
- Navigate to policy ‘Monitor file and program activity on your computer.’
- Choose Disabled and choose the Apply option then pick the OK tab.
- Select the policy ‘Turn on process scanning whenever real-time protection is enabled’ and twice click on it.
- Reach the Disabled tab and choose the Apply option then select the OK tab.
- Navigate to ‘Turn on behavior monitoring and twice click on it.
- Later, choose the Disabled tab and select the Apply option then pick the OK tab.
- Now, reboot the system.
- Press Win + R keys together on your keyboard to launch the Run dialog box.
- Then enter ‘regedit’ then select the OK to launch the Registry.
- You should search the pursuing: HKEY_LOCAL_MACHINE\SOFTWARE\policies\Microsoft\Windows Defender.
- Navigate to Windows Defender folder, and right-click on it then choose the New and select the ‘DWORD (32-bit) Value.
- Input the key name ‘DisableAntiSpyware.’ Then press the Enter key.
- Go to the key that was freshly created and twice click on it and adjust its value to 1 from 0.
- Click on the OK tab.
- Navigate to the folder of ‘Windows Defender’, then select the ‘New’ button and press the key.
- Input the key name ‘Real-Time Protection’ and hit the Enter button.
- After that, go to the folder of ‘Real-Time Protection’ and choose the ‘New’ then click on the value of DWORD (32-bit).
- Rename the key named ‘DisableBehaviorMonitoring.’ Then hit the Enter button.
- Twice click on the freshly made key and adjust the value from 0 to 1.
- Press the OK button.
- Reach folder of ‘Real-Time Protection’ and right-click on it.
- Choose the New option and press the ‘DWORD (32-bit) Value’.
- Give a new name to the key named ‘DisableScanOnRealtimeEnable.’ Then hit the Enter button.
- Twice click on the freshly make key and adjust value to 1 from 0.
- Finally, hit on the OK key.
- Launch ‘Windows Defender Security Center’ on the Windows 10.
- After that, click on the option ‘Virus and threat protection.’
- You should select ‘Virus and threat protection settings.’
- Now, disable ‘Real-time protection’ switch toggle.


The error message called Reference by Pointer Error is one of the blue screen errors on the Windows 10 operating system.
It has the error code number of 0x00000018, and it appears on the screen, which makes it hard for you to access your equipment.
Although the error message may appear so hard o fix, it is not that hard to manage.
Source:-How to fix Reference by Pointer Error BSOD in Windows 10 Simple Solutions to fix the Reference by Pointer Error BSOD on Windows 10 Here is how to Fix Reference by Pointer Error BSOD Windows 10 –Method 1: Updating the Old or Corrupted Graphics DriversIf you are getting the Reference by Pointer Error, then it could be a reason for your computer’s outdated, missing or even corrupted drivers.
You will be needed to fix them in order to fix the Pointer error:Hit Start + I keys on your keyboard, and this will trigger the Run program.
Now enter the ‘devmgmt.msc.’ command and then hit enter on your keyboard.The Device Manager utility would appear, find the Display adapters.Make a right-click on the display driver you want to remove or update.Select the Update option.Head to the Search automatically for drivers option.Now you can hold tight until the installation or the update process wraps up.

There are several new Pokémon included by Game Freaks in their recently released game, Sword and Shield.
Read the blog carefully and implement the obtained information into your game.
How to Locate Applin?Players can find Applin in Route 5 location near the grasslands, and there is one more location of Applin, which is in the Dusty Bowl in Sunny weather conditions.
Several players also spawn Applin during Stormy weather conditions in Stony Wilderness location.How to Evolve Applin into Appletun or Flapple?There is a specific criterion for the evolution of Applin in Sword and Shield, which is to get only one evolution of Applin in one game, which is either in Sword or Shield.
Below, we have explained how it works:Players can evolve Applin into Flapple by Tart Apple in Pokémon Sword.Players can evolve Applin into Appletun by Sweet Apple in Pokémon Shield.After players have successfully attained Applin, they should move to Hammerlocke where they need to keep on walking on the left side of the road.
After passing the shops and a Pokémon Centre, they need to stop and try to locate a man wearing a Red jacket and brown hairs near the drawbridge.

One of the most popular online tax education software program that is gaining huge interest in the technological era is TurboTax.
It helps you to get maintain of your tax, and they will prepare your tax return accurately.
However, this tax making ready software program also has some glitches that make it not possible for the users to entire their tax filing process.
If you ever come across any such issue, then you can TurboTax aid number, which stays energetic at all 24 hours a day round the clock irrespective of time and region constraints.
Updating the TurboTax is an remarkable way to experience the cutting-edge function of this tax preparing software.
When you update the software, then only you get to understand what all new adjustments have been carried out in the software.