With the increase in the demand for wireless router, there are many routers available in the market providing various features and services. Out of that ASUS routers are one of these providing the best qualities of service, easy to configure and faster efficiency rate. As we know ASUS provides a wide range of router its AC5300 router is one of the best routers when it comes to wireless routers. Here we are going to explain steps for ASUS-AC5300 login.
- Firstly, open the internet explorer and search for ASUS RT-AC5300 Wireless AC5300 Default IP addresshttp://router.asus.com into the address bar.
- After then ASUS RT-AC5300 Wireless AC5300 Login page will appear and you will ask to fill the correct login credentials for that.
- After successfully entering the ASUS RT-AC5300 Asus login username password, you can make the changes in the setting in the router according to the requirement.
- Last points that need to be kept in mind if you are doing first-time you will be automatically directed to the Quick Internet Setup (QIS) page.
If you want to know about Steps for Quick Internet Setup (QIS) page, you can place a call to our router login team for further steps guidance. Call on toll-free number (1-800-531-1267) whenever you want.


Webroot antivirus software is one of the best security product which gives cloud cyber security to its user and this product can install via www.webroot.com/safe the downloading with free key 2021.How you can Purchase Webroot?Open your web browser such as Internet Explorer, Google Chrome, Firefox, Safari, etc in your computer.Then, visit to the official website of Webroot via webroot.com/safe.Now, it will open the homepage of Webroot.At this point, you will view two options “Products For Home” and “Products For Enterprise”.Just go through both of the lists and select the product according to your need.Here, you should tap on the red “Get Now” button which is situated just below your product name.Then, a new window will display on your screen in which you have to select your payment process like debit card, credit card, PayPal, etc.Next, “Enter your payment details” like your first name, last name, card number, expiry date, CVV and fill all the necessary details.Just enter the ZIP Code in the specific field.After this, read the “Privacy Notice”, “License Agreement” and also the “Auto-Renewal Policy”.You have to agree to all the Terms and Conditions of Webroot, and then click on the blue “Place my order” button which is at the bottom right side of the page.Now, you will receive an email on your registered Email ID to confirm your purchase.
How You can Download And Install Webroot On Windows?Just start the Webroot Download process by launching the Web Browser on your computer system.Then, visit to the official website of Webroot via www webroot com safe.After this, tap on the “Account” option which is there at the top of your computer screen.Now, click on the “My Account” option from the list of option.After this, enter the e-mail address and password and then click on the sign in button.In case, you don’t have created your Webroot account, then first create an account.
Then, hit on the “register now” button and just follow the instructions in order to finish the process.After the successful login to your account, select your Windows operating system and Webroot product which you have purchased.Here, just tap on the “Download” button.Read the Webroot license agreement carefully and then tap on the “Agree and Download” button.Now, note down the serial number of your Webroot product.Wait for the download process to complete.After this, double-click on the setup file to finish the installation process.Here, a box will appear on your screen, just tap on the “Install” button.Now, the installation procedure will begin and just wait till it completes.When the installation is done, then tap on “Restart” button.click here this link: What is the Method to Disable Webroot Web Advisor?
Activation Process:First, enter “webroot.com/safe” in the address bar and tap on enter key.
It will redirect you to the Webroot Activation window.After this, select the name of your country from the drop-down list.Here, just you need to “Enter your 25-digit activation code”.Now, login to your account just by entering your credentials.
And your subscription is activated.For more details about Webroot product, just tap on the webroot.com/safe find and the downloading with free key.read also..................................www.office.com/setupwww.avg.com/retail


In this post, we are going to let you know about the QuickBooks Payroll Error Code 15270 and its solution.
QuickBooks is the most trustworthy accounting software in the sphere of financial management applications.
If you are looking for instant support for the QuickBooks error code 15270 by professionals – you can get in touch with the QuickBooks payroll support team immediately.When trying to download a payroll update, you may receive the following message:QuickBooks Error Code: 15270QB Error Description:Error 15270: The (payroll) update did not complete successfully.
The update is missing a file.Why QuickBooks Error 15270 Occurs?Here are some of the causes of QB Error 15270:-If the QuickBooks download or update is partial or incomplete.In case, the ‘User Account Settings’ is turned on.If the ‘Internet Explorer’ isn’t setup as a default browser.If the QB file(s) are improper or corrupt.What are the Ways to Fix QuickBooks Error 15270?Follow the steps to resolve QuickBooks Error Code 15270:-Method 1: Download the QuickBooks UpdatesFreshly start the QuickBooks again, if you see the update instruction..!
Hit onto the “Later”Hit onto the “Help” icon & then, choose the QuickBooks.Choose the “Update Not” & “Continue” option when it appears on the display.Hit onto the “Reset Updates”Activate the “Get Updates”In the ‘QuickBooks Update Service’ tab, click on the “Install Now” Finally, restart the QuickBooks application.Method 2: Manually RepairFirst of all reboot your QuickBooksNow click Install Later option, if the QuickBooks Update Service window appearsNow select Help option and then click on Update QuickBooksHit a click to the Update Now tab, in the Update QuickBooks window section.Now hit a single click on select the Reset Updates checkbox before you clicking the Get UpdatesHit on OK button to confirm the reset.Once the update is finished, the Get Updates button will be active and you will appear the “Update Complete" message below.Just reboot your QuickBooks software now.Hit a click on the Install Now button, in case the QuickBooks update service message appears, it means the update is installed successfully.Now go to the Employees sectionClick on Get Payroll Updates box.
This command will try to install the Payroll updates Note: Make sure your entire QuickBooks payroll update download is selected and finally click Update button.

If you would like to cast your laptop to the TV through the network connection, it is a very simple task on Windows 10.
But not everyone achieves favorable results.
So, if you are facing some issues, then here are the instructions to help you with the same.Sources :- Fix Internet Explorer Has Stopped Working , Bloggers-newsUpgrade Network DriversThe first step to fix the cast to device not working issue is by updating all your network drivers.
Here’s how you can do it:Firstly, you have to invoke the Device Manager on your device.After that, go to the Start Menu and right-click on it.Choose the Device Manager on the menu.Then right-click on the Network adapters that the network is linked to.You should select the Update Driver option.Go to the dialogue section that launches asking whether you would like to browse automatically or check locally for the newest drivers, pick the ‘Search Automatically’ option.Once the pop-up appears, enter the needed details.After you complete the installation, restart the system and check whether you are capable of repairing the issue of ‘Cast to Device not working.’Enable Network DiscoveryIf you wish to try the enable network discovery, here are the steps for it:Hold the Windows and I buttons together on your keyboard to invoke the Windows Settings.After that, select the ‘Network and Internet’ option present beneath the Settings.You should choose the ‘Network and Sharing Centre’ option.Then select the option of ‘Change advanced sharing settings’ on the left side panel.Don’t forget to select the ‘Turn on network discovery’ option and close any open screens that have these settings.Now, try ‘Cast to Device’ then check whether you are capable of repairing ‘Cast to Device not working in Windows 10’ error.Check for Windows UpdateUsers can try updating their Windows to resolve this issue.
Here are the steps to do that:Hold the Windows and I buttons together on the keyboard to invoke the Windows Settings.Thereafter, select the Update and Security option.You should click on the Windows Update option on the left side.Select the button of ‘Check for updates’ to look for any available and latest updates.In case any upgrades are pending, then you can select the ‘Download & Install updates’ option.Now, after downloading the updates, install them.Check Streaming ChoicesIf there is an issue with your streaming channel, you can fix it in the following ways:Hold the Windows and S keys both together on your keyboard to invoke the Search section.After that, select the option of Windows Media Player through the search results.You should select the ‘Stream menu’ button at the upper left side of the screen.Select ‘more streaming options.’Don’t forget to choose the right network.Remember to grant permissions to access each library for streaming.Now, store the settings and check whether you are capable of repairing the error.ConclusionThis article will help you find the cast’s issue to the device not working on Windows 10.
We hope that the above tips can help you overcome the issue!Abigail Smith is an inventive person who has been doing intensive research in particular topics and writing blogs and articles on Bloggers-news and many other related topics.

QuickBooks is one of the best accounting application, whether you are operating a sole proprietorship or a large company.
Errors are unpredictable in QuickBooks; they can occur due to multiple reasons and affect the productivity of the organizations.
QuickBooks Error 101 is one of those errors; it is also known as QuickBooks Online Banking Error.
Users may encounter this error when they try to import bank transactions into QuickBooks.
The primary reason which triggers this error is improper settings of Internet Explorer.
To resolve QuickBooks Error 101, you must Reset Internet Connection Settings and for advanced technical help contact us at our toll-free number (844)-932-1139.
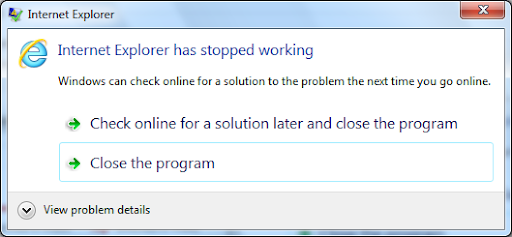
Isn’t it irritating when you are using your web browser and it suddenly stops working?
Internet Explorer users often encounter this problem.
However, the issue can be easily resolved without installing a new browser.
Follow the solutions mentioned below.Reset the Internet Explorer through Control PanelGo to the Control Panel and reset your browser.
Here are the steps that you need to follow:Firstly, invoke the Control Panel by selecting the Start key.Type ‘control’ into it and select the OK button.You should choose the ‘Network and Internet’ through the screen of the control panel.Beneath the ‘Network and Internet’ option and select the Internet Options.Reach the screen of Internet Properties; move to the Advanced section.You should select the button of the Reset shown at the lower side.Now, mark the ‘Delete personal settings’ box then choose the Reset button.Turn off Hardware AccelerationFollow the guidelines mentioned below and disable hardware acceleration.Thereafter, input ‘inetcpl.cpl’ into it and select the OK button to invoke the Internet Properties.Move to the Advanced section and mark the “Use software rendering instead of GPU rendering” box.You should select the Apply then OK button, and it would turn off the hardware acceleration.Now, once again, reopen the Internet Explorer and check whether you have fixed the ‘Internet Explorer has stopped working error.’Uninstall the Internet Explorer ToolbarsTry uninstalling the IE toolbar.
Follow the below given steps.Hold the Windows and R buttons altogether over the keyboard to invoke the Run section.Then input ‘appwiz.cpl’ into it and select the OK button.You will see the Programs and Features screen.Then remove all the toolbars in the program and features list.Now, select the toolbar and right-click on it you would like to remove then choose the Uninstall button.Finally, reboot the system and attempt to launch the Internet Explorer.Run Internet Explorer TroubleshooterHere is how you can troubleshoot the Internet Explorer.Go to the Windows Search section.Then input ‘troubleshooting’ into it and select the OK button.After that, choose the Troubleshooting option.Reach the left side panel and choose the ‘View all’ option.Click on the ‘Internet Explorer Performance.’Now, pursue the steps and allow the ‘Internet Explorer Performance Troubleshooter run.’Finally, reboot the system and once again attempt to perform the IE and check whether you are capable of solving this error.Run System RestoreFollow the steps mentioned here and learn how to conduct a system restore.Hold the Windows and R buttons altogether over the keyboard to invoke the Run section.Then, click on the System Protection section and select the System Restore.You should choose the Next button and click on the preferred ‘System Restore point.’Later, pursue the steps to finish the system restore.Finally, restart the system and check the issue.John Smith is a creative person who has been writing blogs and articles about cybersecurity.