If your Facebook account was disabled volitionally by you, you can reactivate it by logging in. If your account was disabled by Facebook, and to know how can I recover my disabled Facebook Id or Account. However, you'll need to submit an appeal to get your account back; depending on the circumstances of the disabling, they may or may not grant your request. And to reach a customer service agent of Facebook customers need to dial 18885890539 toll-free number USA.


Are you the user who has found that your Facebook account has been locked?
And you do not know the reason behind the same.
Then you shall not be confused.
This happens when the Facebook servers get to sense some unusual and illegal login attempts.
And there can be many other reasons behind Facebook getting locked.
Now, if you want to know how can I unlock my Facebook account without ID proof then you must first know the reasons behind the cause.

Facebook users have lost their account password and then looking to know about the Facebook Account Recovery process then in case Facebook provides one simple thing or way to recover a Facebook ID or Account.
Customers have to remember the friend's name into the Facebook friends list & easily know about the process of "how to recover my Facebook account using friends" and recover Facebook Account.


Windows 10 is the most convenient operating system as it is configurable as per its users’ needs.
It offers you with a lot of amazing built-in features to use.
It comes with a group editor policy feature that enables the users to make the organization wise changes by going through the settings.
However, this great feature is mainly usable by the IT admin to change the advanced settings, but other individuals can use it too.
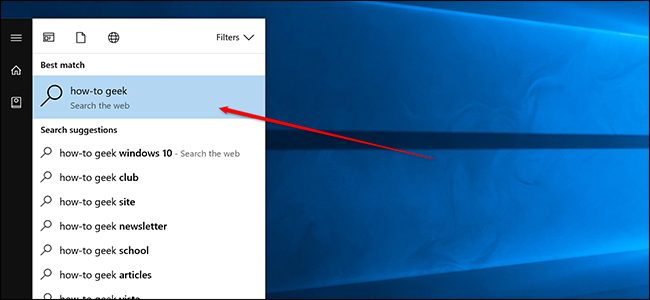
If that is the case, then now, there is no need to go anywhere.Here, in the following article, you will get to know the way to disable the security settings from File Explorer on your Windows 10 computer.
We have mentioned the step-by-step process going through which you can use the Group Policy Editor feature to disable the security settings.

Notifications have become an important part of our lives.
It reminds you of upcoming emails, messages, events, meetings schedule, birthdays,etc.
It helps us to optimize our daily routine and makes many tasks very simple.
Here is how you may stop all your Mac notifications.
To do this, follow these simple steps:Disabling notifications through Notification centerIn case you wish to quickly deactivate your notifications until midnight, follow these simple steps:Go to the menu bar and then hit the “Notification Center” icon.Then search for the “Do Not Disturb” option by swiping down your page.Now turn the “Do Not Disturb” toggle button to “On” mode in order to enable do not disturb function.You may also hold down your options tab while tapping the notification center menu.Once you have enabled do not disturb feature, you will find that the notification icon will fade down.
Now Mac will receive all the notifications under silent mode until midnight or the time you have fixed.Activating Do Not Disturb feature for a fixed timeTo turn off your notifications according to the time of your preference, you may follow these steps:Go to the Apple menu located at the upper-left edge and launch the “System Preferences” option.Hit the “Notifications” option.Now disable your system notifications according to your preferred time slot.Deactivating Safari Notifications on MacFirst of all, launch Safari and then hit the “Preferences” option located at the upper portion of your menu icon.Next, launch the Website now.Then choose the “Notifications” tab located at the left-hand side menu.Now select the website notification that you wish to deactivate.Switching off the Updates Notifications Generally, the App Store application located inside the macOS provides update notifications for various installed applications on your system.If you desire to switch off all update notifications, follow these steps:First of all, go to the “Apple” icon located at the uppermost pane/bar.Then you have to open the “System Preferences” option.Now search for the App Store and hit it to launch.Then you have to switch “Automatically check for updates” to off mode.If you wish to turn it “on” in the future, tap the toggle button to “On” to get updates of every task, emails, app updates, and so on.Be sure to switch your notification tab to on mode to receive important updates related to your tasks.

This happens the very next moment the prior episode of the show ends.
However, there might come a time when you might feel the need to disable this feature.Sources :- Enable/Disable Autoplay on Netflix, 2020-antivirusFor turning off the auto-playing shows and episodes on Netflix, follow these steps.
Remember that this differs from the trailers and the previews of shows and movies that play while you scroll through Netflix.A web browser is required if you intend to disable the auto-playing feature on Netflix:· Search https://netflix.com from a web browser and the device of your choice.· Complete the Login process.· In the Netflix account’s menu option, find and select the Manage profiles option.· To disable the auto-playing feature of Netflix of all the devices in which Netflix has been logged in from that account, uncheck the Auto play option.
· Then click on Save to complete the process.Once you have successfully disabled this autoplay feature of Netflix, it will automatically be updated on all the devices on which the Netflix account would be logged in by this account.
This is a great way to induce a change in the account as you don’t have to go from one device to the other device, making the same changes over and over again.If we go by the Netflix’s suggestions, switching to some other profile and then again switching back to yours can actually speed this process up.
Rebooting or merely switching the device Off and On also sometimes has a similar effect.Once you have disabled the autoplay feature on your Netflix account and for some reason, you miss the automatic playing of the next the episode, enabling it back, is quite easy too.