


To create an Arduino core board with atmega328p-pu as the main control, prepare the tools as follows.
Hardware.
A piece of atmega328p-pu
16M passive crystal (must be 16M)
USBASP downloader (for burning arduino bootloader)
USB to serial port tool (such as PL2303 or CH340)
Software.
Arduino 1.8.2 software
progisp172 software (for burning arduino's bootloader)
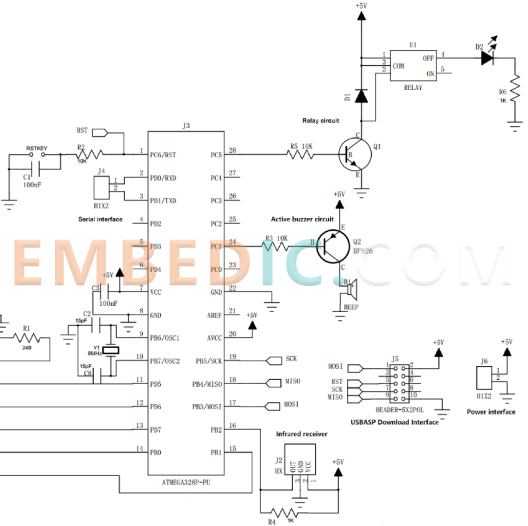
Step 1.
Soldering Arduino core board, see the following schematic.
Step 2.
Burn the bootloader of Arduino.
USBASP connect usbasp download interface, open the progisp172 software, the following operations.
1, Select Chip selected for Atmega 328P, point RD to confirm whether consistent
2, the fuse bit settings: low byte 0xFF high byte 0xDE extended itself 0xFF, write and then read out to see if the fuse bit has been written correctly
3, transfer to flash: in the arduino installation directory of ...\hardware\arduino\avr\bootloaders\optiboot\optiboot_atmega328.hex , note that the crystal must be 16M, if you use 8M crystal then to use ...\hardware\arduino\avr\bootloaders\atmega\ATmegaBOOT_168_atmega328_pro_8MHz.hex.
4、Configure the fuse bit, transfer to flash and then tap auto.
Step 3.
1、Select Chip for Atmega 328P, point RD to confirm whether the same
2, the fuse bit setting: low byte 0xFF high byte 0xDE extended itself 0xFF, write and then read out to see if the fuse bit has been written correctly
3, transfer to flash: in the arduino installation directory of ...\hardware\arduino\avr\bootloaders\optiboot\optiboot_atmega328.hex , note that the crystal must be 16M, if you use 8M crystal then to use ...\hardware\arduino\avr\bootloaders\atmega\ATmegaBOOT_168_atmega328_pro_8MHz.hex.
Here I am using 16M crystal and have burned optiboot_atmega328.hex.
4, configure the fuse bit, transfer to the flash after the point can be automatic.
Step 4.
Use Arduino1.8.2 software and serial tool PL2303 to upload the program.
If the burned bootloader is optiboot_atmega328.hex, the development board option should be "Arduino/Genuino Uno" to be able to. If the burned bootloader is ATmegaBOOT_168_atmega328_pro_8MHz.hex the development board should be selected as Arduino pro or pro mini, and the processor should be selected as 328P. Because the serial port is used to upload the file, it needs to be reset manually, and the white key on the board is the reset key.
Special attention, after the point upload compile progress full quickly press the reset button, wait for about 10 seconds, the display upload success can be. If after half a minute the upload is still in progress or an error is reported, it means the reset timing is not right or the bootloader and development board options do not match.


The World Polyurethane (PU) Wheels Market Research Report 2022 (covering USA, Europe, China, Japan, India, South East Asia and etc), is an informative market report offered by DecisionDatabases.com.Polyurethane (PU) Wheels market research report provides the newest industry data and industry future trends, allowing you to identify the products and end users driving Revenue growth and profitability.
The industry report lists the leading competitors and provides the insights strategic industry Analysis of the key factors influencing the market.The report includes the forecasts, Analysis and discussion of important industry trends, market size, market share estimates and profiles of the leading industry Players.Final Report will cover the impact of COVID-19 on this industry.Access Full Report with Table of Contents @ https://www.decisiondatabases.com/ip/22480-polyurethane-pu-wheels-market-analysis-reportThe Players mentioned in our reportAlbion CastersRWM CastersBlickleUremetElesaR Industrial WheelsHamiltonStellanaSunrayWickeRevvoKastalonGallagher CorpColson CasterTrew WheelsDurablePrecision Chains Ltd.Daxing JiaolunCaster ConceptsGlobal Polyurethane (PU) Wheels Market: Product Segment AnalysisPolyurethane-on-Cast-Iron WheelsPolyurethane-on-Aluminum WheelsSolid Polyurethane WheelsOthersGlobal Polyurethane (PU) Wheels Market: Application Segment AnalysisMedical EquipmentEscalators/ElevatorsSupermarket and Baggage SystemsFurniture Transportation EquipmentIndustrialAmusement Ride/ CarnivalGlobal Polyurethane (PU) Wheels Market: Regional Segment AnalysisUSAEuropeJapanChinaIndiaSouth East AsiaDownload Free Sample Report of World Polyurethane (PU) Wheels Market @ https://www.decisiondatabases.com/contact/download-sample-22480There are 10 Chapters to deeply display the World Polyurethane (PU) Wheels market.Chapter 1 About the Polyurethane (PU) Wheels IndustryChapter 2 World Market Competition LandscapeChapter 3 World Polyurethane (PU) Wheels Market shareChapter 4 Supply Chain AnalysisChapter 5 Company ProfilesChapter 6 Globalisation & TradeChapter 7 Distributors and CustomersChapter 8 Import, Export, Consumption and Consumption Value by Major CountriesChapter 9 World Polyurethane (PU) Wheels Market Forecast through 2022Chapter 10 Key success factors and Market OverviewPurchase full World Polyurethane (PU) Wheels Market Research Report @ https://www.decisiondatabases.com/contact/buy-now-22480Other Reports by DecisionDatabases.com:World Aircraft Wheels Market Research Report 2022 (covering USA, Europe, China, Japan, India, South East Asia and etc)World Aluminum Alloy Wheels Market Research Report 2025 (covering USA, Europe, China, Japan, India, South East Asia and etc)World Ferris Wheel Market Research Report 2024 (Covering USA, Europe, China, Japan, India and etc)About Us:DecisionDatabases.com is a global business research report provider, enriching decision makers and strategists with qualitative statistics.
DecisionDatabases.com is proficient in providing syndicated research Reports, customized research reports, company profiles and industry databases across multiple domains.Our expert research analysts have been trained to map client’s research requirements to the correct research resource leading to a distinctive edge over its competitors.
We provide intellectual, precise and meaningful data at a lightning speed.For More Details:DecisionDatabases.comE-Mail: [email protected]: +91 9028057900Web: https://www.decisiondatabases.com


The latest trending report Global PU (Polyurethane) Timing Belt Market 2020 by Manufacturers Regions Type and Application Forecast to 2025 offered by DecisionDatabases.com is an informative study covering the market with detailed analysis.
The report will assist reader with better understanding and decision making.The PU (Polyurethane) Timing Belt market report provides a detailed analysis of global market size, regional and country-level market size, segmentation market growth, market share, competitive Landscape, sales analysis, impact of domestic and global market players, value chain optimization, trade regulations, recent developments, opportunities analysis, strategic market growth analysis, product launches, area marketplace expanding, and technological innovations.This report also researches and evaluates the impact of Covid-19 outbreak on the PU (Polyurethane) Timing Belt industry, involving potential opportunity and challenges, drivers and risks.
We present the impact assessment of Covid-19 effects on PU (Polyurethane) Timing Belt and market growth forecast based on different scenario (optimistic, pessimistic, very optimistic, most likely etc.
).Final Report will cover the impact of COVID-19 on this industry.Browse the complete report and table of contents @ https://www.decisiondatabases.com/ip/41593-pu-polyurethane-timing-belt-industry-analysis-reportThe major players covered in PU (Polyurethane) Timing Belt are:GatesMegadyneNOKContinentalMitsuboshiHabasitOPTIBELTBANDOForboBRECOKaiouSlongwangFuju BeltFengmaoWutongJiebaoFulongBeltBy Type, PU (Polyurethane) Timing Belt market has been segmented intoBelt Width (Below 25mm)Belt Width (Above 25mm)By Application, PU (Polyurethane) Timing Belt has been segmented into:AutomotiveIndustrial MachineryOtherThe report offers in-depth assessment of the growth and other aspects of the PU (Polyurethane) Timing Belt market in important countries (regions), including:North America (United States, Canada and Mexico)Europe (Germany, France, UK, Russia and Italy)Asia-Pacific (China, Japan, Korea, India and Southeast Asia)South America (Brazil, Argentina, etc.
)Middle East & Africa (Saudi Arabia, Egypt, Nigeria and South Africa)Download Free Sample Report of Global PU (Polyurethane) Timing Belt Market @ https://www.decisiondatabases.com/contact/download-sample-41593The content of the study subjects, includes a total of 15 chapters:Chapter 1, to describe PU (Polyurethane) Timing Belt product scope, market overview, market opportunities, market driving force and market risks.Chapter 2, to profile the top manufacturers of PU (Polyurethane) Timing Belt, with price, sales, revenue and global market share of PU (Polyurethane) Timing Belt in 2018 and 2019.Chapter 3, the PU (Polyurethane) Timing Belt competitive situation, sales, revenue and global market share of top manufacturers are analyzed emphatically by landscape contrast.Chapter 4, the PU (Polyurethane) Timing Belt breakdown data are shown at the regional level, to show the sales, revenue and growth by regions, from 2015 to 2020.Chapter 5, 6, 7, 8 and 9, to break the sales data at the country level, with sales, revenue and market share for key countries in the world, from 2015 to 2020.Chapter 10 and 11, to segment the sales by type and application, with sales market share and growth rate by type, application, from 2015 to 2020.Chapter 12, PU (Polyurethane) Timing Belt market forecast, by regions, type and application, with sales and revenue, from 2020 to 2025.Chapter 13, 14 and 15, to describe PU (Polyurethane) Timing Belt sales channel, distributors, customers, research findings and conclusion, appendix and data source.Purchase the complete Global PU (Polyurethane) Timing Belt Market Research Report @ https://www.decisiondatabases.com/contact/buy-now-41593Other Reports by DecisionDatabases.com:Global Polyurethane Sealant Market 2020 by Manufacturers, Regions, Type and Application, Forecast to 2025Global Polyurethane Elastomers Market 2020 by Manufacturers, Regions, Type and Application, Forecast to 2025Global Polyurethane Film Market 2020 by Manufacturers, Regions, Type and Application, Forecast to 2025About-Us:DecisionDatabases.com is a global business research reports provider, enriching decision makers and strategists with qualitative statistics.
DecisionDatabases.com is proficient in providing syndicated research report, customized research reports, company profiles and industry databases across multiple domains.Our expert research analysts have been trained to map client’s research requirements to the correct research resource leading to a distinctive edge over its competitors.


