If you are trying to search the HP Printer Assistant For Mac, then you are definitely looking in the wrong direction. The HP printer assistant tool is not compatible or available with the macOS device. This software comes along with the printer drivers package on Windows devices only. For macOS devices, you have HP Utility software. This software also assists HP printers with all the major tasks but is just compatible with macOS devices. When you download the full feature program on a macOS computing device then you will get the HP utility tool along with it. But, in case you are unable to find it there, follow this guide to know how to find it or how to download it on your mac device.


Get the Best fully customized IPTV Smarters App with new advanced features for your IPTV Business.
We are offering the Custom version of our IPTV Smarters Pro App with your own logo, and brand name that allows your IPTV customers or end-users to stream content like Live TV, VOD, Series, and TV Catchup supplied by you on their Android devices, iOS devices, Smart TV, and on macOS/Windows PC/Laptop.For more information, please visit here:https://www.iptvsmarters.com/

The corresponding list of free YouTube video downloading software' can be used on macOS, Windows, Linux, Android and iPhone devices.
Download videos from YouTube and many more sites for free.
Convert them into the desired format without any hiccups.

DesignEvo is an absolutely free logo creator software developed by PearlMountain Ltd.
It is compatible with Windows 10, 8, 7, and macOS.
Let’s know something more about DesignEvo logo design app.Read full story here
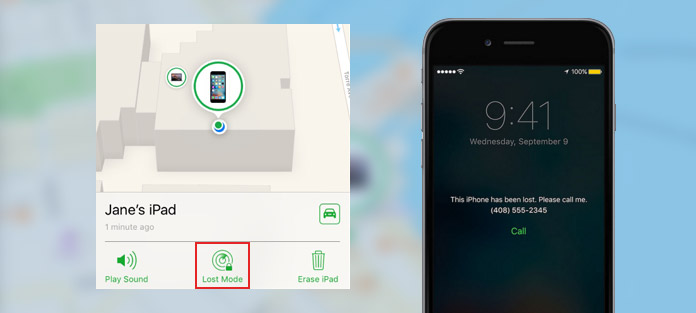
While you may feel that the Police can essentially find your telephone once your report is taken, that is not the situation, they depend on you to give them the specialized data just as the instruments to find your taken gadget.
By these easy steps, you can have mobile security from theft So as to enable the Police to help here are some significant hints to follow so as to recoup your telephone.
This is a 16 digit number that is explicit to your handset which the Police can use to follow your telephone, regardless of whether the criminals have changed the SIM card IMEI number tracking.
You can discover your telephone's IMEI number imprinted on the case wherein it came or, in the event that you don't have the container you can get to it by dialing *#06# – this will show your telephone's IMEI on the screen.
It's likewise a smart thought to make a record of some other numbers on the telephone's internal parts and on the container (this is additionally solid counsel for any electronic gadget, for example, DSLRs and MP3 players all of which will have one of a kind ID numbers stepped on them).
Find a lost or taken phone gadget Utilize the Find My application to find your missing gadget, regardless of whether it's gone disconnected how to locate lost iPhone.The Find My application joins Find My iPhone and Find My Friends into a solitary application on iOS 13 or later, iPad, and macOS Catalina.

McAfee protects all types of devices either it is on phone, tablets or computer with iOS, Android, Windows, or macOS.Visit: mcafee.com/activate

Visual Studio Code is a popular code editor which is lightweight and cross platform application.
It is available for macOS, windows and Linux.
In this article, We will see about how to install visual studio code on ubuntu 20.04.