Introduction
In today's digital age, data loss can be a catastrophic event, whether it results from hardware failure, cyber attacks, or simple human error. For users of Synology Network Attached Storage (NAS) systems, cloud storage presents a reliable, scalable, and convenient option for backing up critical data. This guide walks you through the process of securing your valuable data by backing up your Synology NAS to cloud storage, ensuring peace of mind and data integrity.
Understanding Synology NAS and Cloud Storage
Synology NAS systems are renowned for their reliability, offering users a centralized platform to store, share, and protect data. With built-in support for various backup and synchronization applications, Synology NAS provides a versatile foundation for data management.
Cloud storage, on the other hand, offers accessible and secure off-site data storage. By leveraging cloud services, users can protect their data from local hardware failures and access it from anywhere in the world, enhancing data resilience and availability.
Preparing Your Synology NAS for Cloud Backup
Before embarking on the backup process, ensure your Synology NAS meets the system requirements for cloud backup and is running the latest version of DSM (DiskStation Manager). Organize your files and folders, deciding which data is crucial and needs backing up, to streamline the backup process.
Step-by-Step Guide to Backing Up Your Synology NAS to Cloud Storage
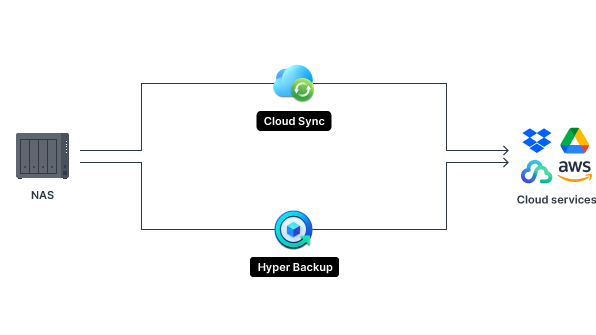
Step 1: Choosing a Cloud Storage Provider. Select a provider that meets your storage needs, security requirements, and budget. Popular options include Google Drive, Dropbox, and Amazon S3.
Step 2: Installing and Configuring Cloud Sync/Cloud Backup Application. Access the DSM Package Center, install the Cloud Sync or Hyper Backup application, and open it to configure your cloud storage account details.
Step 3: Setting up the Backup Task. Create a new backup task, select the local folders to back up, and choose your cloud destination. Configure settings such as backup schedule, file versioning, and encryption.
Step 4: Monitoring the Backup Process. Once the backup starts, monitor its progress through the application dashboard. You can see the status of your files and any errors that might occur.
Step 5: Verifying and Testing Your Backup. After the initial backup completes, verify the data integrity by accessing some files from the cloud storage. Periodically test your backup to ensure data recoverability.
Best Practices for Cloud Backup with Synology NAS
To maximize the effectiveness of your cloud backups, adhere to these best practices: regularly update your backup tasks to include new data, encrypt sensitive information to enhance security, and perform routine tests of your backup files to ensure they can be restored successfully.
Conclusion
Backing up your Synology NAS to cloud storage is a straightforward process that significantly enhances data security. By following this step-by-step guide, you can protect your valuable data against loss, ensuring its availability whenever and wherever you need it. Regular backups, combined with best practices for data security, will keep your information safe and accessible, providing peace of mind in the digital realm.


